Crafts for Teens
How to Make Crafts for Teens Including: Button Bracelet, Back-to-School Journal for Success,"In My Pocket" Altered Book Page, Decorative Paper Mache Letters
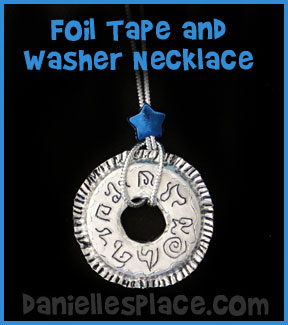
Foil Tape and Washer Necklace
What you will need:
Large Washer
Silver Ribbon
Bead with Large Hole
Scissors
Black Pen
How to Make the Washer Necklace:
1. Cut two piece of foil tape a little bigger than the washer.
2. Stick the first piece of tape over the washer and press it flat. Cut the excess tape away from the washer leaving a slight edge. Punch a hole through the tape in the center of the washer and press the tape down flat through the hole and through to the other side.
3. Place another piece of tape on the other side and do the same thing.
4. Use a pen to draw designs onto the tape
5. Cut a long piece of ribbon and fold it in half. Stick the folded half of the washer through the hole and bring the other side through the loop. Pull the string through the hole until the ribbon is tight.
6. To finish string a bead through the ribbon and tie a knot at the end.
©2013, Digital by Design - See Copyright Information
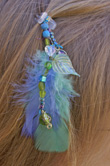
Feather Hair Decorations and Extensions
What you will need:
Assortment of Feathers
Button, Beads, and Other Decorative Items
Hair Combs and/or Clips
Ribbon
Thin Wire
Hot Melt Glue Gun
String
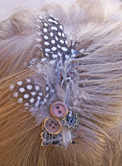
How to Make a Feather Hair Comb:
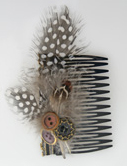
1. Decide what feathers and other items you would like to include on the comb. Place them on the comb to get an idea of how they will look. Use different sizes of feathers. Groups of three look nice.
2. Glue a piece of ribbon around the side of the comb to cover the back and front. Make sure it matches your feathers.
3. Glue the feathers to the ribbon using a hot melt glue gun, then glue on small decorative items such as buttons, beads, and small stones to finish. The picture on the right shows what the back of the hair comb looks like.
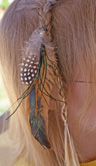
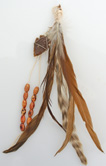
How to Make a Feather Hair Clip:
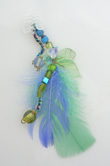
1. Pick two or three feathers that look good together. They should be slightly different sizes. Also pick beads and other decorative items that match.
2. Wire the feathers together by wrapping very thin wire around the shafts of the feathers. Leave about four inches of wire on both ends of the piece of wire. Bring one end of the wire through a bead. The bead should have a big enough hole so that it fits through the wire and over the ends of the shafts of the feathers. Add a few more beads to the end of the wire. Then wind the end of the wire to a small plastic hair clip or other type of hair clip.
3. To finish add more beads and decorative items to the other end of the wire and let it hand down over the feathers.
©2010, Digital by Design, Inc. -*See Copyright Information
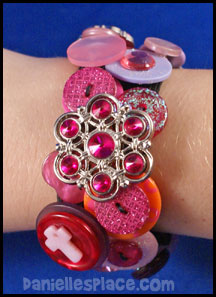
Button Bracelet
What you will need:
3/4" to 1-inch Wide Elastic
Buttons
Glue
Heavy Thread and Needle
Scissors
How to Make Button Bracelets:
1. Organize your buttons and decide which ones look good together.
2. Cut a piece of elastic that will fit around your wrist, without pulling it tight, with a 1/2" overlap. Sew the elastic together to form a band. Place it on your wrist to make sure it fits loosely.
3. Begin sewing buttons on the band starting by sewing your most important or prettiest button on the middle top of the band. Use a needle and thread to attach the button and tie a double knot to secure it to the elastic band.
4. Work out and around from the main button on both sides until you have covered the entire band. You can also glue buttons on top of the buttons you sewed on the band to give it more interest and dimension.
©2010, Digital by Design, Inc. -*See Copyright Information
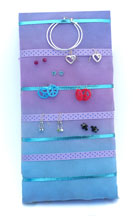
Earring Holder
What you will need:
Lid from a Shoe Box or a Strong Sheet of Cardboard
Pretty Material that is at Least One Inch Bigger on all Sides than the Cardboard Lid or Cardboard Piece
Thin Batting (You can find this at a fabric store.)
Various Ribbon that Matches the Material
Low Temperature Glue Gun
What to do:
1. Cut a piece of batting one inch wider on each side than the cardboard piece you are using.
2. Glue the batting to the cardboard lid bringing the batting around the sides and gluing it to the back of the lid or cardboard piece.
3. Cut a piece of material about one inch wider on each side than the cardboard piece and bring it around to the back of the cardboard piece gluing it to the back of the piece.
4. Cut pieces of ribbon to fit around the width of the cardboard and glue it to the back of the piece on each side.
5. Hang your earrings on the piece of ribbon.
6. You can also glue a piece of ribbon on the top of the piece to hang it.
Created by Corin Burner
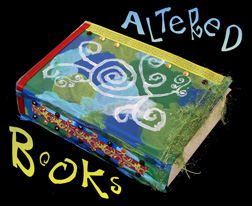
Back-to-School Journal for Success Craft for Teens
Recycle old books to make your own work of art. Express yourself, inspire, and grow using journaling and different artistic mediums.
What you will need:
1. Old Book - You might be able to find an old book around the house that is no longer useful, but if you can't you can find them in used stores, garage sales, or library sales. The best books are hardback books.
2. Pictures that Inspire You - You can find pictures in magazines, print them from the Internet. Use photos of friends and family. Buy scrapbook paper from craft stores, or draw them yourself.
3. Other Essentials: scissors, exacto knife, glue, markers.
4. Extras: Things to embellish and accent your art: tissue paper, colored pencils, paint, sequins, buttons, rubber stamps, stickers, ribbon, and other decorative items.
How to Make an Altered Book:
It is very easy to make an altered book. Decorate the cover of an old book using paint, decoupage, and/or any other techniques. Try different art mediums and combine them in any way you would like. The whole idea is to make something unique that depicts your own style. Don't be afraid to experiment.
There are many techniques you can use to create your pages. Here are some ideas:
1. Poems or Songs - Use your favorite songs or poems and decorate a page to represent the song or poem, or write your own poems.
2. Illustrate Your Interests - Find pictures or draw pictures of things that interest you. Glue them to the pages and add other objects to enhance the page.
3. Use Words from the Page - Use words from the page to make a poem. Highlight the words you are using by painting over the words you don't want to use. You can make sentences, use fragments of sentences or just one word. Decorate the page to go along with the words you have picked.
4. Make Pockets - Pockets can be made by folding the pages in many different ways. You can use the pockets to hold pictures and other items relating to your theme.
5. Make Windows - Make windows by cutting slits in the pages and folding back the paper. Glue picture on the other side of the page so they show through the windows. Fold back, curl up, or crinkle up the paper to make frames around the window.
6. Make Holes and Indentations - Glue lots of pages together so you can make holes an indentation in your pages. Use an an Exacto knife to cut the pages. You can then place of glue small objects inside the indentations.
7. Special Effects - Tear pages to make your picture look old and worn for special effects. Burn the sides (carefully) with a match or lighter. Experiment with origami techniques, and other book making techniques.
©2006, Digital by Design - See Copyright Information
The 7 Habits of Highly Effective Teens

The 7 Habits of Highly Effective Teens: The Ultimate Teenage Success Guide
Filled with great advice, poems, quotes and cartoons about how to succeed and make the most out of life, teens will find this book very inspiring.
A great way to help reinforce the concepts in this book is to make personalized journal pages in altered books.
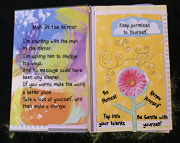
This altered book shows two journal pages. The first page uses a poem from the book about change beginning with you. The second page lists the seven habits.
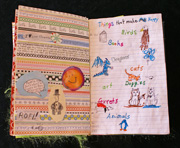
This altered book was also created using ideas from "The 7 Habits of Highly Effective Teens". On the left side a quote from Abraham Lincoln was used, "People are just about as happy as they make up their minds to be." And on the facing page is a list of and pictures of "Things that Make me Happy".
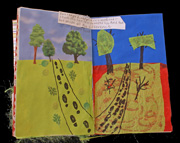
This altered book was created using ideas from "The 7 Habits of Highly Effective Teens" using a poem from Robert Frost, "Two roads diverged in the wood, and I-- I took the one least traveled by, And that has made all the difference."
©2006, Digital by Design - See Copyright Information
"In My Pocket" Altered Book Page
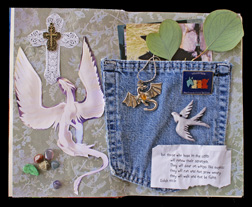
If the only way you could communicate was by showing the objects in your pocket, what things would you include to tell someone about yourself?
Glue a piece of scrapbook paper on a blank page of your altered book. Cut a pocket from an old pair of jeans.
You can find these at second hand stores. Think about what interests you, or what you would like other people to know about you. Find pictures and other objects that you can glue to your page. You can also place items in the pocket. Include your favorite poems, verses, or quotes.
©2006, Digital by Design - See Copyright Information
Altered Book Pages on Other Web Sites
Very good directions on how to make altered books - Earmark-decorative-painting-studio.com
Examples of Altered Pages - The Art of Happiness
How to make an altered book with pictures - on eHow
Great example of Altered Book Pages - https://www.mephistophelia.com/artwork2.htm and Dogberry Hill Studio
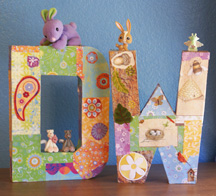
Decorative Paper Mache (Papier-mâché) Letters
Create works of arts using large 3D letters. Hang them on your bedroom walls or set them on your dresser.
What you will need:
12" Paper Mache 3D Letters from JoAnn Fabrics
Glue
Scissors
Scrapbook Paper
pictures from magazines, embellishments such a buttons, ribbon, bows, charms, or anything else you can use to decorate the letters such as paint, markers, found objects in nature, etc. You can make your own paper mache letters if you can't find them in the store. Go to Art Projects for Kids Web Site for directions on how to make the letters.
How to Make 3D Letters:
1. First decide what letters you would like to use, and what you would like to convey through your art. You can use your initials and decorate the letters to depict your personality: what you like, who you are, your interests, etc., or you can spell out words that describe how you feel, who you are, or wish to be, or you can pick words that describe one of your interests such as "Sports" and decorate the letters with pictures relating to that subject. If you picked sports, you would decorate the letters with sports related pictures and words.
2. Collect pictures and other decorative items you might want to use on your letters.
3. Glue the pictures to the letters. Cut the pictures out and decide where you would like to glue them. If you are using pictures from magazines, use Elmer's Rubber Cement so that the pictures won't wrinkle when you glue them on. If you are using heavy paper such as scrapbook paper, you can use regular glue such as Aleene's Tacky Glue.
4. To finish paint on a clear coat of Mod Podge to protect the paper.
©2010, Digital by Design, Inc. -*See Copyright Information
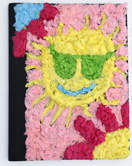
Crepe Paper Journal - Altered Book Craft
What you will need: Composition Book (the kind that is bound on the side), Different Colors of Crepe Paper (You can use sheets of crepe paper or crepe paper streamers), Tacky Glue, and a Marker
How to make a crepe paper covered altered book craft:
1. Decide on a design for the cover. Try not to make it too complicated with a lot of small lines. The design should cover the entire surface of the book.
2. Draw the design on the cover of your composition book with a marker. Don't worry about making mistakes because the drawing will be completely covered with crepe paper when you are finished.
3. Cover the design with crinkled up crepe paper. Start with the shapes with the smallest lines such as the sun's rays and mouth in the picture above. Tear off pieces of crepe paper in the desired color and crinkled it up. Fill in the area on your book with glue and then place the crinkled up paper on the glue.
4. Fill in the larger areas and background area last. Add extra crepe to areas to make a 3D effect such as the flower petals or the middle of the flowers.
5. Glue down any crepe paper that is sticking up when you have completed your design.
Designed by Corrin Burner
Copyright 2011, Digital by Design, Inc. - See Copyright Information
Wrapping Paper Beads
Don't throw old Birthday wrapping paper away! You can make beautiful beads with it.
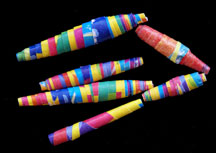
What you will need: Wrapping Paper, Scissors, Ruler, Elmer's Glue, Round Toothpicks, and Clear Paint or Nail Polish
How to make:
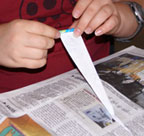
1. Flatten out the wrapping paper and cut it about 8" long x 8" wide. Cut long wedges 1 - 1.5" inches wide at the bottom to a point at the top and 8" long.
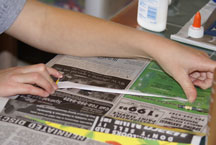
2. Pour some glue into a cup and add some water to make it thin.
3. Carefully roll the wide end of the paper around a toothpick as shown in the picture.
4. Paint glue on the rest of the paper and roll it up around the toothpick.
5. Gently twist the toothpick the opposite way you rolled the bead and pull it out.
6. Let the beads dry completely and paint them with clear paint or clear fingernail polish.
©2010, Digital by Design, Inc. -*See Copyright Information
Rubber Band Jewelry

Rubber band jewelry is so fun to make! With just a little practice you can make a wide variety of bracelets and rings, and maybe even come up with your own designs. There are lots of free tutorials on Youtube and other web sites to get you started.
Make some for your friends and family for Christmas gifts, sell them to make a little money, or trade them with your friends.
You can add pony beads, charms, and buttons to make them even more unique!
Even though there are lots of instruction online, you may want to invest in a book about rubber band jewelry to give you inspiration.


