Fall Crafts and Activities for Kids
How to Make Fall Crafts and Learning Activities for Home Schools, Preschools and Libraries
Newspaper Rake to Play Fall Games
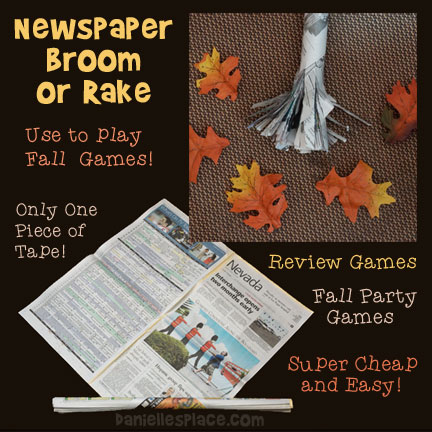
What you will need: Newspaper, Tape and Leaves
How to Make the Newspaper Rake:
1. Layout about six pieces of newspaper, one on top of the other, and roll them up starting on a long side.
2. Place another full sheet of newspaper on the floor and set the newspaper roll at one corner so that the corner of the newspaper is at the center of the roll as shown in the picture. Roll the newspaper around the newspaper roll and tape it closed in the center (on the opposite corner). Stuff the extra newspaper into one end of the roll. Cut the extra newspaper off the other end of the roll.
3. Cut six inch slits about 3/4" apart around the cut end of the roll to make the rake.
How to Use the Newspaper Rake:
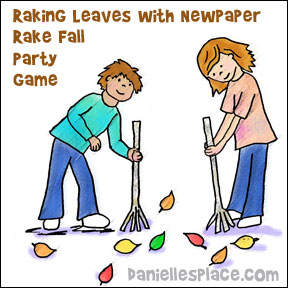
1. Math Review Games - Write math facts on leaves (Write the same math fact on both sides of the leaf) and have your children race to separate the math facts into groups using their rakes. For example, you may tell the children to find all the math facts that have an even answer. They would then use their rakes to move the leaves with even number answers to a designated area. The child that finds and piles up the most leaves matching your description wins.
2. Word Review Games - Write words that your children are studying on leaves and place them on the floor. You can use them to review many things such as nouns, verbs, adjectives, sight words. Have your children separate the words into piles according to what you say. For example, you can tell them to find all the leaves with words that are verbs. The child that piles up the most verbs using only his leaf rake wins.
3. Fall Festival Games - Break children up into teams. Give each team a designated area in which they can rake their leaves. (You can use masking tape to tape off areas.) Have all the children stand in a circle, and then place all the leaves in a pile in the middle of the circle. On the word "go" children should try to rake as many leaves as they can to their designated areas. The team that gets the most leaves wins. You can place stickers or write words on some leaves. Tell your children that if they find one of these leaves and rake it into their piles they will win a special prize.
We would love to hear how you used the newspaper rakes and leaves in your classroom. Email us and we will place your ideas here.
©2014, Digital by Design, Inc. - See Copyright Information
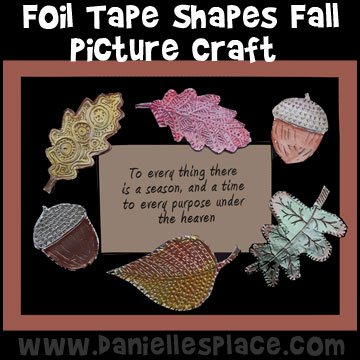
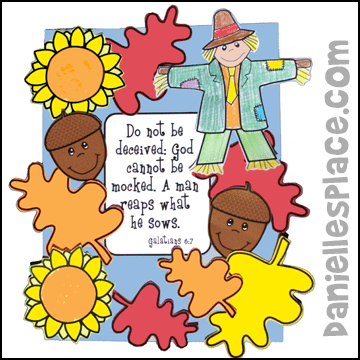
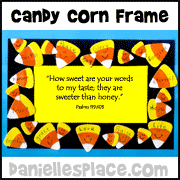
Foil Tape Fall Shapes Fall Picture Craft
What you will need:
Utensils to Engrave the Tape Such as a Ballpoint Pen, Straws, the End of a Paintbrush, and the Tines of a Fork
Card Stock Paper (Heavy paper)
Sharpie Fine-Tip Permanent Markers
Printer Paper
How to Make Foil Tape Fall Shapes and Picture:
1. Print out the leaves and acorn patterns and the saying pattern onto colorful paper. Cut out the leave patterns and use them as templates.
Member's ![]()
Free Digital Download ![]()
2. Cut craft foam pieces big enough to fit the leaf patterns. Cover the craft foam with foil tape.
3. Place the leaf or acorn templates on top of the foil tape and craft foam and trace around the edge.
4. Cut out the shapes and then engrave the tape with objects such a straw, tip of a paint brush, ball point pen, etc. by pressing the objects into the tape or drawing designs on the tape surface.
5. Use permanent markers such as Sharpies to color in the patterns. Do not press down on the tape when coloring. Quickly wipe off the excess ink with a paper towel to make the ink translucent.
6. Cut out a saying pattern and glue it to the center of a piece of construction paper or card stock. Glue the leaf and acorn shapes around the edge of the saying.
Copyright 2013, Digital by Design, Inc. - See Copyright Information
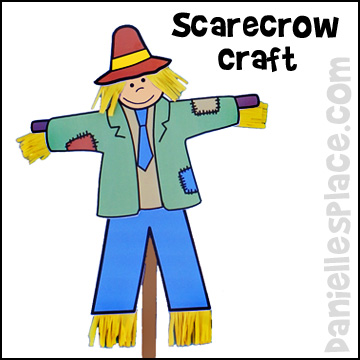
Fall Scarecrow Craft
What you will need:
Paint Stick or other Stick
Card Stock (Heavy Paper)
Crayons or Colored Pencils
Glue
Yellow Paper
Scissors
How to Make a Fall Scarecrow:
1. Draw a picture of a scarecrow without a hat and straw on a piece of card stock.
Member's ![]()
2. Cut the scarecrow out and glue it to a paint stick.
3. Cut small pieces of yellow paper about the length of the bottom of its pants and arm sleeves and then cut slits in the paper to make it look like straw. Glue the pieces to the arms and legs as shown in the picture.
4. Cut two more pieces of yellow construction paper to make the hair and cut slits to make it look like straw. Glue the pieces to the head and then glue the hat on top.
Copyright 2011, Digital by Design, Inc. - See Copyright Information
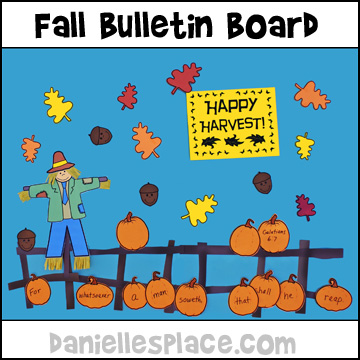
Happy Harvest Fall Bulletin Board Display
What you will need:
Bulletin Board Paper
Fall Colors Colored Paper - Brown, Orange, Yellow, and Red
Fall Leaves
Glue
Stapler
Scissors
How to Make a Fall Bulletin Board Display:
Member's ![]()
1. Cut brown construction paper into one-inch thick strips and staple them to your bulletin board to make a rustic looking fence. I cut the paper so that they were uneven to make the fence look old. You could also use white paper and make a picket fence.
2. Make a "Happy Harvest" sign and print it out onto yellow paper and staple it to the top of the board.
3. Cut pumpkin shapes from orange and brown paper and staple them to the board.
4. You can also cut leaf and acorn shapes from different colors of paper or use silk fall leaves. (Pattern available to members only.)
5. To make the scarecrow use the pattern above.
Copyright 2011, Digital by Design, Inc. - See Copyright Information
Happy Harvest Picture
What you will need:
Printer Paper
Crayon, Markers or Colored Pencils
What to do:
1. Print out the pattern and have your children color it.
Member's ![]()
Copyright 2011, Digital by Design, Inc. - See Copyright Information
Fall Poem Activity and Craft
What you will need:
Fall Colors construction Paper
Scissors
White paper
Crayons or Colored Pencils
Glue
What to do:
1. Print out the patterns sheets and cut out the shapes.
Member's ![]()
2. In class have your children write a fall poem on the frame and glue onto the middle of a sheet of construction paper, and then glue the fall pictures around the sides of the paper.
Copyright 2011, Digital by Design, Inc. - See Copyright Information
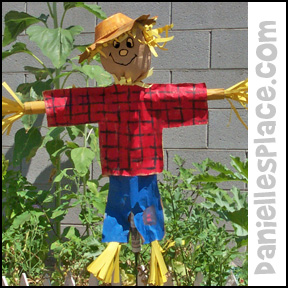
Paper Bag Garden Scarecrow
What you will need:
Newspapers
Brown Grocery Bags
Brown Lunch Bag
Paper Bowl
Construction Paper
Tape
Glue
Stapler
Paint and Markers
How to Make the Paper Bag Garden Scarecrow:
1. To make the main stake, roll up 6 sheets of newspaper to make a tight roll. Roll another sheet of newspaper around the roll and tape it closed. For the arms, roll up 5 sheets of newspaper to make a tight roll. Roll another sheet of paper around the roll and tape it closed. Glue or tape the arms across the main stake to make a cross shape.
2. To make the head stuff a brown lunch bag with crinkled up newspapers. Place the top of the bag on the top of the main stake and gather it around the stake. Tape it to the stake. Draw a face on the bag.
3. To make the clothes. Open up some brown grocery bags and flatten them. Place the scarecrow frame on the grocery bags. Draw around the frame to make an outline of a shirt and pants. Draw the outline at least 3" from the edge of the frame. Cut out the shirt and pants shapes and use them to trace another pattern for the back of the shirt and pants. Paint a design on the shirt and pants and then glue or staple the front and back shapes to each other onto the frame. Leave the arm holes and leg holes open.
4. To make the straw for the hands, feet, and hair. Fold a piece of yellow construction paper in half lengthwise. Cut slits down the short length of the folded paper, but do not go all way through stop about 2" before you get to the fold. Roll the paper up and crinkle up the cut paper slightly. Place some glue on the folded end and shove them into the arms. Glue or staple some straw in the arm and leg holes, and around the neck, and on the head.
5. To make the hat, lay another grocery bag out flat on a table. Place a paper bowl in the center of the bag. Trace around the edge of the bowl and then draw a large circle around the bowl. Cut out the circle and the inter circle. Glue the circle onto the hat. Paint the hat and glue it to the head.
6. To display your scarecrow, pound a stake into the ground and slide the scarecrow on the stake.
Copyright 2003, Digital by Design, Inc. - See Copyright Information
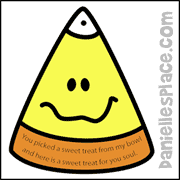
Halloween Alternative Crafts

Candy Corn Crafts

Fall Crafts from other Pages