Christmas Crafts for Kids
Crafts for Christmas, Reindeer Crafts, Christmas Ornament Crafts and Christmas Crafts for Preschool and Homeschool
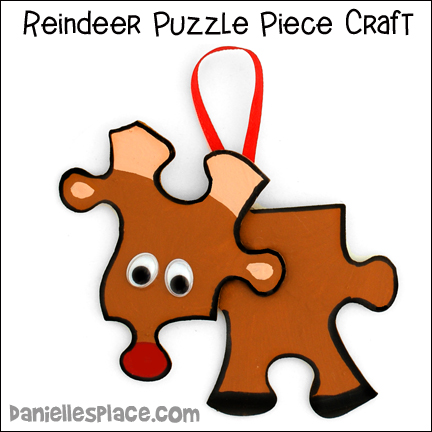
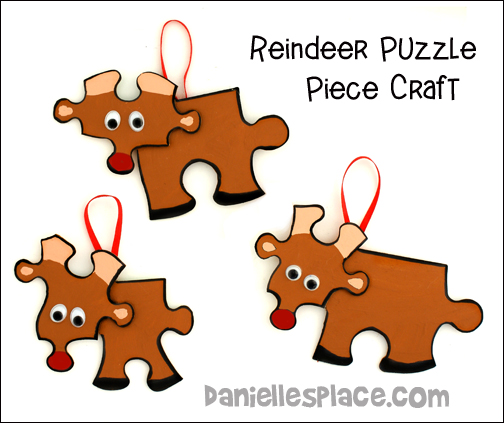
Reindeer Puzzle Piece Christmas Ornament
What you will need:
Puzzle pieces from an old child's puzzle. You can find them at second-hand stores or garage sales.
Brown, Tan, and Red Acrylic Paint
Black Permanent Marker
Glue Gun
Googly Eyes
Red Ribbon
How to make the Reindeer Puzzle Christmas Ornament:
1. Find one puzzle piece for the body that has a flat side and two bumps on the sides as shown in the picture. Find a head piece that has three bumps, one for the nose, and two on the sides for the ears.
2. Paint the puzzle pieces with acrylic paint.
3. When the paint dries use a permanent marker to outline the puzzle pieces and draw in the hooves.
4. Glue the head to the body. You may have to cut off one of the bumps on the head side of the body if the head doesn't cover it up.
5. To finish glue on googly eyes. Cut a length of ribbon, fold it in half, and tie the ends together. Glue the tied end to the back of the reindeer ornament.
©2012, Digital by Design, Inc. - See Copyright Information
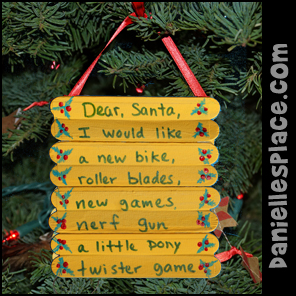
Craft Stick Letter to Santa Christmas Ornament Craft
The craft sticks are taped together so that when the craft sticks are pushed together from the top and bottom of the stack they fan fold up into a compact stack of sticks.
What you will need:
Woodsies Mini Jumbo Craft Sticks -4.5" 50/Pkg - Use good quality craft sticks that lay flat. The 5/8" work perfect with the one-inch tape. *You can use the Woodsies Jumbo Craft Sticks with the 1.5 Inch - 3M Scotch Masking Tape for a bigger Canvas.
3M Scotch Masking Tape, 1-Inch - Other brands will work, but this tape works great! It is the exact color of the craft sticks.
(Staple's Tape works better with the washable markers, but it is lighter than the stick and more transparent and doesn't cover the stick as well.)
Permanent Markers, Crayons, or colored Pencils - (The washable markers don't work well because they smear.)
Ribbon
How to Make the Folding Craft Stick Letter to Santa:
1. If you are using the mini-jumbo craft sticks, cut the one-inch masking tape into 4-inch pieces.
2. Place two sticks together, side by side, and tape them together covering both the sticks with the tape.
3. Turn the two sticks over so that they are diagonal to you.
4. Place another craft stick next to and below the two sticks that you taped together. Use another piece of tape to tape the bottom two sticks together.
5. Turn all three sticks over diagonally and place another stick at the bottom of the row and tape the last two sticks together. Keep going until you have a whole row of sticks.
6. Draw out your design on the craft stick canvas with a pencil. If you make a mistake, you can erase it. When you are happy with your design paint it with the acrylic paint. When the acrylic paint is dry write your letter to Santa with a permanent marker.
You can make this craft even easier for younger children. Just have them place six or more crafts stick one on top of the other in a row and then glue two other craft stick perpendicular to the row of craft sticks. To keep the craft sticks together while they are gluing them you can place a piece of tape across the row of sticks. Attach a piece of yarn to to top so it can be hung up. You can also use the Colored Jumbo Craft Sticks or the regular-sized Colored Craft Sticks so they don't have to paint them.
View a Video on Youtube showing how to make this craft.
©2013, Digital by Design, Inc. -*See Copyright Information
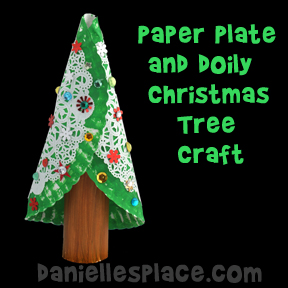
Paper Plate and Doily Christmas Tree Craft
What you will need:
9-inch Paper Plates
8-inch Paper Doilies (Optional)
Green and Brown Acrylic Paint
Sequins and Gemstones, and Rhinestones
White Glue
Card Stock or Paper Towel Tubes
How to Make the Paper Plate Christmas Tree:
1. To make the tree trunk cut a paper towel tube so it is six inches long and paint it brown. If you don't have a paper towel tube, you can use card stock. Cut the card stock so it is 6 inches by 8.5 inches and roll it into a tube and glue the side closed.
2. To make the top of the tree paint a paper plate green and let it dry. When it is dry glue an eight-inch doily to the center of the plate. Roll the paper plate into a cone shape as shown in the picture above. Glue it closed where it overlaps with a low temperature glue gun.
3. Glue the "tree trunk" inside the top of the tree.
4. To finish glue sequins and gems on the tree to decorate.
©2013, Digital by Design, Inc. -*See Copyright Information
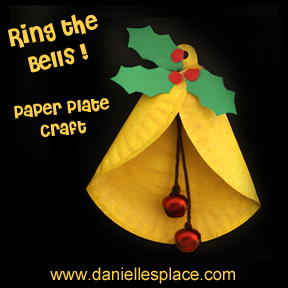
"Ring the Bells!' Paper Plate Craft
What you will need:
Lunch-sized Paper Plates or use a Piece of Yellow Construction Paper cut into an 8-inch circle
Green and Red Construction Paper
Jingle Bells or Beads
Yarn, String or Chenille Stems
Scissors and Hole Punch
Ribbon and Glue
How to Make the Paper Plate Bell:
1. Print out the pattern and use it to cut the paper plate. If you don't have paper plates you can just use the paper pattern as your bell.
Member's ![]()
Free Instant Digital Download ![]()
2. Fold down the sides of the paper plate where indicated on the pattern and glue the plate together where it overlaps. Punch a hole in the top of the bells.
3. In class have your children paint the paper plate and string two bells on a piece of yarn, and tie the bells to the ends of the piece of yarn. Fold the yarn in half and then glue it to the top of the bell under the place where the paper plate overlaps.
4. Have your children glue on holly leaves and berries to decorate the bells. You can bring in other decorative items to decorate the bell.
5. Tie a ribbon to the bell to hang.
This craft goes along with the Christmas Sunday School Lesson "Ring the Bells!" on The Resource Room.
©2012, Digital by Design, Inc. - See Copyright Information
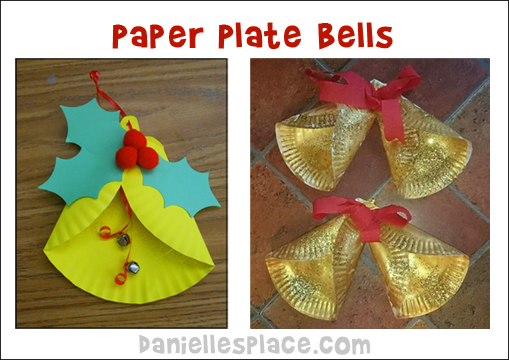
These paper paper plate bells were made by Mindy Watson and Namtalae Srifa
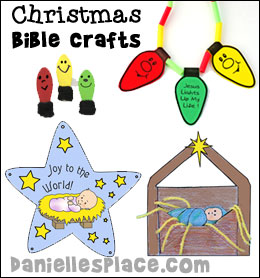
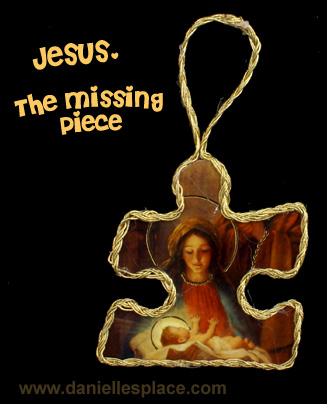
"Jesus the Missing Piece" Puzzle Piece Christmas Craft
Jesus Makes the Picture Complete! Make this Puzzle Piece Christmas Ornament to share the Good News!
What you will need:
Nativity Scene from a Christmas Card
Elmer's Rubber Cement
Scotch Craft Stick Glue
Scissors
Exacto Knife
Pencil
Large Puzzle Piece from an old children's puzzle
Round Ribbon
Low Temperature Glue Gun
How to Make the Puzzle Piece Ornament:
1. Find a nativity scene from an old Christmas card that will fit in the puzzle piece. The entire picture doesn't have to fit on the puzzle piece completely, just the important parts of the picture.
2. Lightly trace around the puzzle piece to make sure the picture will be in the correct place and it will look okay on the piece.
3. Cut around the traced outline.
4. Glue the picture onto the puzzle piece.
6. Glue ribbon around the edge of the puzzle piece using a low temperature glue gun. Leave two inches of ribbon at the top of the puzzle piece at the beginning and end of the ribbon. Tie the ribbon ends together to make a loop.
©2012, Digital by Design, Inc. -*See Copyright Information
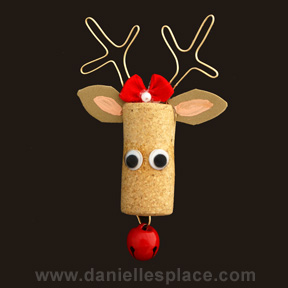
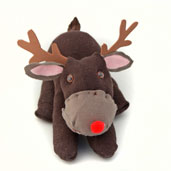
Reindeer Cork Christmas Pin Craft
What you will need:
Cork - If you don't have any you can purchase them from www.amazon.com: Premium Recycled Wine Corks, Set of 50
One-half Inch Red Bell
Thick Gold Wire
Tan Craft Foam
Pink Acrylic Paint, Red Ribbon, Fake Pearl, and Googly Eyes
How to Make the Cork Reindeer Pin:
1. Cut a one-inch piece from the gold wire. Poke one end of the gold wire into one end of the cork. Insert the red bell, bend the wire over, and poke the other end into the end of the cork as shown in the picture.
2. Cut two more pieces of wire about six inches long. Fold the pieces into antler shapes and poke the ends into the top of the cork.
3. Cut ear shapes from the tan craft foam. Paint the inside of the ears pink. Glue the ears next to the antlers.
4. Tie a piece of red ribbon into a bow and glue it to the top of the head. Glue a pearl to the center of the bow.
5. Glue on the googly eyes.
6. To finish stick a pin to the back.
©2012, Digital by Design, Inc. - See Copyright Information
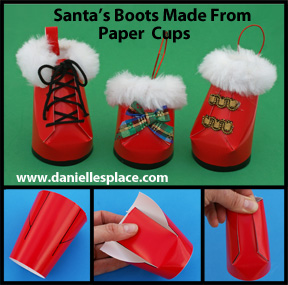
Santa's Boots Christmas Ornament Craft
What you will need:
9 oz. Red Paper Party Cups
Pencil
Hole Punch
Scissors
White Fake Fur
Low Temperature Glue Gun
Card stock (heavy paper), Black Acrylic Paint, Christmas Trim, and Ribbon and Decorative Items
How to Make the Santa Boots Ornaments from Paper Cups:
1. Print out the Boot Patterns on to card stock and cut along the dark lines.
Member's ![]()
Free Printable ![]()
2. Cut the curled up rim off the top of the cup, and then place the boot pattern on the cup so that the bottom of the pattern fits around the bottom of the cup. Tape the pattern on so it doesn't move. Use a pencil to trace along the outside edge of the pattern.
3. Cut along the lines you traced.
4. Push the tongue of the shoe in while pushing the sides over the tongue so that the sides are parallel to each other.
5. Glue the sides of the shoe to the tongue of the shoe. If you would like to use shoe laces instead, punch tiny holes on the sides of the shoe and lace it up with nylon string.
6. Cut fake fur to fit around the top of the boot and glue it down with a glue gun.
7. To finish paint the bottom edge of the show black and glue on decorative items and a string to hang the ornament.
The craft was inspired by Scrapbutterfly Blog "How to make Styrofoam Cup Baby Booties".
©2012, Digital by Design, Inc. - See Copyright Information
Sock Reindeer Christmas Craft
These easy-to-make sock reindeer make great inexpensive stocking stuffers.
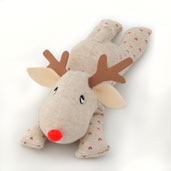
Go to the Cow Craft Page for directions to this craft.
Use the directions for the Cow Beanbag Craft and then cut antler shapes from brown or tan craft foam and glue them behind the ears.
Reindeer Christmas Gift Bag Craft for Kids
What you will need:
Brown Paper Lunch Bag
Card Stock (Heavy Paper)
Crayons
Markers or Colored Pencils
Red Pompom for the Nose
Tape or Glue
Stapler
How to Make Reindeer Christmas Gift Bag Craft:
1. Draw a picture of the head of a reindeer with antlers, and four legs.
Member's ![]()
Instant Digital Download - ![]()
2. Color the pictures and cut them out.
3. Place your Christmas gift in the paper lunch bag and then fold down the top about two inches. Fold in the sides about two inches at the top and staple the bag closed.
4. Glue the head and legs onto the lunch bag as shown. Glue a red pompom on the face for the nose, and write "to:" and "from:" on the back of the bag.
©2010, Digital by Design, Inc. - See Copyright Information
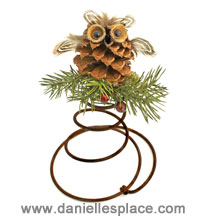
Owl and Bedspring Craft
What you will need:
Old Bed Spring
Pinecone and Feathers
Fake Pine Bough
Acorn Tops
Eyes and Glue
How to make the Owl and Bed Spring Craft:
1. Glue two acorn caps on the pointy edge of the pinecone for the eyes. Glue fake eyes inside the pinecone caps.
2. Glue small feathers on for the wings and the owl's horns.
3. Glue pine boughs on the top of the bed spring and then glue the owl on top.
©2012, Digital by Design, Inc. - See Copyright Information
Felted Owl Craft
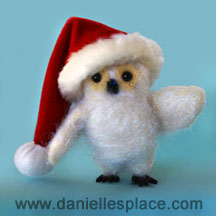
Felted animals and other creatures make great Christmas gifts for children. Needle felting is a lot like working with clay. You can make the creatures quite large by using foam for the inside or make them very small. The more you felt them them the smaller they become.
This little owl was made with wool roving and a felting needle.
You can purchase the supplies you need from a craft store.
You can find directions on how to make felted animals on the Felt Crafts Page.
©2012, Digital by Design, Inc. - See Copyright Information
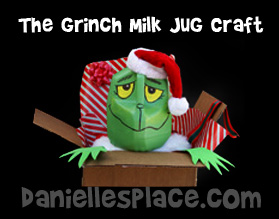
The Grinch Milk Jug Christmas Craft
What you will need:
Plastic Milk Jug with cap
Krylon Fusion Green Spray Paint or Krylon Clear Plastic Primer Paint - If you are using the Green Acrylic Patio Paint
Black Sharpie Fine Point Marker (Permanent Marker)
Santa Hat
How to Make The Grinch Milk Jug Christmas Craft:
1. To remove the label fill the jug up with hot water and let it sit for a minute. This will loosen the glue. Carefully pull off the label. Do not get the label wet before trying to remove it or it will just disintegrate and you will have a hard time getting it off. Once the label is removed you can wash and dry the plastic milk jug. If you are using the Grinch outside, fill the bottle with dry rice or sand to make it heavy and replace the cap.
2. Spray the entire jug with plastic primer paint. The primer paint will help the spray paint or acrylic paint stick better. When the primer paint is dry spray it with the green spray paint. Then paint in the eyes with yellow acrylic paint.
Spray paint works best because the craft foam hands sticks better to the spray paint than the acrylic paint.
3. Use a Sharpie marker or other permanent marker to draw in the mouth, eyes, and nose. Paint the eyes yellow.
4. Cut hand and arm shapes from green craft foam. You can trace your own hands making the fingers longer and pointier.
5. Display your Grinch. If you have snow in your area, you can make the Grinch look like he is covered with snow with only his hands and head sticking out of the snow. Just pile up a bunch of snow where the body would be. If you don't have snow, you can place the Grinch on a wall so that it looks like he is peeking over. Or make him look like he is coming out of a Christmas present as pictured above.
Don't forget to read Dr. Seuss' classic book "How the Grinch Stole Christmas" and watch Jim Carrey's movie "The Grinch".
©2010, Digital by Design, Inc. -See Copyright Information- Bloggers if you use this craft link back to this web site for the complete directions - see copyright regulations. Bloggers we would love to see your Grinch creations. Send us a picture and we will publish it here with a link back to your blog or web site.
Chenille Stem Gift Toppers
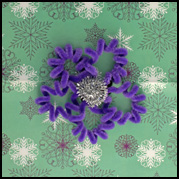

Make your own gift toppers this holiday season. All you need are chenille stems and a little glue. Fold and bend the stems into flower petals and leaves and glue them together.
To make the flower with the coiled petal wrap the chenille stem around a pencil before shaping it into petal shapes.
Christmas Tree for the Wild Animals
Start a new Christmas tradition this year! Children love making and giving gifts to their friends and family, but will also treasure the times they spend showing their appreciation for God's creatures decorating a tree with gifts for the wildlife in their area. Eve Bunting wrote a beautiful book called "Night Tree" in which a young boys tells about a memorable family tradition they do the night before Christmas.
He describes how they go to the edge of town and find their special tree, decorate it with popcorn chains, apples, and popcorn balls, share in hot chocolate, and sing their favorite Christmas songs.
If you have a tree you can see from your window, decorate it so that your children can actually see the birds and other wildlife enjoying their gifts.
Below are some ideas for some things you can use to decorate your own wildlife Christmas tree.
Angel Bird Food Ornament
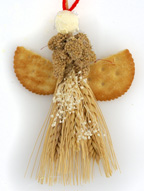
Tie three dried wheat heads together with ribbon or yarn. Make flour and water paste by mixing a small amount or water with a tablespoon of flour. Cut Ritz crackers in half and glue them to the back of the wheat heads. Glue part of a millet sprig to the wheat heads and a piece of popcorn on top of the millet. I also glue some baby's breath to the wheat heads on the skirt area.
(You can buy dried wheat at your local craft store and millet sprigs at a pet store.)
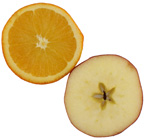
Cut Slices of Apples and Oranges
Cut apples and oranges into slices so that the core of the fruit is in the center of each slice. Tie them with string or thread to hang them up.
Peanut Butter Pinecones
Spread peanut butter in between the cracks of a pinecone and sick cereal to the peanut butter. You can also sprinkle bird over the peanut butter. Tie string on the pinecone to hang it up.
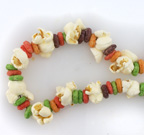
Popcorn, Dried Fruit, and Cereal Chains
String popped popcorn, pieces of dried fruit, and cereal onto a string using a needle and heavy-duty thread.
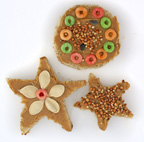
Bread Ornaments
Use a cookie cutter to cut bread into star shapes. Punch a hole on one side and let them dry out. When they are dry tie string or thread through the holes and then spread them with peanut butter or jam. Sprinkle bird seed on top.

Natural Star Ornaments
Use dried grasses and flowers to make ornaments. Buy dried flowers and grasses from your local craft store. This ornament was made from dried wheat, a Ritz cracker, and half a dried cranberry. Glue the wheat, yarn cord, and cranberry to the cracker using flour and water paste. Mix a small amount of water into a tablespoon of flour until it is a paste consistency.
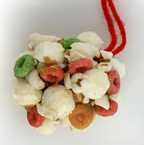
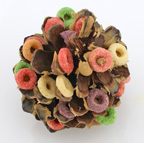
Popcorn - Peanut Ball Ornament
Tie a ribbon or yarn around a peanut in a shell. Coat the outside of the peanut with peanut butter and then stick popcorn and other things to the peanut butter. You can use cereal, sunflower seeds, pumpkin seeds (raw), dried fruit, etc.

Millet Bird Ornament
Buy sprigs of millet at your local pet store. Cut the pieces into smaller pieces and tie the tops with yarn or ribbon. Use red raffia to make a bow.
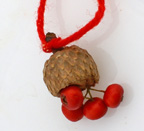
Natural Christmas Ornament - Acorn Cap
Fill acorn caps with peanut butter and stick wild berries, seeds, or dried food into the peanut butter. Tie or glue a red ribbon or yarn on the top to hang it on the tree.
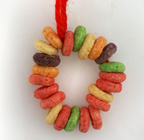
Cereal Christmas Wreath Ornament for the Birds
String cereal onto a piece of yarn and then tie it into a loop. You can also use small donuts. Spread peanut butter on the top and then sprinkle with bird seed.
Charlie Brown Christmas Tree and Snoopy Sock Doll
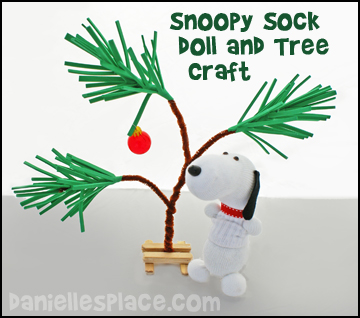
What you will need:
Green Craft Foam, Brown Chenille Stems, Wood Craft Sticks, Scissors, Low Temperature Glue Gun, and Small Christmas Ornament
How to Make Charlie Brown Christmas Tree and Snoopy Sock Doll:
1. Wind two brown Chenille stems together to form the main branch of the Christmas tree.
2. Wind two more Chenille stems together about half way. Connect these two Chenille stems to the main branch about one-third of the way down from the top by winding the bottom half of the stems (the part that isn't wound) around the main branch.
3. To make the lower branch do the same thing except connect it to the main branch about two-thirds of the way from the top. Wind the extra lengths around the bottom to make it thicker.
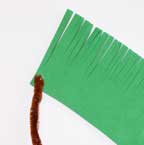
4. To make the Christmas tree needles cut green craft foam into 6" x 2 1/2" lengths. Mark off 1/2" on one of the long sides with a pen. Cut small slits, 1/4" wide, down the whole length, cutting up to the 1/2" line.
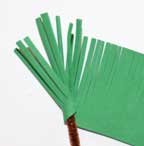
5. Wind the foam strip around the branches starting at the ends. Glue the end of the branch to the foam piece on the uncut edge so that the foam piece is at a slight slant. (See picture above.) Wind the foam around the branch adding small amounts of glue to secure it to the Chenille stem.
6. To make the Christmas tree stand, cut craft sticks in half or use small craft sticks. Make the bottom rails of the tree stand by gluing three half craft sticks on top of each other for each rail. To make the top rails glue four halves together. Glue the top rails onto the bottom rails leaving just enough room between the top rails to glue in the tree. (See diagram to the left.)
7. To finish add some small Christmas directions.
For directions on how to make the Snoopy Sock Doll go to the Sock Doll Page and follow the Two-Sock, No-Sew Sock Doll Directions and the Snoopy directions. Follow the directions at the top of the page. To make the ears cut ear shapes from black felt and use a red ribbon for his collar.
©2009, Digital by Design, Inc. - See Copyright Information
For Even More Christmas Ideas Check Out These Pages:
Christmas Craft Page 1
Christmas Crafts Page 2
Christmas Crafts Page 4
Christmas Crafts Page 5
Christmas Crafts Page 6
Winter Crafts Page
Bible Themes - Christmas Crafts
Bible Themes - Christmas Crafts Page 2
Bible Themes - Christmas Crafts Page 3