Under the Sea Crafts Page 4
Crafts and Learning Activities Relating to the Sea, Ocean, Fish, Sea Shells, and Whales
3D Horseshoe Crab Craft and Learning Activity

These horseshoe crabs bend like real horseshoe crabs! Use them to learn more about horseshoe crabs.
What you will need: Grey, Tan, or Light Brown Card Stock, Colored Pencils, Scissors and Glue
How to Make the Horsecrabs:
1. Print out the horseshoe crab pattern onto card stock and cut them out on the dark lines. Cut up around behind the eyes.
Member's ![]()
2. Show your children pictures of horseshoe crabs online and and them color their patterns to match the pictures they see.
3. As you work answer the following questions with your children and then look up the answers online.
- What do horsecrabs eat?
- Where are their mouths located?
- How many legs do they have?
- How many eyes do they have and where are they located?
- How often do horseshoe crabs molt?
4. Before assembling the crabs have your children write important facts they learned about horsecrabs on the back of the crabs.
5. To assemble the crab body fold the dotted lines in the center of the pattern back.
6. Place dots of glue where indicated on the pattern and bring the sides of the pattern up over the glued part to make the pattern bow. Hold until the glue dries.
7. To make the tail fold the center line back. Fold the straight line up and the the diaganal lines back. Place glue on the end and glue it to the horseshoe crab to the underside of the horseshoes body or abdomen.
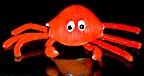
Crab Crafts and Learning Activities
How to Make Craft Crafts and Activities Relating to Crabs
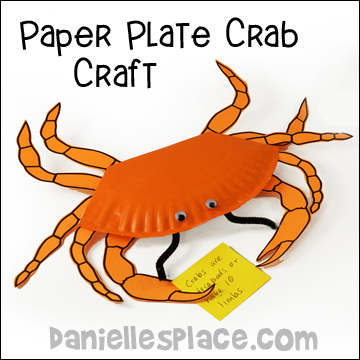
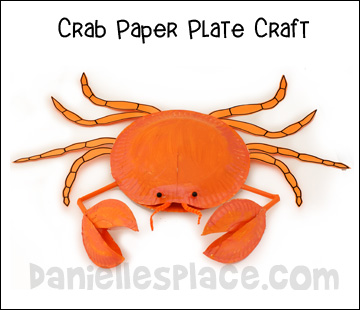
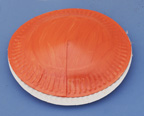
Crab Paper Plate Craft and Learning Activity
What you will need:
Glue
Paint
How to Make the Paper Plate Crab:
Member's 
Instant Download Pattern - 
1. Print out the Crab leg patterns onto card stock and cut them out.
2. Fold a paper plate in half and measure 2 1/2" in from each folded edge and make a mark and 2 inches down to the plate edge and make a mark. Fold the plate at the marks back and forward. Unfold the paper plate slightly. Press in on the sides to make the crab shape.
3. Paint the top of the paper plate red or orange.
4. Punch holes in the crab claws and in the bottom of the paper plate. Attache the claws with brass fasteners, opening the fasteners inside the folded plate.
5. Cut Chenilles stems about three inches long and glue them to rounded side of the plate.
6. Use a picture of a crab to place the legs in order and then tape them to the bottom of the paper plate crab.
7. To finish glue on googly eyes.
Watch a View it and Dot it Craft Video to see how to make this craft:
Educational Ideas
1. After studying crabs have your children make their own crabs and then write facts about crabs on pieces of paper. Tape the pieces of paper onto the crab's claws, or have them store the crab fact papers inside the crab's body.
©2013, Digital by Design, Inc. -*See Copyright Information
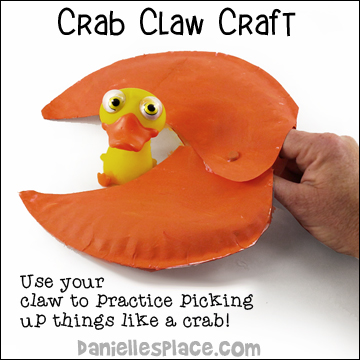
Crab Claw Paper Plate Craft
What you will need:
Large Paint Brush
Scissors
Pencil
Hole Punch
Low Temp. Glue Gun
How to Make the Crab Claw:
1. Print out the crab claw patterns and cut the patterns out.
Member's
Instant Download Pattern -
2. Fold a paper plate in half and place one of the crab claw patterns on the paper plate so that the rounded edge of the pattern is on the edge of the paper plate. Do the same thing for the other crab pattern.
3. Glue the claw cutouts together around the fluted edge of the paper plate, around the tip of the claw and up to the line marked on the pattern. Do this for top and bottom part of the claw. Use a hole punch to punch holes where indicated on the pattern through both sides of the claw.
4. Place the top claw part over the bottom part, matching up the holes, and secure it with brass fasteners.
5. Roll up 1" x 4" pieces of card stock to make tiny tubes. Insert the tubes inside the claw right where your fingers would go. Glue them in place with a low temp. glue gun.
Watch a "View it and Do it!" Craft video to see how to make this craft:
Learning Activities Using the Crab Claw:
1. Practice Picking up Things With the Crab Claw - Collect small objects and place them on a table in front of your children. Have them practice picking up the objects and placing them in a pile. Remind your children that to open their claws they must close or bring their index finger and thumb together. And to close the claws they must open or push their thumb and forefinger apart. (This is the opposite of what you would naturally do to pick something up with your fingers.) If you have very small children, just let them use both hands to open and close the crab claw.
2. Play a Game Using the Crab Claw - Divide your children into two teams. Place small objects at one end of the room and the teams at the other. On the word "go" the children should try to pick up as many things as they can with their crab claws and bring them back to the team side of the room. The team that collects the most objects wins.
Crab Paper Plate Craft
What you will need:
Black Beads
How to Make the Paper Plate Crab Craft:
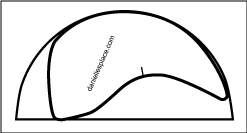
1. Cut a three-inch slit from the edge of a 9-inch paper plate toward the center of the plate. Overlap the edges formed by the slit about one inch and glue the together to make a dart.
2. Glue another paper plate around the edge, top to top, to the cut paper plate starting from the opposite side of the slit. Glue around to the sides bringing the edges together. The bottom plate will bend slightly. (See diagram.)
3. Cut around the edge of the bottom paper plate to match the top plate.
4. Glue two 6-inch paper plates together, top to top. Cut claw shapes from the sides. Cut the end off of one claw shape and glue it inside the other claw shape. Glue an orange straw to the claw shape. Glue the other end to the inside of the crabs body paper plates on one side. Make another claw the same way.
Member's
5. Glue the body paper plates closed.
6. Draw crab legs onto orange card stock, cut them out, and then glue them to the bottom of the crabs body.
7. To finish cut short pieces of orange straw for the eye stocks and glue them to the body. Glue a black bead to the ends of the eye stocks.
©2013, Digital by Design, Inc. -*See Copyright Information
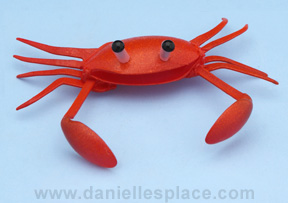
Crab Pool Noodle Craft
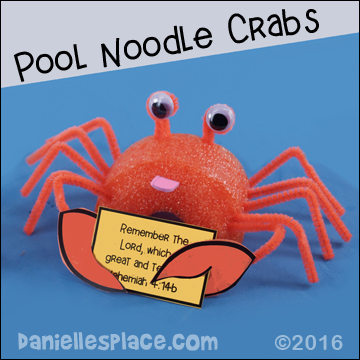
What you will need:
3 1/4" Pool Noodles - Red or Orange
Scissors
How to Make the Crabs:
1. Cut two inches off the end of a pool noodle and then round off the edges with scissors.
2. To make the eyes cut a chenille stem in half. Use one half for each eye. Fold a half a chenille stem in half and then roll down from the folded end. Poke the two cut ends into the pool noodle. Do the same for the other half. Glue googly eyes onto the rolled end of the chenille stems.
3. Cut chenille stems 3 1/2" long and poke them into the sides of the pool noodle for the crabs legs. Fold down the chenille stems to look like legs.
4. To make its front claws cut claw shapes from card stock and glue them to the end of 3 1/2" chenille stem pieces. Punch them into the front side of the pool noodle and fold them forward.
Member's
Instant Download Pattern -
5. To finish cut a slit in the front of the noodle and insert a tongue cut from a piece of pink paper.
Watch how to make this craft on our "View it and Do it" Craft video:
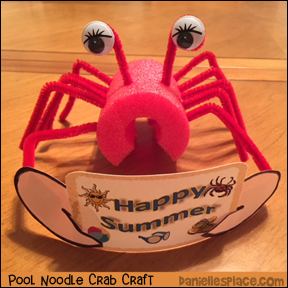
Pool Noodle Crab
Cheryl Samuels adapted this craft for her assisted living residents.
Crab Craft Made with Sea Shell Macaroni
This cute little crab was made from sea shell macaroni and pipe cleaners.
What you will need:
Sea Shell Macaroni
Pipe cleaners
Red or Orange Patio Paint
Low Temp. Glue Gun
Tiny Sea shells
How to make:
1. Paint the macaroni red and let it dry.
2. Cut pipe cleaners in half and glue to the under side of the shell.
3. Glue two tiny sea shells to the two front legs for claws.
4. To finish, glue the eyes to the shell.
 5. Make a crab habitat by decorating
a small heavy duty paper plate with paint and colored sand or (colored
salt) or maybe some small sea shells or rocks or aquarium rocks.
5. Make a crab habitat by decorating
a small heavy duty paper plate with paint and colored sand or (colored
salt) or maybe some small sea shells or rocks or aquarium rocks.
©2000, Digital by Design, Inc. -*See Copyright Information
Crab Craft Made with Plastic Spoons and Forks
What you will need:
Two Regular-sized Plastic Spoons and Forks
Two Mini Plastic Spoons - You can find these at party stores. They are used for cocktails and desserts.
Spray Paint
Low Temp. Glue Gun
Lighter with a Long Handle
Drinking Straw and Two Black Eyes or Beads for the Eyes.
How to Make The Crab from Plastic Spoons:
1. Cut the handles off the two regular-sized spoons. Melt the cut edges with a lighter just until the plastic is bendable. Bend them slightly to flatten them out so that they fit on top of each other to form the crab's body. You must work quickly because they cool within a few seconds. Glue the two spoons together at the sides (See picture.)
2. Cut the ends off the two forks and heat them up to flatten them. Press them against a table while they are still hot to flatten. Heat up the tines and spread them apart. Glue the fork ends to the bottom of the crab body.
3. To make the pinchers bend the mini plastic spoons where the spoon parts attach to the handles. Heat up the area with a lighter until the spoons ends start to bend. Hold them in place until they have cooled. Glue the pinchers to the body just above the legs.
4. Cut two short pieces of drinking straw and glue them to the body to make the eyestalks.
5. Spray paint the body and then glue tiny black eyes or beads to the end of the straw pieces for the eyes.
©2012, Digital by Design, Inc. -*See Copyright Information