Material & Sewing Crafts for Kids and Adults
How to Make Crafts Using Material
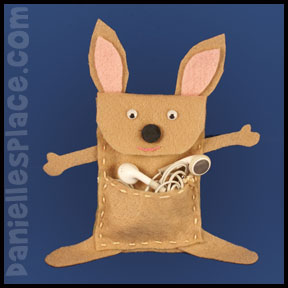
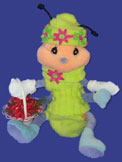
Kangaroo iPod Pouch Sewing Craft for Kids
This simple sewing project is great for children eight and older. The pouch can be used for iPods, business cards, or Bible verse cards. Instead of using felt, you can use fun foam and just glue the pieces together, and instead of using a button for the nose you can use foam and use velcro for the clasp.
What you will need:
Brown, Tan, and Pink Felt Squares
Large Sharp Needle
Black Shank Buttons
Straight Pins
Scissors
How to make:
1. Print out the patterns and use them to cut the pieces from tan or brown felt squares.
Member's ![]()
2. Cut inner ears from pink felt and glue them to the top of the ear pieces.
3. Sew a straight stitch at the top of the pouch piece (Curved edge)
4. Stack the piece one on top of the other starting with the back piece, the front pocket and then the pouch on top. They should match up at the bottom as shown in the picture to the left.
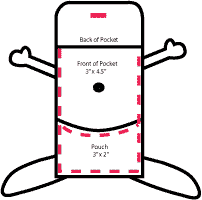
5. Stick the arms and feet pieces between the back and front pocket pieces and use straight pins to hold them in place. Sew all the pieces together using a small straight stitch as shown in the picture by the red dotted lines.
6. Fold the top of the back piece forward to form the flap and decide where you want the button nose.
Mark the place with a marker on the front pocket piece. Sew the button on by reaching your hand inside the pocket and using embroidery floss. Stick the needle through the felt and the buttonhole and then back through the felt to the inside of the pocket. Bring one end of the floss all the way through and tie the two ends together to secure it in place.
7. Fold the flap down again and mark where the button should come through. Cut a small slit the same length as the button through the material for a buttonhole.
8. To finish glue on googly eyes and ears. You can also use embroidery floss to sew on a mouth. You may also want to add a rope to the pouch to carry it on your shoulder.
©2009, Digital by Design, Inc. - See Copyright Information
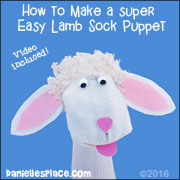
Sock Doll Clothes and Sock Dolls
Use old socks to make clothes for your dolls and stuffed animals. These are cheap and easy and take very little time to make. Most of them where made without any sewing. Go to Sock Doll Craft Page for directions.
©2009, Digital by Design, Inc. - See Copyright Information
"Jesus Loves You" Beanbag Craft

What you will need:
Cold Peel T-shirt Transfers such as Wyndstone Jet-Pro (Do not use the hot peel transfers on felt because the felt stretches when the transfers stick to the felt. If you can't find cold peel transfer that will work on your printer, use a poly/cotton material instead of the felt)
Iron
Embroidery Needle
Small Dried Beans or Rice
How to make Smiley Face Bean Bags:
1. Print out the pattern onto T-shirt transfer material.
Member's ![]()
Free Digital Download ![]()
2. Cut around the edges of the smiley faces.
3. Cut two, 4 1/2" circles from felt or material for each bean bag.
4. Iron one of the smiley faces onto one of the circles.
5. Put the circle together and use a straight stitch to sew the two circles together leaving an opening to insert the beans.
6. Fill the bean bag with the beans and close up the bag.
©2004, Digital by Design, Inc. - See Copyright Information
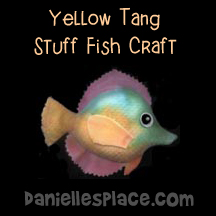
Stuffed Fish (Yellow Tang) Craft
Children of all ages will love painting or coloring these adorable fish.
What you will need:
White Polyester Stretch Material
Wiggly Eyes (optional - Do not use if you have very small children.)
Pinking Shears
Thread
Polyester Stuffing
Glue Gun
How to make:
1. Print out the Fish Pattern.
Member's ![]()
Free Digital Download ![]()
2. Fold the material in half with right sides together. Pin the body, pectoral fin, and pelvic fin patterns onto the material and cut out the patterns on the solid lines. Pin the dorsal fin and anal fin patterns onto a single layer of material and cut out the patterns on the solid lines.
3. Pin the dorsal, anal, and pelvic fins onto the body patterns with rights sides together matching up the points. The fish pieces will be laying on top of each other.
4. You can sew the pectoral fins on at point G now if you would like. Or you can just use hot melt glue and glue them in place when you are finished stuffing the fish.
5. Place the other body piece on top of the body piece with the fins sewed on (right sides together). The fins should be laying flat against the body material so that they are inside the fish. You will be sewing over the same stitches you used to sew the fins on.
6. Sew the fish together starting at one end of the caudal fin and ending at the other. Leave the back of the caudal fin open.
7. Turn the fish inside out and stuff with fiber fill. Sew the end of the caudal fin closed and use pinking shears to clip close to the seam.
8. If you haven't sewed on the pectoral fins you can glue them on now. Glue the wiggly eyes in place to finish. Do not use wiggly eyes with small children. They could come off.
9. These fish can be colored with water paints, magic markers or fabric markers or a combination of all three. I like the Crayola washable markers because even young children can safely complete this project. When the children are done coloring their fish they can paint over the fish with water to make the colors blend together. If the child goofs or doesn't like his work, you can wash off the markers and start again.
10. A string can be added to hang the fish. A fish mobile can be made by hanging a collection of fish from a plastic hanger.
©2004, Digital by Design, Inc. - See Copyright Information
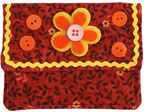
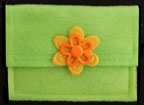
Credit, Store, and Business Card Wallet Craft
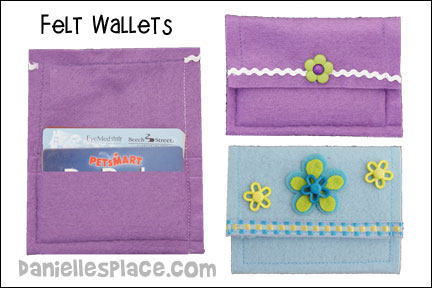
These card holders are quick and easy to make, inexpensive, and can be designed with a personal touch for everyone you know.

What you will need:
Fabric
Felt Squares
Decorative Items
Velcro
Sewing Machine
Matching Thread
There are several different ways to make these adorable wallets depending on the material you use. The stiff felt wallets are the easiest and quickest because there is very little sewing. The material wallets take a little longer and require a little more sewing, but there you have a much wider selection of designs to pick from.
How to Make the Wallets:
1. Print out patterns and cut them out.
Member's ![]()
2. Pin the patterns to your fabric and cut them out. Cut two of the Wallet Cover Pattern. Cut the slits where indicated on the pattern. Note the x and y marks on the pieces from the pattern.
3. Place the two cover pieces together, right-sides together and pin the top part. The side without the letters x and y.
4. Sew around the top part from slit to slit. Trim the corner, and then turn the piece right side out. Poke the corners out and iron them flat.
5. Fold the two pocket pieces in half (right side of the material facing out) and top stitch 1/2' from the fold line on each piece.
6. Place the two folded pocket pieces on top the cover piece with the smaller pocket on the bottom. The x's and y's should all be on top of each other. The top of the larger pocket piece (the folded side) should match up with slits cut on the cover piece. Pin the pieces together and then stitch the pockets to the cover piece. Turn the pockets inside out so that both pockets are on the same side.
7. Stitch all the way around the wallet close to the edge.
8. Glue on buttons, Rickrack, ribbon, etc. to decorate the wallet.
9. Cut small pieces of Velcro and glue them to the wallet to keep it closed.
©2010, Digital by Design, Inc. - See Copyright Information
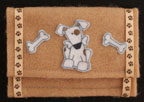
Felt Square Wallets - Soft felt
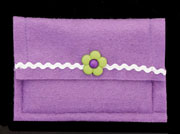
You can make two of these wallets one 50 cent square of felt.
How to make:
1. To make the main part of the wallet cut a piece of felt 8.5" x 4 1/4" or use the pattern.
Member's ![]()
Fold down the top and bottom of the piece, the 4 1/4" length, one-half inch and top stitch the folded material. Trim the folded part close to the seam
2. Measure two inches from the bottom folded edge and draw a line across the width of the material. This is where you will line up the bottom of the inside pocket.
3. To make the inside pocket cut another piece of felt 4 1/4" by 3" or use the pattern. Fold the top edge down 1/2" and top stitch it down. Trim the folded part close to the seam.
4. Place the inside pocket on the main piece so that the folded edge is facing the inside of the main piece. You should see the folded down edge on the main piece and not the folded down edge on the inside pocket piece. Line up the bottom of the inside pocket piece with the line you drew two inches from the bottom of the main piece.
5. Sew the inside pocket piece to the main piece 1/2" from the bottom of the inside piece.
6. Fold up the bottom of the main piece at the two inch line so that it covers all but 1/2" of the inside pocket. Pin the folded bottom to the inside pocket and stitch all the way around the outside of the wallet as close to the edge as possible.
7. To finish sew on or glue on buttons and decorative items.
©2010, Digital by Design, Inc. - See Copyright Information
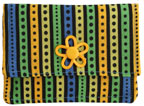
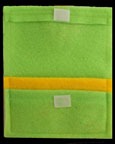
Felt Square Wallets - Made from Stiffened Felt Squares or Fabric that Doesn't Fray Such as Vinyl or Leather.

These wallets are made basically the same as the soft felt wallets above except that you do not have to turn down the edges because the felt is much sturdier.
How to make:
1. To make the main part of the wallet cut a piece of felt 7.5" x 4 1/4" or use the pattern.
2. Measure two inches from the bottom edge and draw a line across the width of the material. This is where you will line up the bottom of the inside pocket.
3. To make the inside pocket cut another piece of felt 4 1/4" by 2.5".
4. Place the inside pocket on the main piece so that lining up the bottom of the inside pocket piece with the line you drew two inches from the bottom of the main piece.
5. Sew the inside pocket piece to the main piece 1/2" from the bottom of the inside piece.
6. Fold up the bottom of the main piece at the two inch line so that it covers all but 1/2" of the inside pocket. Pin the folded bottom to the inside pocket and stitch all the way around the outside of the wallet as close to the edge as possible.
7. To finish sew on or glue on buttons and decorative items.
©2010, Digital by Design, Inc. - See Copyright Information
Stuffed Star Fish Toy Craft

What you will need:
White Polyester Stretch Material
Wiggly Eyes (optional - Do not use if you have very small children.), Pinking Shears
Thread
Polyester Stuffing
Glue Gun
How to make:
1. Make a copy of the pattern and cut it out.
Member's ![]()
2. Fold the material in half with right sides together. Pin the pattern onto the material and cut on the solid line.
3. With right sides together sew the pieces together at the long dashed lines.
4. Turn the starfish right side out. Push some fiber fill into each arm and then into the center of the fish.
5. Sew the starfish closed with a needle and thread. Glue on wiggly eyes. Do not use wiggly eyes if you have young children. They can be pulled off.
©2004, Digital by Design, Inc. - See Copyright Information
Stuffed Sea horse Toy Craft
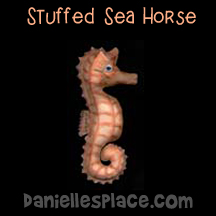
What you will need:
White Polyester Stretch Material
Wiggly eyes (Optional - Do not use if you have very small children.)
Pinking Shears
Thread
Polyester Stuffing
Glue Gun
How to make:
1. Make a copy of the pattern and cut it out.
Member's ![]()
2. Fold the material in half with right sides together. Pin the pattern onto the material and cut on the solid line. Use pinking shears to cut the outside edges of the fins if you would like.
3. Mark the darts where the fins should be attached at point A and B on the wrong side of the cut out pieces.
4. Sew the darts where you marked them on the fabric. You can sew the pectoral fins on at point B now if you would like. Or you can just use hot melt glue and glue them in place when you are finished stuffing the sea horse.
5. With right sides together sew the pieces together at the long dashed lines (the front part of the sea horse).
6. Turn the sea horse right side out. Stuff the tip of the tail, the nose, and the coronet with some fiber fill.
7. Stuff the rest of the sea horse. Pin the dorsal fin in place and finish sewing the sea horse closed.
8. If you haven't sewed on the pectoral fins you can glue them on now. Glue the wiggly eyes in place to finish. Do not use wiggly eyes with small children. They could come off.
©2004, Digital by Design, Inc. - See Copyright Information
Material Crafts on Other Pages