Free Sunday School Lessons for Children
Ladybug Friends
The following Sunday School lesson for children is a free sample Sunday School lesson. There are many more Sunday School lessons for children available on The Resource Room.
Memory Verse:
Gal. 5:13
Printable Bible Verse Cards:
Print out Verse Pattern onto card stock, cut apart, and send home with each child. The children can also make File Boxes for their cards.
Member's ![]()
Teaching Concepts:
Ladybugs are helpful insects. People like to see them around because they know that they can help save their plants from being destroyed by aphids. Jesus also helped many people. He was sent to save the world. We should follow Jesus' and the ladybug's example. We should be ladybug friends.
Opening Activities
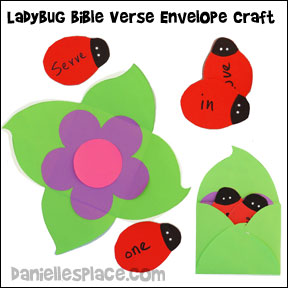
1. Make Ladybug Memory Verse Cards with flower envelope
What you will need:
Green Paper
Red Cardstock
Colored Paper
Black Markers
How to Make:
1. Before class cut out six ladybug shapes (ovals) from red construction paper for each child about 3" x 4". If you have young children who are still learning to read and write, write one word of the memory verse on each ladybug shape. If you have older children let them write the words.
2. Print out the Envelope Leaf Pattern on to green paper and cut them out.
Member's ![]()
Free Instant Download ![]()
3. Print out the flower pattern onto different colors of paper. Cut out one flowers and center of the flower.
4. In class give each child a leaf envelop, flower shape and circle shape. Show them how to glue them together and fold it into an envelope.
5. Have your students draw black spots on their ladybugs and place their ladybugs in their envelope. Tape the envelopes closed or use ladybug stickers to keep them closed. Tell the children they can use the ladybugs at home to help them remember their verse. Write the complete verse on the outside of the envelope. You can also buy ladybug stickers to give as reward to the children for remembering their verse.
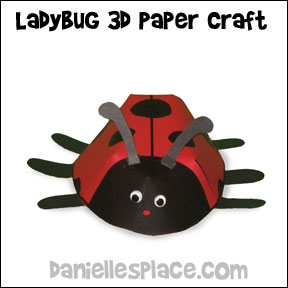
2. Make Paper 3D Ladybugs
description
What you will need:
Card Stock (Heavy paper)
Color Pencils or Crayons
Tape or Glue
Black Construction Paper
Wiggle Eyes
How to Make the 3D Ladybug Craft:
1. Before class print out the Ladybug Pattern onto red or yellow paper.
Member's ![]()
Free Instant Download ![]()
2. Cut the patterns out on the solid lines. Also cut the solid white line on the face.
2. In class have your children color the ladybugs and draw spots on them, and then glue the pattern together at the darts.
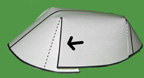
To assemble, glue the darts so that the solid-line sides of the darts overlap to cover the dotted-line sides of the darts (See diagram).
3. Have your children cut out six legs and antenna to glue onto the body. To finish glue on two googly eyes to the face.
3. Look at Books About Ladybugs
Bring in books from the library for the children to look at. Show the children interesting pictures and talk a little about ladybugs.
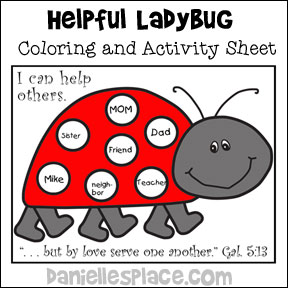
4. Work on the "Helpful Ladybug" Activity Sheet
1. Before class print out the Activity Sheet and make copies.
Member's ![]()
Free Instant Download ![]()
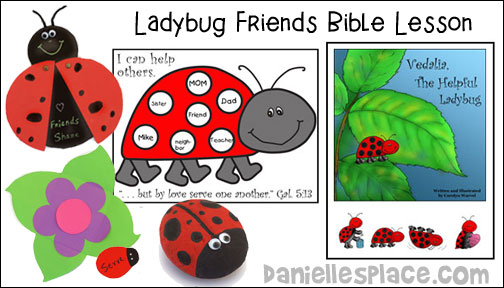
2. In class have your children color the picture, but tell them not to color the spots on the ladybug. Help them write names of people they can help during the week on the spots of the ladybug.
3. Tell your students to color in the spot with the person's name on it that they helped when they have helped that person.
5. Practice Printing and Writing
This lesson was designed to go along with the ABC worksheets using the Bible verse. Children practice writing the letter A in print or cursive or write the complete verse in cursive.
Member's ![]()
© 2000, Digital by Design, Inc. - See Copyright Information
The Lesson
(Preparation: If you are doing this lesson in the spring or summer, you might want to bring in some real ladybugs for your children to look at and hold. If you can't find some in your yard, you can usually buy them at garden stores.)
How many of you have ever seen a real live ladybug? Did you pick it up? Were you afraid of it? Not very many people are afraid of ladybugs, are they? Ladybugs are kind of pretty, aren't they? When you see one it is hard not to want to pick it up and look at it a little closer. They kind of tickle when they walk on your arm, don't they?
Most people don't mind having them around especially people who like to grow fruits and vegetables and flowers. They are glad to see them because they know that ladybugs are very helpful.
Along time ago the farmers in California had a big problem. Some very harmful insects, called the cottony-cushion scale, were eating and killing all their orange trees. They found out that the bug had been brought over from Australia by mistake on some ships. The insects weren't so bad in Australia because Australia had ladybugs that ate the cottony-cushion scale. These farmers knew that they needed the Australian ladybugs to help them save their trees. So 500 ladybugs were sent to California. When they arrived they started eating the cottony-cushion scale and within two years the trees were saved. Yes, those ladybugs were very helpful. The trees were no longer dying.
This story reminds me of another story. A long time ago someone was sent to save a world that was lost and dying. This person cared about people very much. He helped people every where he went. He healed people who were sick and he helped them when they were in need. He was very gentle and loving to every one. As a matter of fact, he loved people so much that gave up his life for them. Do you know who I am talking about? Yes, I am talking about Jesus.
Have you every held a ladybug? They don't bite do they? Jesus wants us to be like the ladybug. He wants us to be like him. He wants us to be good friends to people, to be gentle, kind, and helpful just like he was. What are some ways that you can be helpful and kind? Let the children come up with as many ideas as they can.
(Older children ) Have older children look up the following verses and tell the class how they can be a friend by following the advice of the following verses: Galatians 5:22, Ephesians 4:29, 1 Corinthians 13:4-7, Proverbs 12:18, Leviticus 19:18
Jesus doesn't like to see you fighting and being mean to each other. He gets very sad when he sees you doing things that aren't nice. It makes Jesus very happy when he sees you helping others and being like the ladybug. Let's try to be ladybug friends today.
Today we are going to make a ladybug to remind us to always be helpful and kind. And next time you see a ladybug in your garden or on a plant you can remember to be helpful like Jesus.
© 2000, Digital by Design, Inc. - See Copyright Information
Prayer
Father, we thank you for sending Jesus to show us how to be helpful and kind. Help us always to remember to be a good friend. Amen
Crafts and Activities
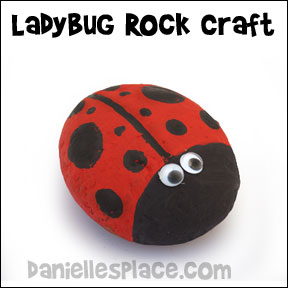
1. Make Ladybug Rocks
What you will need:
Smooth Beetle Bug-shaped Rocks (we got ours from a landscaping company)
Red and Black Acrylic Paint (Patio Paint if you are using them outside)
Chenille Stems for Antennas (Optional)
Wiggle Eyes (any size you want to use),
Clear Spray Paint - if you are going to use them outside (Optional)
How to make the Ladybug Rock Craft:
1. Wash the rocks removing all dirt particles let dry.
2. Paint and let dry.
3. When completely dry spray with a clear spray paint if you are going to use them outside.
4. Glue on Chenille antennas and eyes.
Also try making other insects, spiders, and bugs using the same techniques.
© 2004, Digital by Design, Inc. - See Copyright Information
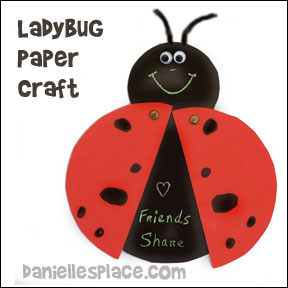
2. Ladybugs with Movable Wings Craft for Kids
If you are planning on making a bulletin board display, have your children make two ladybugs so that they will have one to take home. As the children work, point out when you see a child helping someone. Say things like, "Amy is being a ladybug friend. She is helping Matt find some scissors. Darren is being a ladybug friend. He is sharing his glue with Mike." You can also place ladybug stickers on the children to reward them and remind them to be helpful.
What you will need:
Black and Red Poster Board
Two Paper Fasteners (the shorter ones)
Chenille Stems for Antennas (Pipe Cleaners)
What to do:
1. Use the ladybug pattern to cut wings from red poster board and the head and body from black poster board.
Member's ![]()
Free Instant Download ![]()
2. Glue the head on to the body and then line up the wings with the body so that the body is completely covered. Punch holes where indicated on the wing pattern and insert paper fasteners to connect the wings to the body.
3. Cut pipe cleaners about 6 inches long and fold in half for the antennae.
4. Write, "Help one another." Gal. 5:13 on the black part of the ladybug's body with a milky pen or on the back. Have the children decorate the ladybug's wings, glue or draw on eyes, and tape pipe cleaner antennae to the back of the ladybug's head.
Activities
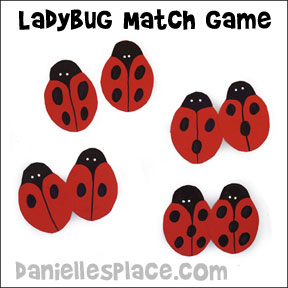
1. Play a Match Game
(Younger Children)
1. Make ladybugs form red and black poster board.
2. Draw spots on the ladybugs so that you have two cards with the same pattern on each.
3. Let the children help you match up the ones that look the same.
2. Play a Memory Verse Game
(Older Children)
1. Cut out and draw eight ladybugs from red poster board. Make one game for every 3 to 4 students you have. If you have too many players the game will go too slow and the children will lose interest.
2. Color spots on the ladybugs so they all look different.
2. On the back of each ladybug write one word of the memory verse. Turn the ladybugs over so the words can't be seen. Have the children take turns turning over the ladybugs in order to spell out the verse. Let each child turn over as many cards as he can until he gets one out of order. If the child misses, the next child takes a turn.
3. Find the Ladybugs
If it is possible for the children to leave the room for a few minutes or if you can hide the ladybugs outside. Play a game of find the ladybugs.
4. Observe Real Ladybugs and Release Them
You may be able to buy real ladybugs at your local nursery or go to www.ladybuglady.com to order some online. Children will enjoy watching them fly away. Or you can send some home with each child to release at home.
5. Play "Fly In and Out of the Window Little Ladybug"
Have the children stand in a circle holding hands. Pick a child, or more than one child if you have a lot of children, to be the ladybug. Keep singing the following song over and over until the "ladybug or ladybugs" find their way back to their place by weaving in and out of the children's arms around the circle.
"Fly in and out the window, fly in and out the window, fly in
and out the window little ladybugs."
(Sent in by Nancy Foss)
6. Print out and Read "Vedalia, The Helpful Ladybug" Book
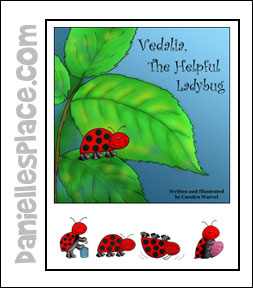
"Vedalia, The Helpful Ladybug" is a children's story based on this real life event. Vedalia, a clumsy little ladybug, wants more than anything to follow God's teaching and to be helpful, but she never seems to get things right no matter how hard she tries. One day she discovers a newspaper article that tells about the problem in California. She realizes that she can help the farmers. She and her family become one of the over 500 ladybugs that are sent to California to help save the farmers' trees.
Member's ![]()
7. Make and Read 'I Can Help" Itty Bitty Book
Eight page printable itty bitty book. Each page tell a different way children can be helpful.
I Can Help
I can help take care of my pets.
I can help clean up.
I can help by making a card for someone who is sick.
I can dress myself.
I can go visit people who are lonely.
I can draw a picture for a friend.
I can give someone flowers.
I can put my toys away
.
Member's ![]()
8. Make a Lapbook
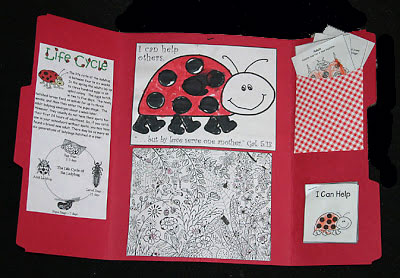
1+1+1=1 website used this lesson and the life cycle of a ladybug printout from Enchanted Learning to make this lapbook with her child.
For more pictures and a detailed list of what she used, check out the 1+1+1=1 website. This web site has a wide selection of links to free printables and ideas for other lapbooks.
© 2000, Digital by Design, Inc. - See Copyright Information
Songs
Ladybug, Ladybug
Written by Nancy Foss
Ladybug, Ladybug turn around. (Have the children turn around.)
Ladybug, Ladybug touch the ground. (Have the children touch the ground.)
Ladybug, Ladybug show your love. (Use the sign language sign for "I love you.")
Ladybug, Ladybug point to heaven above. (Point up.)
Ladybug, Ladybug stomp your feet. (Stomp your feet.)
Ladybug, Ladybug take a seat. (Children all sit down.)
A Teeny, Tiny Ladybug
Written by Nancy Foss
(Sing to the tune of "Itsy, Bitsy Spider)
A teeny, tiny ladybug crawled up my arm this way. (Walk your fingers up your arm.)
Giggle, giggle, giggle this is what I say. (Hold your belly and laugh.)
Along came the wind and blew my friend away. (Blow wind with mouth and wave your arms.)
Out came the sun and my friend is here to stay. (Make sun with your arms.)
With a giggle, giggle, giggle we'll have fun today. (Hold your belly and laugh.)
© 2000, Digital by Design, Inc. - See Copyright Information
Comments
I taught this lesson during Children's Church to our 3 - 5 year olds. I think it was a really wonderful message and the kids were able to relate well to the concept of helping one another using the ladybug craft. I made my prototype of the ladybug from construction paper glued to poster board for added strength. Spray adhesive works really well and makes your gluing jobs much faster. Children this age have trouble being "neat" with glue, so to avoid using a really thick glue to hold the ladybugs antennae and the mess, I punched two holes near the top of the ladybug and inserted the pipe cleaner from the back to front, over and through the hole on the other side to the back. The result is the same, but less mess and a very cute ladybug. The kids just loved it. Instead of sending out letters using the flower, I used it as a craft as well. Again, I glued the construction paper to poster board for the leaf pattern and small ladybug (my own hand-drawing). I used construction paper only for inside of the flower and the petal. Layering all of the above together and punching a hole in the center (using an ice pick), I inserted a paper fastener to hold it all together. I added my own pen embellishments and wrote the memory verse "Help One Another" on the back. I hope these ideas are found useful and that you enjoy this lesson as much as I did. Donna
I did the ladybug craft project with moveable wings with my 3- year-old preschool class. They loved the ladybugs. I opened the wings and placed their names on the black part with red glitter glue. They looked terrific. We all enjoyed doing this craft project. Thank you. Sharon
I teach a 2 to 6 year old Sunday school class. This week I used the "Ladybug Friends" idea for my lesson. My lesson was entitled "Helpful Friends", because we talked about several useful insects: Ladybugs, butterflies and honeybees. Before class, I hung butterflies and honey bees from the ceiling (on string) all around the room and taped ladybugs to our class table. This helped to spark my children's attention. We then discussed our helpful insect friends and how they help nature and people, concluding the lesson with how Jesus was helpful (like your lesson) and He wants us to be helpful too!! We made the ladybug craft. The kids had a little trouble putting it together, but they were very happy with the end product. We also used the ladybug card, but I modified it some. I used the pattern for the card, but I printed the different parts separately onto construction paper (leaves on green and the flower petals and the center circle on multi-colors). I used more of the scripture verse (...through love help one another.) Printing one word of the verse on each petal of the flower and the reference (Galatians 5:13) on the center circle of the flower. I use double-stick tape on most of my craft projects, instead of glue. My children really love it, and there is no cleanup. The children got to pick their flower colors, and then used double-stick tape to put them together. We then stuck bug stickers to the leaves (butterflies, ladybugs and honey bees). They enjoyed the card more than the ladybug craft, because it was a little more on their level and is more of what they are used to. All and all, the lesson and the crafts went over great!! Thank you for providing such wonderful lessons and ideas!! Theresa
I taught the "Ladybug Friends" lesson to my Sunday School Class, ages 2-6. They really enjoyed making the ladybugs and the lesson. I got several compliments on the craft from members of the congregation. Sheryl
We attend a small church and I am teaching Children's church ages 3 to 8. I have had a hard time finding lessons. I am so thrilled that I found your web site. I love the fact that the lessons and the crafts go together. I did the story about the ladybug. The kids loved it as we had been talking about being friends. We made the ladybugs with the memory verse inside her wings and I got each child a file box for them to keep the memory verse cards in. Thank you so much. You are truly a blessing. Shirley Lynch
Just wanted to say hi and what a blessing The Resource Room has been to my life and my Sunday school class. I just had to comment on the latest lesson I did. My class is really small, the most I get are 8 students, and they range from ages 2 to 6. We did the story and the children really loved and enjoyed the craft where they got to make their own ladybug. I was afraid to use the wiggly eyes because if they come lose some of the children might be tempted to put it in their mouths so I just drew eyes on with milky white pens and it was a very nice craft I did the lesson "Ladybug Friends" for children's Bible hour Sunday and it went over pretty well. The kids ranged in age from about 4 - 9 years old. The older ones may have thought it was on the young side but they seemed to enjoy making the ladybugs. Since I have kids that are too young to turn loose with the scissors, I precut out the patterns and punched the holes for the wings to make things go faster. Using the regular hole punch made holes too big for the paper fasteners and the wings flopped and wouldn't stay open so I ended up using a nut meat extractor to punch the holes. They also fastened magnets to the back so they could put them on their refrigerators at home. I also made the matching game and they had a lot of fun with that. I made a copy of the suggested bulletin board pattern, colored and cut it out and pasted it on a piece of construction paper for a visual aid. I wrote my lesson on the back of that with questions so I didn't appear to be reading from a slip of paper on the table. I got some very favorable comments from some of the parents. Yours truly, Lisa
Today was the opening day of Little Church School for 3 year olds - Kindergartners. I share the teaching of this school with three other mothers on a rotational basis. I kicked off our program with your Ladybug Friends lesson because I wanted something fun, light, yet potent. We started with the ladybug poem in your lesson, which had the kids turning around, touching the ground, etc. all smiles because of the actions and familiarity. I went through the lesson and included the ladybug logic story referenced in your lesson. The kids really loved it. I acted out the way Lori behaved to great effect. We talked about the fact that ladybugs really don't know all the good they do - they just are what they are and make such a difference. We talked about the ripple effect of a stone thrown on the water, and how that was like a smile or a good deed. This idea really sank in I think. We talked about making the world a better place to live by the way we live. I wanted the kids to get the idea of being like ladybugs and Jesus so I found a different craft to go with the lesson by searching the internet - one that they could wear. I found a ladybug crown idea at www.dltk-kids.com that I modified by using red poster board to make the 4" long strips for the hats, and two different sizes of black chenille pompoms for the spots. We used tacky glue to stick them on (dipping the pompoms in a dollop of glue which was placed on a square of tin foil - very easy clean up). For the antennae, I used pipe cleaners that had a variegated width. We curled the cleaners around pencils to make them curly, leaving space on the ends. We placed little black hearts cut out of black card stock on one end of the pipe cleaners. I had punched holes near the bottom of the hearts so that the pipe cleaners could be wrapped through the holes and twisted onto them. We pulled the pipe cleaners up to show a nice wide spiral, and they stayed up beautifully. On the bands, I had found the center and measured 5 inches on either side to mark where the holes should go. I had pre-punched them near the top of the band so we didn't use up too much pipe cleaner to wrap and twist. In the end, we wrapped the bands around the children's heads to get a good fit, and taped them closed. I wore my sample one throughout the class period. The kids are totally ready for more fun and learning. Thanks for your wonderful web site. Yours in Christ, Susan
On Sunday, we had a 'friendship' day in Sunday School. The children had all taken home invitations the week before inviting a friend to come to Sunday School the next Sunday. Your lesson on the ladybugs was such an amazing story to tell children who had possibly never been inside a church, that I just had to do it with my group of 2 to 5 year olds. We did the ladybug craft out of red and black fun foam to make it a little more special. I made all the holes ahead of time to line up the wings with the body, and for the antennae. I couldn't find black circle stickers (easier than gluing for little fingers) so I colored some round, small, file folder labels with a black permanent marker to make the spots. I used labels to print out "Jesus loves _____________" and filled in the child's name on Sunday. They stuck these in the middle of the ladybug body, under the wings. We used pipe cleaners for antennae and glued on googly eyes. We stuck a magnetic strip on the back so the kids could keep them on their fridge. The kids loved doing the craft, and they all turned out well. We played some of the games on your site and ended with a party to celebrate friends. I made mini cupcakes and iced them with red icing. My daughter piped on the outline of the ladybugs: spots, wings and eyes with brown icing. They were very simple. She drew a horizontal line across the cupcake, about 1/3 of the way down from the top, and a vertical line from that to the bottom of the cupcake to split the body. She piped two eyes, and then spots on the body. So, not only did I have a wonderful morning with my Sunday School class and a great lesson to teach, I had a great mother-daughter time with my 17-year old! Thank you so much for sharing your wonderful ideas. You are such a blessing to many. Elizabeth
Just wanted to let you know that as a new subscriber to your website, I was really encouraged by the amount of effort and creativity put in to your every lessons. "Ladybug Friends" was the first lesson that I used for my Sunday School class that ranges from 2 to 4. I did the story and was amazed that children of that age already knew what this little insect was! They made their own ladybug and I drew the face and wrote the words with a white color pencil. I must say that it was indeed a very easy and nice craft. God Bless, Jocelyn Yip (from Singapore)
I used your Ladybug Friends lesson on a relatively small class of about 6 ages from 4 to 8. I pretty much used the lesson in the Resource Room however I did make a few changes to keep the attention of the children. I started the class out asking the children if they knew what a mosquito was and a ladybug was. They did not know that in my pocket I had a jar of ladybugs. We had a little discussion of the usefulness of ladybugs and the hindrance of mosquitoes. After a brief discussion I pulled out the ladybugs and the children were in amazement, as was I to know that some children had never seen one. We passed them around after that sat in a circle and I read the story that went with the lesson. Went over very well and the children paid lots of attention. For the craft we did the ladybug.
I have viewed your site for many months before I actually became a member. Since I have joined I have used just a couple of your lessons and have found them to be so rewarding to my Pre-K children. The lessons on the ladybug and mosquitoes were terrific because the children could compare their behavior and also learn about why God makes all things. Their eyes and ears were wide open as they listened to the lesson and were excited to be helpful and kind like a ladybug. This lesson was truly fun and we were able to include it in our review of letter L & M. Thank you again and I look forward to many more lessons like this. Darlene
I just taught this lesson to my preschool class. They really love ladybugs anyway! We read the story of "The Grouchy Ladybug" by Eric Carle. Comparing the two ladybugs in the story, the one who is always sweet and nice and ready to share, and the one the story is about who tries to start a fight with everyone she meets, then ends up back where she started and shares the aphids with the nice ladybug again. They love the pictures and the story, and I felt it tied into the lesson very well! Thanks again, Nancy Hart
I used some of the ladybug ideas with a group of 3-year-olds while their older siblings were in Pathfinder Camp. We were out in a field on a lovely sunny morning. I made ladybug memory verse cards for them to take home and use with their parents. We also played the Ladybug matching game which was very well received. They enjoyed sorting out the pairs. We made ladybug cards and stuck a small wooden ladybug on each one. I asked for one positive comment about each child and wrote this on their card. I was pleased that the children had no trouble finding something nice to say about everyone. Finally we made ladybugs which the children loved; especially as the wings opened and they could run around pretending they were flying.
I have been using your lessons for several months now and find that they are very helpful in teaching my 3 - 5 year olds on Sunday. We have been working on the ABC lessons for several weeks; and I am always impressed with the amount of materials that I can choose from. My kids have especially liked the "L" lesson. The ladybugs have made the children think about the kind of person they want to be for the Lord. They keep telling me they want to be like ladybugs and be kind and helpful to others. Thanks and may God continue to bless you and yours. Kathie
We did the lady bird theme in our Sunday School, ages range from 4 to 11.The kids loved this lesson. We made a poster board with lady birds velcroed on. Each lady bird had one word to the memory verse. We played a game where all the lady birds were mixed up (so the memory verse was all over the place) and the kids had to put the lady birds in order. The kids loved this game and wanted to play it over and over again, which was great because they certainly knew the verse by the end of the lesson. Thanks for all of these resources it has made Sunday School so much easier to prepare. Regards, Michelle
 I used this lesson and printed out the Itty Bitty books, but I cut all the pages apart and punched holes in them and put a metal ring through the holes to bind them.
This makes it easier for the kids to turn the pages.
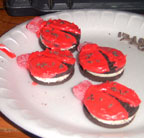
I also took oreos and made ladybugs by putting red frosting on them and using candy for the head. Kay
I used this lesson and printed out the Itty Bitty books, but I cut all the pages apart and punched holes in them and put a metal ring through the holes to bind them.
This makes it easier for the kids to turn the pages.
I also took oreos and made ladybugs by putting red frosting on them and using candy for the head. Kay
I noticed that in all the comments from others that no one did the craft where you make the ladybugs out of the plaster of Paris and a plastic spoon to make a refrigerator magnet. I loved this craft and it was so easy to do. I thought it would be time consuming but much to my surprise it wasn't. We colored them with markers instead of painting them (less mess). And they turned out darling. I would suggest this to anyone who does this lesson. With the craft with the moveable wings instead of using a gel pen to write with I used a white crayon or a paint pen and I used construction paper and laminated it for durability. Thanks, Courtney
I am an alternate for a Wednesday night class at our church. The ages of children range from 2 years to sometimes 3rd grade. It is very difficult to find activities for such a wide range of ages. I recently did a teaching on Lady Bugs and how we can be helpful also just like the lady bugs are. I printed out the story of Vedalia the Helpful Lady Bug and the children made the lady bug craft from poster board. We put on wiggly eyes and pipe cleaner antennas. I read the story and we discussed how the lady bugs helped with the fruit trees and also ways we could be helpful in all situations. The children really came up with some really good answers and we had a very long discussion on being helpful. Sometimes I put the older children with a younger one to be helpful and that always works out well.
Again that you for your wonderful site. I use it often and anything I use, it always adds to my original plans and makes everything even better. I am so blessed that I found your site. Keep up the good work and may God Bless. Vicki, IN
For more Sample Sunday school lessons go to the Sample Sunday School Lessons Page.
For free Sunday school lessons go to the Free Sunday School Lessons for Children Page.