Cat and Kitten Crafts for Kids
How to Make Cat and Kitten Crafts for Kids
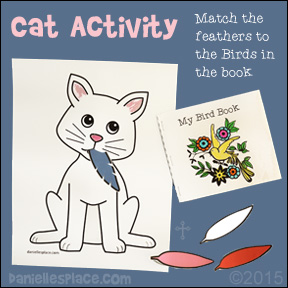
Cat and Bird Coloring Activity and Printable Book
Use this activity with the children's book "Feathers for Lunch" by Lois Ehlert.
What you will need:
Card Stock (Heavy Paper)
Printer Paper
Colored Pencils, Markers, or Crayons
Scissors
Stapler
Activities:
Member's ![]()
1. Before class print out the cat printable and make copies onto card stock. Cut a slit in the cat's mouth so feathers can be placed in the mouth. Print out the feather patterns and cut them out.
2. Print out the "My Bird Book" pages. Fold them in half lengthwise so that the pictures are on the out side. (The fold creates envelopes behind each bird picture.) The sides will not match up evenly (See below). Fold the page in half again so that the pictures are still on the out side. Place the pages together so that the unfolded edges are the binding side of the book. Cut out the cover pattern and fold it in half. Place the cover over the book so that the the fold is up against the unfolded edge of the book. Staple the pages and cover together.
3. After reading the book "Feathers for Lunch" by Lois Ehlert give your children the cat printout and Bird book. Let them color the cat picture and the cover of the book.
4. Give your children each a set of feathers. Ask them what bird the feather might belong to. For example, the pink feather belongs to a pink flamingo. Once they have guessed what bird it pink let them look through their books to find a pink bird. Once they find the flamingo, let them place the feather in envelope behind the picture of the flamingo.
My Bird Book
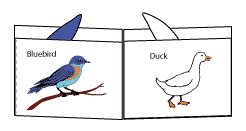
This book contains eight different birds each with different colors of feathers.
Children match the feather to the bird, and place the feather in the envelope behind the bird.
They can also use the envelopes to store more feathers, or to place descriptions of the birds.
©2015, Digital by Design, Inc. - See Copyright Information
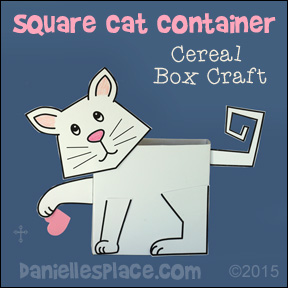
Square Cat Box Container Craft
What you will need:
14.5 oz. Cereal Box
White Card Stock
Scissors
Colored Pencil or Crayons
Paper Glue (Elmer's Rubber Cement)
Low Temperature Glue Gun and Glue
Heart Shape
How to Make the Square Cat Box Container:
1. Cut the bottom off of the cereal box to make it square.
2. Cover the box with paper using Elmer's Rubber Cement.
3. Print out the patterns and glue them to the box, or draw the arms and legs on the box. Draw the head, arm, and tail on a separate piece of card stock.
Member's ![]()
4. Fold back the edges of the arm and tail and glue them to the sides of the box.
If you use this box as a Valentine's Day card box, glue a heart to the cat's hand.
Use this craft with the book "Square Cat" by Elizabeth Schoonmaker. Children will absolutely love this book! It addresses the serious matter of fitting in in such a silly way that children will not be able to help but laugh at their own fears of not measuring up. Eula, the square cat, is sad because she is not like anyone else. Eula's friends teach her to look at the positive instead of the negative.
©2015, Digital by Design, Inc. - See Copyright Information
Sitting Cat - Paper Plate Craft for Kids
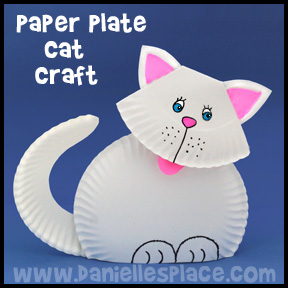
What you will need:
Four Regular-sized Paper Plates for Each Kitty
Tacky Glue
Magic Markers
Pink Paper
Scissors
How to Make the Paper Plate Cat Craft:
1. To make the body cut about two inches off the sides of two paper plates. Glue the paper plates together top to top.
2. To make the head of the kitty fold another paper plate in half. Measure 3.5" from each side of the fold and fold down and then back both sides at an angle.
3. Unfold the paper plate and cut about 1/4" away from the side folds (see diagram below). Use the cut out triangles to cut ear shapes.
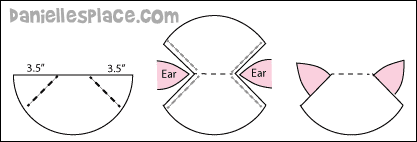
4. Fold the paper plate in half again. Fold in the cut edges on the pre-folded lines. Glue the ears onto the inside of the folded paper plate at the fold, and then glue the edges together.
5. Glue the head onto the body paper plate.
6. Cut a tail shape from the edge of another paper plate and glue it to the body.
7. To finish draw paws at the bottom of the body, and draw in the face. You can also draw on whiskers.
©2013, Digital by Design, Inc. - See Copyright Information - If you use this craft please do not put it up on Pinterest without giving Danielle's Place credit for the craft.
Great Children's Books About Cats
There Are Cats in This Book - This is such a fun book! Children actually interact with the cats in this book. They help them get to the yarn on the next page, throw yarn in a yarn ball fight, look for cats hidden in boxes, have a pillow fight, rescue them from a tidal wave, and blow their hair dry so they look like fluff balls.
The Cat and the Bird: A Children's Book Inspired by Paul Klee - "The Cat and the Bird" is a colorful story about a bird that frees a cat from a cage inspired by artist Paul Klee's "Cat and Bird" painting. This book also contains information about Klee and a copy of his famous painting.
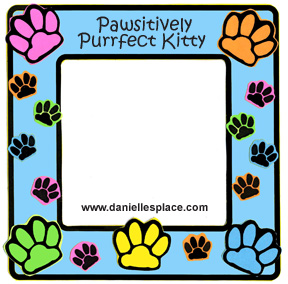
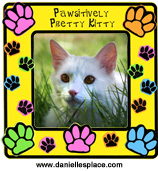
"Pawsitively Pretty Kitty" and "Pawsitively Purrfect Kitty" Paw Print Frame
What you will need:
Different Colors of Card Stock (Heavy Paper)
Scissors
Elmer's No-wrinkle Rubber Cement
Magnets
Pawsitively Pretty Pattern
Pawsitively Purrfect Kitty Pattern
Paw Print Pattern
How to Make the Pawsitively Pretty Kitty Frame:
Member's ![]()
Instant Digital Download - ![]()
1. Print out the frame pattern onto card stock and cut it out.
2. Print out the paw print patterns onto different colors of paper.
3. Glue the paw prints onto the frame and then tape a picture of your kitty onto the back of the frame.
4. Glue small magnets to the back of the frame so you can hang the picture on your refrigerator.
5. If you don't want to use magnets, you can glue a string to the frame so you can hang the picture.
©2012, Digital by Design, Inc. - See Copyright Information - If you use this craft please do not put it up on Pinterest without giving Danielle's Place credit for the craft.
Paw Print Patterns
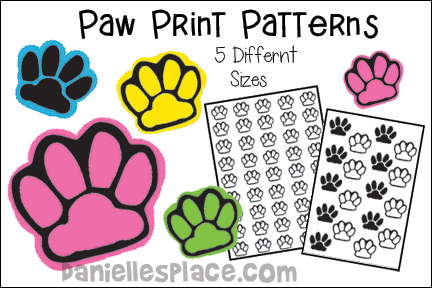
The paw print patterns are available to members and as a digital download. This download includes eight pages of both blank paw prints and white paw prints. Print them on colored paper to make different colored paw prints. Included:
One page 3/4" black paw prints
One page 3/4" white paw print
One page of 1 1/2" black paw prints
One page of 1 1/2" white paw prints
One page of 1 1/2" both black and white paw prints
One page of 2 1/2" white paw prints
One page of 3 3/4" white paw prints
One page of 5 1/2" white paw prints
Members 
Instant Digital Download - 
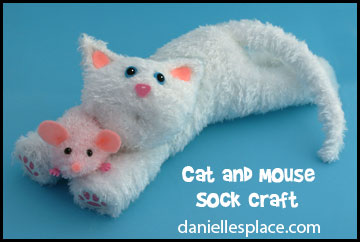
Sock Cat and Mouse Craft for Kids
What you will need:
Two 100% Polyester Adult Socks (these socks are very stretchy)
Pink Felt for the Ears
Pink Craft Foam for the Nose
Small Eyes
Low Temp Glue Gun
Polyester Fiberfill
Pink Acrylic Paint
White Craft Foam for the Feet
Sewing Machine or Thread and Needle
Scissors
How to Make Sock Cat and Mouse Craft:
1. Cut the toe off one sock about 4 1/2" from the end to make the head. Stuff the head with fiberfill. Close the head by gluing the middle of the cut end together. Don't worry about frayed ends. This type of sock does not fray and the glue will keep it from fraying if any. Pull up on the two sides that are not glued to form the ears. Then stick some glue inside on of the ear shapes and press the material together while pulling up on the material to form the ears. Wait until the glue dries before releasing. See the picture above. Then glue the other ear the same way.
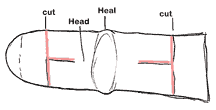
2. To make the body lay another sock flat so that the heal of the sock is on top. Cut the toe off about 5" from the center of the heal. Cut a slit about 3" up the center of that cut end to make the front legs. Cut the cuff end of the sock off about 4" from the center of the heal and cut a slit about 2" to make the back legs. See the diagram below.
3. Turn the sock inside out and sew the inside leg seams leaving the ends of the legs open. Turn the sock right-side out through one of the leg openings. The material is very stretchy and this is very easy to do.
4. Fill the legs and the body with poly-fil. Cut paw shapes from the craft foam and paint on the paw prints with pink acrylic paint. When the paint is dry glue the paws onto the ends of the legs as shown in the picture above.
5. Glue the head to the body as shown in the diagram using a low temp glue gun.
6. Cut the inside of the ears from pink felt and glue them to inside of the ears.
7. To make the eye sockets insert a threaded needle into the place where you want one eye and then bring it back out where you want the other. Pull the thread to make a slight indent and tie it. Glue the eyes to the indents.
8. You can also make an indent for the mouth by inserting a threaded needle where you want the mouth and pushing it through the head to the back of the head. Pull the thread tight to make an indent and then tie it off.
9. Cut a tail from the fold of a left over sock piece at little bigger than you want it. Sew the side of the tail that is not folded and then turn it inside out. The material is very stretchy and is easy to turn inside out even though the tail is very thin. Glue the tail to the body.
Mouse
Stretchy Sock, Pink Felt for the Nose an Ears, Pink Craft Foam for the Feet.
1. Cut off the toe of a sock making one side thinner than the other. The thinner side is the nose. Turn the piece inside out and sew the toe of the sock closed leaving one-half inch open at the nose. Turn it right side out through the hole. Stuff with fiber-fil and then use a glue gun to close the hole.
2. Cut a nose, ears, and tail from the pink felt and glue them to the body.
3. Cut tiny feet from the craft foam and glue them to the body also. To finish glue on tiny black eyes.
©2009, Digital by Design, Inc. - See Copyright Information - If you use this craft please do not put it up on Pinterest without giving Danielle's Place credit for the craft.
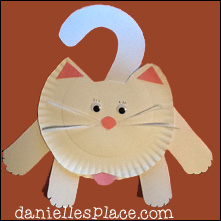
Hanging Around Paper Plate Cat for Kids

What you will need:
Four Dinner-size Paper Plates
Card Stock (heavy paper)
Pink Paper or Pink Crayon or Marker
Glue
How to Make Hanging Around Paper Plate Cat:
1. Print out the patterns for the eyes, nose, tongue, and front legs and the tail and back legs pattern to card stock and cut them out.
Member's ![]()
Free Instant Download ![]()
2. Print out the cat head pattern and use it as a template to cut the shape from two paper plates. Trace the pattern onto the top of one paper plate and the bottom of another. Glue the two paper plates together (top to top) to make the face. You should have a small opening for the mouth.
3. Cut the tongue and nose from pink paper or color them pink and glue them to the face. Draw in the whiskers. Cut out the eyes and glue them on the face or draw the eyes with a marker.
4. Glue two paper plates together (top to top) to make the body. Glue the head to the body as shown. Glue on the legs, arms, and tail.
©2007, Digital by Design, Inc. - See Copyright Information - If you use this craft please do not put it up on Pinterest without giving Danielle's Place credit for the craft.
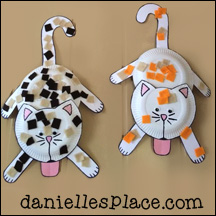
Hanging Cat Crafts Made by Followers
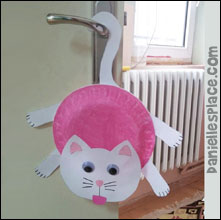
Pink Cat Hanging from Door Knob from - https://okuloncesiogretimi.com/
Three Little Kittens Preschool Craft and Matching Game
Three Little Kittens have lost their mittens. Can you help them find the matching mitten?
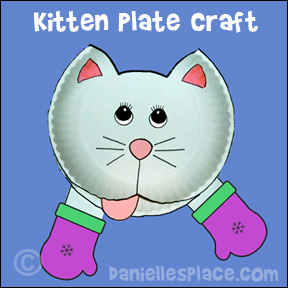
What you will need:
Two Paper Plates
Card Stock (Thick Paper)
Glue and Scissors
How to Make Three Little Kittens Preschool Craft and Matching Game:
1. Print out the eyes, nose, arms and tongue pattern and cut them out. Color the nose and tongue pink.
2. Print out the cat face pattern and use it as a template to cut a paper plate to make the cats face. Use the pattern to cut just the ear shapes out of another paper plate for the back of the head. Glue the two paper plates together (top to top) to make the face.

3. Print out the mitten patterns onto colorful paper. You can make more sets of matching mittens by using different colors for the same patterns.
Member's ![]()
Free Instant Download ![]()
4. Glue on the nose and eyes. Draw in the whiskers with a black marker. Color in the ears. Glue the arms on the back of the head as shown in the picture.
5. Cut a slit in the paper plate used for the back of the head 2 1/2" long and 1/4" wide. Slip the tongue down through the hole so that it sticks out of the mouth.
6. Read your children the poem about the three little kittens that lost their mittens. (You can find it on Enchanted Learning.) Then play a mitten matching game. Place all the mittens on the floor or table spread out in front of your children. Let them take turns finding matching mittens and gluing a set their kitten.
Extensions - You can also use this activity to reinforce other learning skills by using the blank mitten patterns.
1. Matching Numbers - Make pairs of mittens with matching numbers.
2. Matching Letters - Make pairs of mittens with matching letters or use the upper and lower case of each letter.
3. Match by Texture - This is a great activity for vision-impaired children - Cut mitten shapes from different types of material. Have your children match the mitten by texture.
4. Letter Sounds - Print out small pictures of different items and place a piece of tape on the back of each one. Using pictures from your child's worksheets works great. Tell your child that the kitty is very hungry but she only wants to eat things that start with the "a" sound. (Move the kitty's tongue back and forth.) Ask your child if he or she can find a picture of something that starts with that sound and place it on the kitty's tongue. If the child is correct, the kitty will eat it. (Pull up the tongue so it looks like the kitty is eating it. And pull it all the way out and remove the picture. Then place the tongue back in it's mouth. If the child picked a picture that does not match that letter sound, just move the tongue back and forth and tell your child that the kitty does not like that one because it doesn't start with that sound, and he should try again. (You can also play this game using ending sounds and long or short vowel sounds.)
5. Writing Numbers or Letters - Give your child a pad of small sticky notes. Tell him that the kitty is hungry for a certain letter or number. He should write the letter or number on the sticky note and feed it to the kitty. If he is correct, the kitty eats it. If not, he must try again.
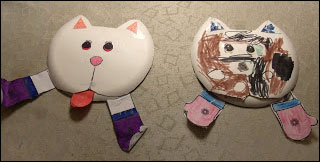
Kittens Wearing Mittens Matching Game Made by Followers:
©2007, Digital by Design, Inc. - See Copyright Information - If you use this craft please do not put it up on Pinterest without giving Danielle's Place credit for the craft.
3D Paper Cat Craft for Kids
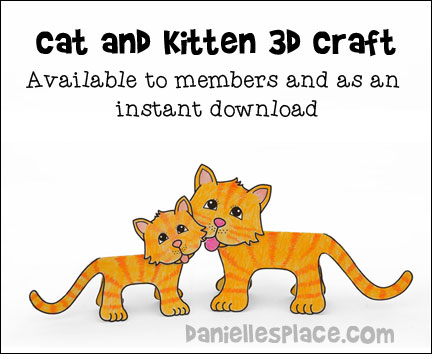
What you will need:
Cardstock (Heavy paper), Colored Pencils, Tape and Scissors
How to Make the 3D Paper Craft:
1. Print out the patterns and color the heads and body. (A printable pattern for this craft is available to members.)
2. The head pattern comes with an extra set of heads to glue to the back of the folded cat bodies.
2. Cut the patterns out. Fold the body pattern in half and tape a head on both sides of the body matching up the heads.
Members
Instant Digital Download -
©2004, Digital by Design, Inc. - See Copyright Information