Creation Crafts for Sunday School
Creation Crafts for Day 3 of Creation
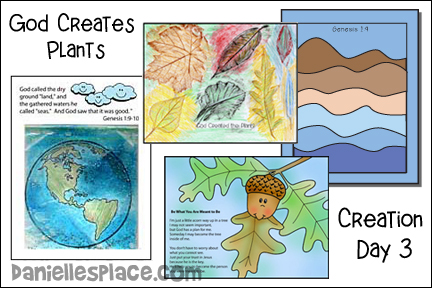
The following ideas come from the lesson God Made the Earth and Seas and God Made the Plants Bible Lessons on The Resource Room.
Member's Bible ![]()
Genesis 1:9-10 - Land and Sea Layered Bible Verse Review Craft and Activity
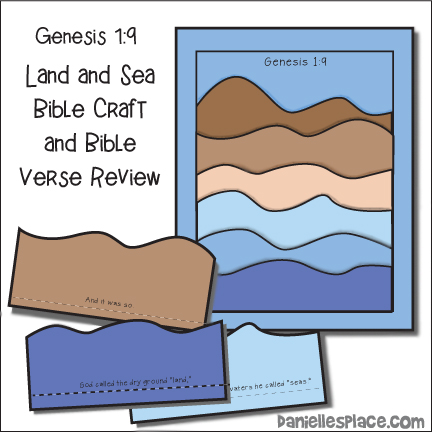
Each piece of this layered picture contains a part of the Bible verse. Children glue the pieces in order of the Bible verse to make the sea and land picture. They can use the picture to review the Bible verse by folding down the piece to reveal parts of the verse.
Member's ![]()
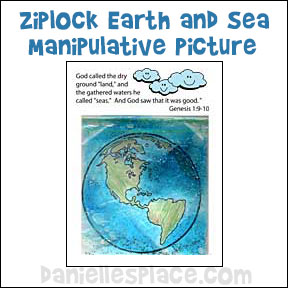
Make a "3D Sea and Land Picture" with Water that Separates from the Land
This is a great craft for young children. They will love pressing their fingers on the Ziplock bag to "separate the water from the earth".
What you will need:
Heavy-duty Ziplock Bags
Blue Dish Soap, or Clear Soap with Blue Dye
Stapler
Paper
Crayons, Colored Pencils, or Markers
How to Make the Ziplock Bag Picture:
1. Before class print out a picture of the earth and write the Bible verse on the top.
Member's ![]()
2. In class have your children color the picture of the earth, and then put hand soap, glitter, and food coloring into a storage bag and staple it over the picture of the earth.
©2005, Digital by Design, Inc. -*See Copyright Information
Globe or Map Game for Creation- Day 3

What you will need:
Globe or Large Map
How to Play:
1. Before class make a list of places, continents, oceans, etc. that you will use for the game.
2. Break your children up into teams of two, and take turns asking the teams to find something on the map or globe.
3. The team that accomplishes the task in the shortest amount of time wins.
Also have your children find things on the globe or map such as: where they live, where they went on vacation, etc.
©2005, Digital by Design, Inc. -*See Copyright Information
Play a Review Game with a Die

1. Before class print out the die (or make one) onto card stock.
Member's ![]()
2. Cut it out the die and glue it together.
3. In class have your children sit in a circle and take turns throwing the die. The child who throws the die should say what the picture that is facing up represents and on what day it was created.
If the child gets it right, he gets the designated points (see below.) The child with the most points wins. If you have very young children, don't keep score.
White - Light - Day 1 - 1 Point
Blue - Sky - Day 2 - 2 Points
Water - Seas - Day 3 - 3 Points
Say the Bible Verse - 3 Points
Name one animal that lives on land - 3 Points
Landscape Picture - Ground - Day 3 - 3 Points
©2005, Digital by Design, Inc. -*See Copyright Information
I just wanted to let you know how much I use this site. I am on it at least once a day trying to get new ideas!!! My Husband and I are missionaries in Ontario Canada. And as a Missionary, recourses are usually limited. I thank God for all of the hard work you put into this site, I now have Sunday school resources at my disposal for merely pennies!!!!! I love to search your site daily because I always find something there that I have not seen before!!!!! Thank you so much and may God bless all of your efforts Living to serve HIM, Barb
Play a Globe Game

What you will need: Globe or Large Map
How to Play: Remind your children that the oceans are very important to us, and that they cover about two-thirds of the earth. Have your children line up in a row behind a globe. Blindfold a child and spin the globe. Have the child place his or her finger on the globe. When the child has picked a place on the globe remove his blindfold and show him where his finger landed. If it landed on dry land, he gets a snack. If it landed on water, he has to go to the back of the line and try again. Keep playing until all the children have a snack.
©2005, Digital by Design, Inc. -*See Copyright Information
Make a Place Mat Using Contact Paper
Have the children drop pieces of grass, flowers, etc. onto the contact paper. When they are done, put a piece of paper on top that says "God created the flowers, trees, and grass" and then place another piece of contact paper on top.
©2005, Digital by Design, Inc. -*See Copyright Information
Paper Plate Flower Wreath Craft

What you will need:
Large Paper Plates
Scissors
Bright Colored Paper
Silk Flowers (You can buy silk flowers at second-hand stores. Pull the flower off the stems and get rid of any plastic parts.)
Glue
Buttons or Beads
How to Make the Paper Plate Wreath Craft:
1. Before class cut the center out of the paper plates.
2. Print out a flower pattern and write the words "God created the Plants" onto bright colored paper and cut them out. If you don't have silk flowers you can use the paper flower pattern to cut more flower shapes from different colors of paper.
Member's ![]()
3. In class have your children glue silk flowers (or paper flowers) and a "God Created the Plants" paper flower on the paper plate ring. They can add buttons or beads to the flowers to make the wreath more interesting.
Make a Pipe Cleaner and Foam Ball Flower
Fill a tiny clay pot with old play dough. Insert a green pipe cleaner with a foam ball at the end. Have the children add 1" pipe cleaner pieces to the ball to make flowers. The children loved this craft and wanted to make more than one. It is fairly inexpensive. I found 12 tiny clay pots for $2.00 at Wal-Mart. To make it even cheaper, use communion cups.
©2005, Digital by Design, Inc. -*See Copyright Information
Show Pictures of Flowers
Bring in a coffee table book about flowers or trees. Show the children all the beautiful flowers. Have them guess the names and tell them interesting facts about the flowers. If you don't know much about flowers jot down some notes ahead of time. You can ask them how they think a certain flower got it's name. For example, Fireweeds got their name because they are one of the first flowers to bloom after a fire or Elephant Flowers are called Elephant Flowers because they have a petal that looks like a trunk, etc. Emphasize how God created so many different and beautiful flowers for us to enjoy.
©2005, Digital by Design, Inc. -*See Copyright Information
Play a Flower or Tree Identification Game
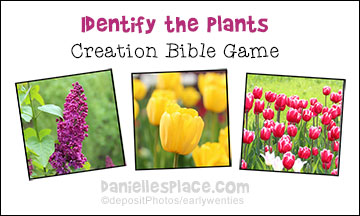
1. Before class cut out at least five pictures of flowers or trees.
2. Glue each picture onto a separate piece of construction paper.
3. In class tell your students that you are going to play an identification game so they need to listen closely to the names of the flowers. Show them one picture at a time, tell them the name of the flower and have them repeat it, and then tell them some interesting facts about the flower that will help them remember the name. For example, you could show them a picture of a Lady's Slipper and point out how it looks like a shaped like slipper.
4. When you have gone through all the pictures hold up one picture at a time and see if the children can remember the name or facts about the flower.
©2005, Digital by Design, Inc. -*See Copyright Information
Identify Seeds Game for Sunday School

What you will need:
Different Kinds of Seeds from Fruits and Vegetables You Eat
Dried Beans or Seeds Collected from Your Garden
How to Play:
1. Place the seeds on the table and see how many of the seeds the children can identify.
2. You can also bring in leaves from different plants and see how many they can identify.
©2005, Digital by Design, Inc. -*See Copyright Information
Just last week I subscribed to your site and I gave my first Sunday school lesson this past Sunday. We did the "God sends Rain" topic and thanks to your site my first class was an overwhelming success. The other teachers and parents were very impressed. I can tell the kids are excited about having a new and fun way to learn about God. Thanks, Cindy
Look at Pictures of Plants
Bring in pictures of trees and plants from the library. Ask the children if they know the names of the plants. Find out interesting things about the plants (like how long they live, how high they grow, how they got their name, etc.) and share them with your children. Comment about how amazing the plants are, and that only God could create something so amazing.
©2005, Digital by Design, Inc. -*See Copyright Information
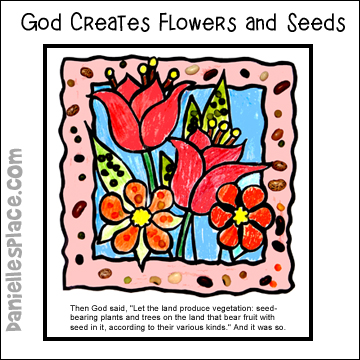
Make a Creation Picture of Flowers and Seeds
What you will need:
Paper, Seeds and Glue
How to Make the Flower Picture with Seed Frame Craft:
1. Before class print out a flower pictures with a frame.
Member's ![]()
2. Collect different types of seeds. You can use a package of mixed, dried beans, or unpopped popcorn, sunflower seeds, pumpkin seeds, grass seed, seeds from flowers you have in your garden or from fruits and vegetables you eat that week.
3. In class have your children color the picture and then glue seeds onto the picture to finish.
(Do not use seeds with children under 3 years old.)
©2005, Digital by Design, Inc. -*See Copyright Information
Decorate a Frame for a Creation Picture

What you will need:
Card Stock or Construction Paper
Seeds Such as Dried Beans, Pumpkins and Apples etc.
White Paper
White Glue
How to Make the Picture Frame:
1. Before class cut frame shapes from construction paper or card stock.
2. Print out the Bible verses onto white paper and cut them out.
3. Collect seeds from fruits and vegetables or use dried beans.
4. Print out a picture that includes the ocean and some land.
Member's ![]()
5. In class have your children glue the Bible verse and seeds to the frame. Glue the picture to the back of the frame.
(Do not use seeds with children under 3 years old.)
©2005, Digital by Design, Inc. -*See Copyright Information
Make a Sunflower and Seeds Picture
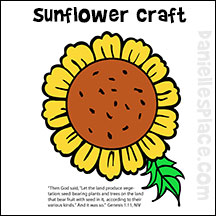
What you will need:
Paper
Sunflower Seeds
Glue
Crayons, Colored Paper, or Markers
How to Make the Sunflower Craft:
1. Before class print out a picture of a sunflower and write the verse at the bottom of the picture.
Member's ![]()
2. In class have your children color the picture and glue sunflower seeds to the middle of the flower.
(Do not use seeds with children under 3 years old.)
©2005, Digital by Design, Inc. -*See Copyright Information
Make a "Designed by God" Picture
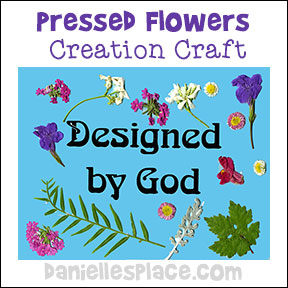
What you will need:
Pressed Flowers
Card Stock
White Glue
How to Make the Pressed Flower Craft:
1. About a week before class collect a bunch of flowers and leaves. Press them between the pages of a book and waxed paper.
2. Print out copies of the "Designed by God" page onto blue paper.
Member's ![]()
3. In class have your children glue the flowers to the page. If you have very young children, you can use flower stickers instead.
©2005, Digital by Design, Inc. -*See Copyright Information
Play a Guessing Game
Bring in some different fruits that have big seeds like apples, oranges, cucumbers, etc. Ask the children to guess how many seeds are inside the fruit. Cut the fruit open and take out the seeds and count them. Cut up the fruit so the children can eat it.
©2005, Digital by Design, Inc. -*See Copyright Information
Play a Review Game with a Die
Before class print out the die onto card stock, cut it out and glue it together. Give each child a sunflower picture and some crayons. Have them sit in a circle and take turns throwing the die.
The child who throws the die should say what the picture that is facing up represents and on what day it was created. If the child gets it right, he gets to color in that many petals on his sunflower picture.
The child who colors in all the petals first wins.
Member's ![]()
White - Light - Day 1 - 1 Petal
Blue - Sky - Day 2 - 2 Petals
Water - Seas - Day 3 - 3 Petals
Trees - Day 3 - 3 Petals
Flowers - Day 3 - 3 Petals
Landscape Picture - Ground - Day 3 - 3 Petals
©2005, Digital by Design, Inc. -*See Copyright Information
I had to let you know how much I am really enjoying the bible lessons. I have been teaching Sunday school for 11 years and have never enjoyed or even gotten so excited to provide the lesson to the kids. I teach preschool/Kindergarten and the kids and I both have enjoyed the lessons so much. Whenever someone asks me where I get the ideas for the lessons I tell them exactly where. The lessons are just the right level for them. Not boring like my lessons had been. I just love it! The lesson is right there and the craft and the color page. Jeanie Wilson
Seeds
A week or two before class place some lima beans in a plastic bag with a paper towel and some water and place them in a dark place. Do this everyday of the week. On Sunday bring in the seeds and have the children place them in order according to which was planted first. Have the children draw the different stages of the plant growing starting with a dry bean through the time the leaves are forming. Talk about the different parts of the seed. Or soak lima bean seeds in small amount of water and a paper towel a couple of days before class. Bring the seeds to class and have the children open the seed and draw what they see inside.
©2005, Digital by Design, Inc. -*See Copyright Information
Make a Leaf Rubbing Collage
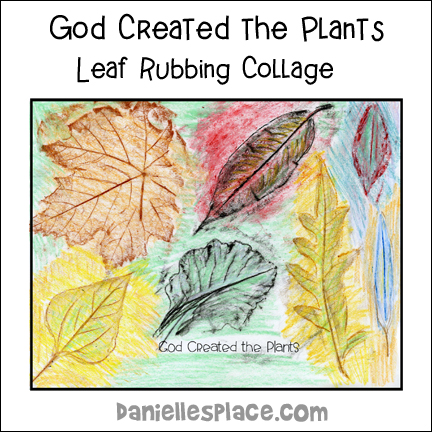
1. Before class collect different types of leaves and press them between wax paper and pages of a book.
2. In class have the children place the leaves under a piece of paper and use a crayon to rub over the leaves.
3. When they are finished have them paint over the rubbings with watercolor paints. When the picture is completely dry write, "God created the plants." on the paper.
©2005, Digital by Design, Inc. -*See Copyright Information
Make a Bulletin Board Display
Bring in books about plants. Have each child pick a plant they would like to learn more about. Have the child read about the plant and write some things they learned about it and also draw a picture of the plant. Have the children share what they have learned in class and then staple their pictures on a bulletin board with the word, "God created the Plants" at the top of the board. If you don't have much time, you can just have the children draw a plant from memory or you can have them look at plant pictures and draw what they see.
©2005, Digital by Design, Inc. -*See Copyright Information
Make a Book
Have each child draw a picture of their favorite plant and then read about their plant and write what they have learned about the plant on the bottom of the page. If you have older children, they may enjoy making a book for younger children to read. Have them start each page with the same words like, "God made . . ." Pick some children to read the book to the younger children in your church or give it to a teacher who teaches the younger children to read to her class.
If you are using this lesson to teach beginning readers, have each child make a page to the book using the same words, "God made . . ." and then help them to spell the kind of plant they drew. Staple all the pages together and have the children help you read the book altogether.
©2005, Digital by Design, Inc. -*See Copyright Information
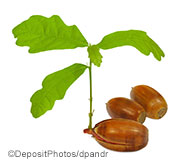
Read God's Oak Tree by Allia Zobel Nolan

This beautifully illustrated Book is a great way to teach your children about God's Plan for the whole world. It tells the story about how God planned for a tiny acorn to become a mighty oak tree and produce more or its kind.
As you turn the pages the acorn gradually disappears and a tree appears.
©2005, Digital by Design, Inc. -*See Copyright Information
Color a Picture of an Acorn with a Poem
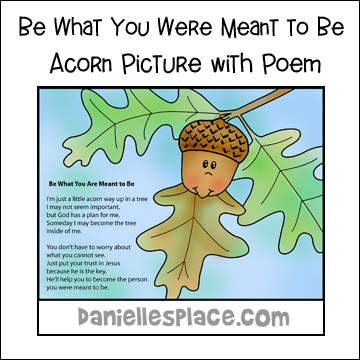
Before class print out copies of the following poem.
Be What You Were Meant to Be
Written by Carolyn Warvel
I'm just a little acorn way up in a tree
I may not seem important,
but God has a plan for me.
Someday I may become the tree inside of me.
You don't have to worry about what you cannot see.
Just put your trust in Jesus because he is the key.
He'll help you to become the person you were meant to be.
©2007, Digital by Design, Inc. -*See Copyright Information
Leave room on the paper for your children to draw a picture of an acorn. In class have your children draw a picture of an acorn to go along with the poem. You can also make a frame for the picture by cutting off the sides and gluing the picture to a piece of construction paper. Have your child glue fun foam leaf shapes all around the edge.
Member's ![]()
Plant an Acorn or Other Seeds
Have your children plant acorns or other seeds in a paper cup with potting soil. Decorate the cup with stickers and the Bible verse.
©2005, Digital by Design, Inc. -*See Copyright Information
Look for Seeds
Take your children on a nature walk and look for plants that are producing seeds.
A complete lesson is available on The Resource Room.
©2005, Digital by Design, Inc. -*See Copyright Information