Sock Crafts for Kids
How to Make Sock Dolls, Sock Puppets, Sock Animals, Sock Toys, Sock Creatures, and Much More! Make Sock Animals and Sock Puppets for Less Than $2.00
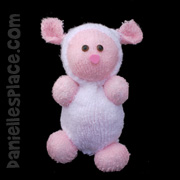
No-Sew Sock Dog
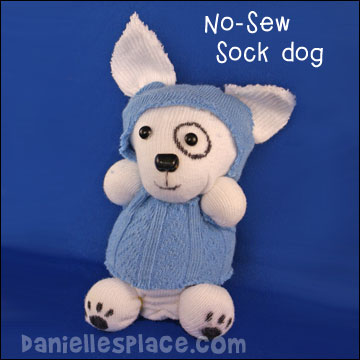
What you will need:
Socks - (Children's stretchy socks in a variety of colors and designs, the stretchier the better. I used socks that were 75% cotton, 22% polyester and 3% spandex from K-mart. They were on sale, 3 pairs for 50 cents)
Poly-fil for Stuffing the Socks - (You can also use stuffing from old pillows or old stuffed animals)
Tiny Rubber Bands (You can find this in the hair accessories section of your department store or use Twist Bands made for rubberband looms.)
8 mm Eyes, and Other Decorative Items
Scissors
Hot Melt Glue Gun - (One that uses low temp. glue sticks)
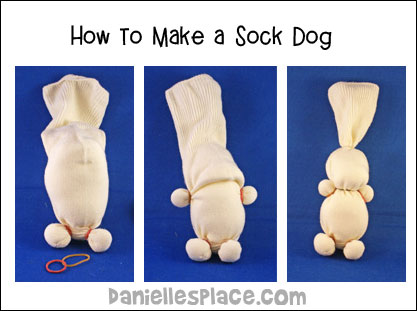
How to make:
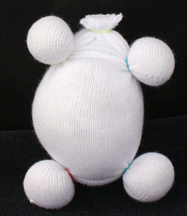
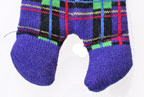
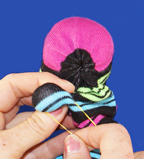
1. Flatten a sock so that the heel part of the sock is facing up.
2. Roll a wad of poly-fil into a ball about one inch in diameter and stick it inside the sock so that it is in the toe area on the bottom left-hand side as shown in the diagram to the right. Use your pointer finger to press the ball up against the side of the sock so that you can see your finger shape from the outside of the sock. Grab the ball of Poly-fil from the outside of the sock and wrap a rubber band around the ball to form a foot as shown in the diagram to the left. Do the same thing to the other side of the toe of the sock to form the other foot of the sock critter.
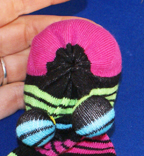
3. Roll up two more wads of poly-fil and place them just below the heel of the sock. Form them into arms just like you did the feet. See the diagram to the left.
4. Place a rubber band just above the arms to form the neck.
5. Put in more stuffing to form the head and secure the top with a rubber band. Once you have the body the way you would like it, you can replace the rubber bands with heavy thread.
This basic shape and technique was used for many of the sock critters shown below.
Watch "Do it, Gurl" on Youtube to see how she uses this technique to make an adorable no-sew stuffed bear for Valentine's Day:
Copyright 2009, Digital by Design, Inc - See Copyright Information
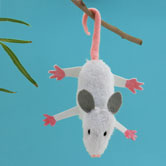
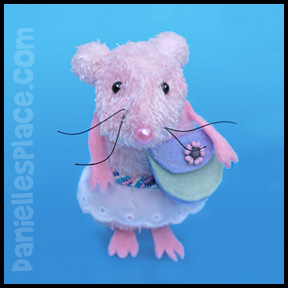
El Ratón the Mouse Tooth Fairy
What you will need:
A Very Stretchy Baby Sock (The one I used was 100% polyester)
Tiny Rubber Bands (You can find these in the hair accessories section of your department store.)
Poly-fil for Stuffing the Socks
8 mm Eyes, Pink Bead or Pompom for the Nose, Black Thread for the Whiskers, Pink Felt Squares, other Felt Colors for the Purse, and Lace and other Decorative Items for the Skirt
Scissors
Hot Melt Glue Gun (one that uses low temperature glue sticks)
How to make:
Member's ![]()
Free Digitial Download ![]()
1. If your sock has a cuff that is folded down and sewed to the sock, turn the sock inside out and carefully cut the stitching and unfold the cuff. This will make the sock longer.
2. Make ears on the sides of the ankle using small rubber bands and poly-fil. (See the General Directions above on how to make no-sew sock dolls.
3. Use a very small amount of poly-fil to stuff the toe of the sock (head of the mouse). The head should be floppy, not stiff. Use a small rubber band to tie off the head.
4. Fill the cuff of the sock with poly-fil so that it is stiff. This is the body of the mouse. (You can add some rice to the top of the cuff to make the mouse bottom heavy. This will help is stand up better.) Glue the sock closed.
5. To make the eye sockets insert a threaded and knotted needle into the place you would like one eye pushing it through the head to the other side where you would like the other eye. Cut off the needle and pull the thread to form the eye sockets. Tie the end of the thread to keep the shape. Glue eyes to the eye sockets.
6. Sew on a bead for the nose or glue on a pink pompom.
7. Make whiskers just like you did the eye socket except don't pull the thread tight and leave the tied ends long.
This craft goes along with the book "Throw Your Tooth on the Roof Tooth Traditions from Around the World"
Go to the Education Crafts Relating to Books Page for more information about this book.
Throw Your Tooth on the Roof: Tooth Traditions from Around the World
8. Use the Patterns to cut the arms, feet, and tail from pink felt and glue them onto the body.
Member's ![]()
Free Digitial Download ![]()
9. Glue on lace for the skirt or make sock doll clothes (See Below) for the mouse.
10. Cut the back and front of the purse from two different colors of felt. Sew the pieces together and then fold down the flap. Glue two tiny pieces of Velcro to the flap to keep it down. Glue a decorative button on the outside of the purse. Glue on a piece of matching ribbon for the strap.
Copyright 2010, Digital by Design, Inc - See Copyright Information
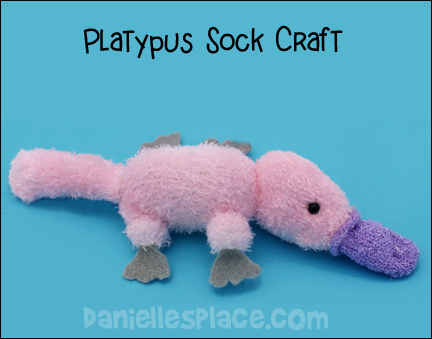
Puggles the Sock Platypus Craft for Kids
What you will need:
A Very Stretchy Baby Sock (The one I used was 100% polyester)
Tiny Rubber Bands (You can find these in the hair accessories section of a department store)
Poly-fil for Stuffing the Socks
Small Black Eyes
One Finger Cut from a Glove
Brown or Gray Felt or Fun Foam for the Feet
Scissors and a Hot Melt Glue Gun (one that uses low temp. glue sticks)
How to make:
1. If your sock has a cuff that is folded down and sewed to the inside of the sock, turn the sock inside out and carefully cut the stitching and unfold the cuff. This will make the sock longer.
2. Use a small amount of poly-fil to stuff the toe of the sock to about half way to the heal of the sock to make the head of the platypus. Use a small rubber band to tie off the head. (See the general directions above on how to make no-sew sock dolls.)
3. Cut a finger off a glove and curl up the cut end a little. Stuff the finger just a little and then glue the cut end of the finger onto the head of the platypus to make the beak.

4. Fill the heal of the sock with poly-fil so that it is stiff. This is the body of the platypus. Secure the body with a rubber band.
5. To make the tail cut the cuff of the sock into a tail shape. Glue it closed on the sides and stuff it with poly-fil. Then glue the end closed.
6. To make the eye sockets insert a threaded and knotted needle into the place you would like one eye, pushing it through the head to the other side where you would like the other eye. Cut off the needle and pull the thread to form the eye sockets. Tie the end of the thread to keep the shape. Glue eyes to the eye sockets.
*You may want to make a "Facts About Platypus" printable Itty Bitty book to go with this craft.
Member's ![]()
Copyright 2010, Digital by Design, Inc - See Copyright Information
Sock Animals and Sock Dolls
Sock Turtle
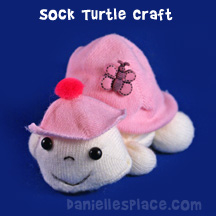
1. Use the directions above except start by making the head in the toe of the sock.
2. The cuff is the turtle's tail.
3. Use the heel of another sock for the hat and the toe for the shell.
Copyright 2009, Digital by Design, Inc - See Copyright Information
Sock Octopus
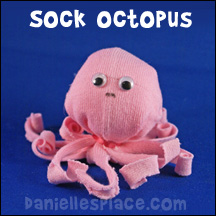
1. Cut off the cuff and heel of the sock.
2. Make the head in the toe of the sock.
3. Cut slits in the top of the sock for the legs.
4. Glue on eyes and a draw on a nose.
Copyright 2009, Digital by Design, Inc - See Copyright Information
Sock Bunny
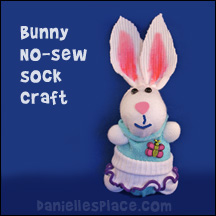
1. Make as in the Directions Above.
2. Cut two ears from the cuff of the sock and use a marker to color in the inside of the ears.
3. Use the bottom of a sock to make the body suit and the top of a sock to make the skirt.
Copyright 2009, Digital by Design, Inc - See Copyright Information
Sock Cat
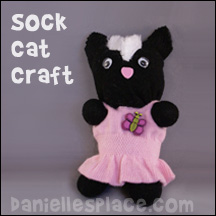
1. Make as in the Directions Above.
2. Cut two ears from the cuff of the sock and glue them together to close the top of the head.
3. Use the cuff of a sock to make the dress.
Copyright 2009, Digital by Design, Inc - See Copyright Information
Sock Baby
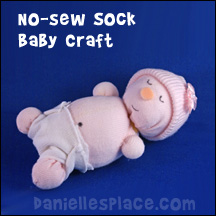
1. Make as in the Directions Above.
2. Fold down the top of the sock to make the baby's cap.
3. Cut a square from another sock or piece of material to make the baby's diaper.
Copyright 2009, Digital by Design, Inc - See Copyright Information
Sock Snowman
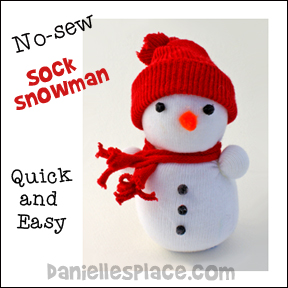
Make as in the directions above, except do not add the feet.
1. Cut the cuff part off the sock after placing a rubber band on the top of the head. Cut the cuff off a red sock and put it on the head as shown.
2. Use a red rubber band to finish the top of the hat.
3. Cut a 1" red strip from the red sock to make the scarf. Use tiny pompoms for the nose and eyes.
4. Fill the body with rice to make a hand warmer.
5. Stick it in the Microwave for a minute to warm the rice before using. This make a great gift!
Copyright 2009, Digital by Design, Inc - See Copyright Information
Sock Doll
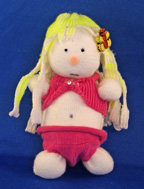
1. Make as in the Directions Above.
2. Fold down the top of the sock for the hair and cut slits to made the individual strands of hair.
3. Use a marker to color the hair.
4. Use the toe of a sock to make the bikini bottoms and the top of a sock to make the bikini top.
Copyright 2009, Digital by Design, Inc - See Copyright Information
Sock White Whale
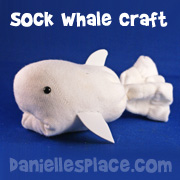
Stuff the a sock almost all the way to the top.
Tie off the cuff with a rubber band to make the whale's tail.
The top of the head is the heel of the sock.
Push in the toe of the sock to make the mouth and glue it shut.
Cut fins from fun foam.
Copyright 2009, Digital by Design, Inc - See Copyright Information
Sock Snail
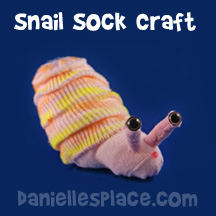
1. Stuff the toe of a sock to make the head.
2. Then bring the sides together and glue to make the head smaller.
3. Stuff the heel for the body and fold down the cuff of the sock over the heel to make the shell.
Copyright 2009, Digital by Design, Inc - See Copyright Information
Sock Elephant
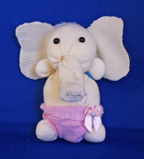
1. Make as in the Directions Above.
2. Twist the top of the sock and glue together to make the trunk.
3. Cut ears from another pair of socks or felt.
Copyright 2009, Digital by Design, Inc - See Copyright Information
Sock Fish
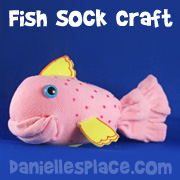
1. Stuff the a sock almost all the way to the top.
2. Tie off the top for the tail. The top of the head is the heel of the sock.
3. Cut off the toe of the sock and roll the end of to make the lips.
4. Glue them closed. Cut fins from fun foam. Add spots with a magic marker.
Copyright 2009, Digital by Design, Inc - See Copyright Information
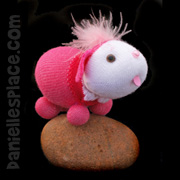
Bunny Head Sock Doll

Stuff the toe of a sock with poly-fil and then cut off the rest of the sock leaving a rounded head.
Glue the head closed. Cut ears from the left over sock and glue them to the head.
Glue fake fur to the top of the head.
Use pink fabric paint to paint in the ears and cheeks.
Copyright 2009, Digital by Design, Inc - See Copyright Information
Dog Head Sock Doll
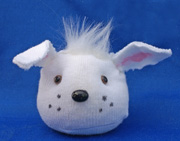
1. Stuff the toe of a sock with poly-fil and then cut off the rest the sock leaving a rounded head.
2. Glue the head closed.
3 .Cut ears from the left over sock and glue them to the head. Glue fake fur to the top of the head.
4. Use a black permanent marker to draw in the whisker spots.
5. Add a key chain to the top of the head to make the bunny head into a key ring decoration. Add a key chain to the top of the head to make the bunny head into a key ring decoration.
Copyright 2009, Digital by Design, Inc - See Copyright Information
Sock Fairy
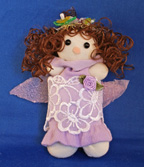
1. Make as in the Directions Above.
2. Glue on doll hair and use lace to make the dress.
Copyright 2010, Digital by Design, Inc - See Copyright Information
Two-Socks, No-Sew Sock Dolls
What you will need:
Socks (Two child-sized socks that compliment each other)
Poly-fil for Stuffing the Socks
Tiny Rubber Bands (You can find this in the hair accessories section of your department store)
Eyes, and other Decorative Items
Scissors
Hot Melt Glue Gun (One that uses low temp. glue sticks)
How to make:
1. Flatten a sock so that the heel part of the sock is facing up.
2. Roll a wad of poly-fil into a ball about one inch in diameter and stick it inside the sock so that it is in the toe area on the bottom left-hand side as shown in the picture to the right. Put your hand inside the sock and use your pointer finger to press the ball up against the side of the sock so that you can see your finger shape from the outside of the sock. Grab the ball of Poly-fil from the outside of the sock and wrap a rubber band around the ball to form a foot. Do the same thing to the other side of the toe of the sock to form the other foot of the sock critter.
4. The head and cover for the body is made with another sock. If you want to make ears, make two ball shapes near the heel of the second sock and then fill the sock with poly-fil to just below the heel of the sock.
5. Cut two very small slits (1/4") just below the heel of the sock where the arms will emerge. The slits should be very small because the sock material stretches a lot. If you make them two big, the material underneath will show through.
6. Now place the head sock over the neck of the body sock and force the two arms through the tiny holes you cut.

7. Pull the cuff of the top sock all the way down to the legs and glue the edge of the sock together between the legs as shown in the picture to the right.
8. To finish glue the arm holes around the arms forcing the material up against the arms so that none of the under sock shows through around the arm holes.
©2009, Digital by Design, Inc. -*See Copyright Information
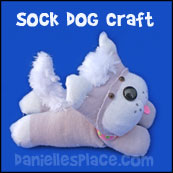
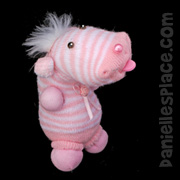
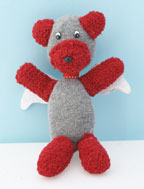
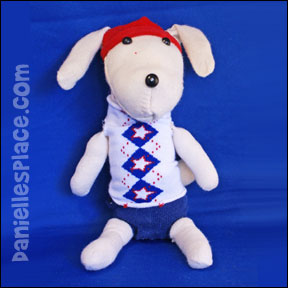
Sock Doll Dog
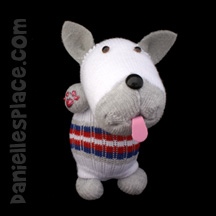
Follow the directions above for the two-sock sock doll.
To make the muzzle and mouth defined put a line of hot melt glue from the nose to where you want the mouth. Squeeze the sides of the face together to cover the glue line. Then squeeze up on the chin area to make the mouth. Glue the sides of the mouth closed but leave the middle of the mouth open where the tongue goes.
Cut a tongue from pink fun foam and glue it to the insde of the mouth. To make the eyes look inset, insert a needle with thread down into the head where you want the first eye bringing it back up where you want the second eye. Poke the needle back down into the head and back up again to where you started. Pull the thread tight to form the indents. Cut off the needle and tie the ends of the thread together. Glue the eyes in the indents.
Copyright 2009, Digital by Design, Inc - See Copyright Information
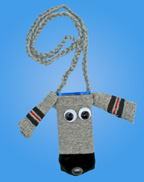
Sock Dog iPod Holder
What you will need:
One Child's Sock
Needle and Thread
Hot Melt Glue Gun
Matching Yarn
Googly Eyes
Animal Nose
How to make:
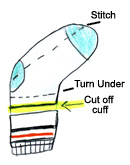
1. To make the dog's head cut the cuff off the sock just above the heal.
2. Turn the toe and heal of the sock inside out and stitch up the length of the sock from the toe to the heal to make the sock skinnier so that the iPod is snug inside the sock.
3. Turn under the cut edge and slip stitch it down.
4. Cut the cuff in half so that you have two equal pieces. Fold each piece in half so that the wrong side is showing. Sew around the cut edges and then turn right-sides out to make the ears. Sew the ears to the head at the sides.
5. Make a slip knot yarn cord and attach it to the head at the ears with a hot melt glue gun. To finish glue on eyes and a nose.
Copyright 2010, Digital by Design, Inc - See Copyright Information
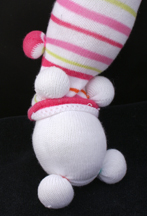
Snoopy Sock Dog
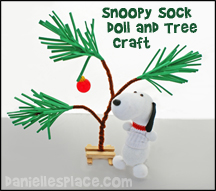
Follow the directions for the Two-sock, No-sew Sock Doll above except make the neck longer. Cut the arm holes closer to the top of the sock so that the cuff of the sock only goes down to the middle of the belly, not covering the whole body.
Go to Christmas Crafts Page 3 for the directions to make the Charlie Brown Christmas Tree.
Copyright 2009, Digital by Design, Inc - See Copyright Information
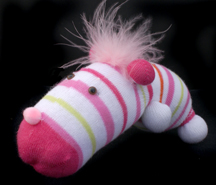
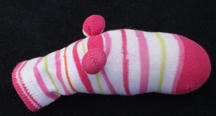
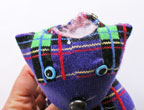
Striped Critter Sock Doll
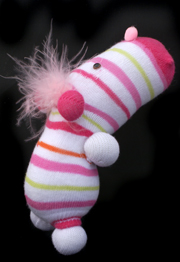
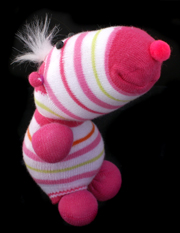

1. Follow the basic directions above for the two-sock doll.
2. Cut a small, round circle from piece of fake fur and glue it to the top of the head.
3. Sew a pink bead on for the nose.
4. Form a mouth by bringing up the material under the chin and gluing it closed on the sides.
5. Glue a tongue cut from pink fun foam inside the mouth.
Copyright 2009, Digital by Design, Inc - See Copyright Information
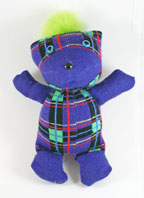
Sock Troll
What you will need:
Socks, Poly-fil
12mm Eyes
Nose
Scissors
Low Temp. Glue and Glue Gun
Needle and Thread or Sewing Machine
Feather Boa or Fake Fur
How to make:
1. Cut the top off your sock about 2" above the heel of the sock.
2. Cut a slit in the middle of the toe of the sock about two inches to make the feet.
3. Turn the sock inside out and sew the slit on both sides to form the legs. Turn the right-side out and stuff the legs. Sew a line across the top of both legs.
4. Stuff the body to about one inch from the heel of the sock. Use a rubber band to close off the body. Stuff the head filling out the heel of the sock.
5. To make the ears fold in the cut edge of the sock on the top of the head about 1/4" so there is not cut edge visible. Glue each side closed about one inch in from the sides. Stuff some more poly-fil up and under the ears to make them stand out.
6. You should still have a hole in the middle, top of the head. Fold in 1/4" on each side of the hole to hide the cut edge. Glue the cut edges down so they don't pop up. Cut off a piece of feather boa about four inches long and fold it in half. Stick the cut edges into the hole in the head and glue the top closed on both sides.
7. Glue on eyes and a nose.
8. Cut arms from matching colored socks sew them and then stuff them. Tuck in the un-sewed edges and glue them to the body.
9. To make the mouth push a threaded needle up into the head starting where you want the mouth, making it come out at the back of the head just below the feather boa. Bring it back down through the head and out near where you started. Pull the thread tight enough to form an indent for the mouth and then tie the thread. Cut off the end of the thread.
Copyright 2009, Digital by Design, Inc - See Copyright Information
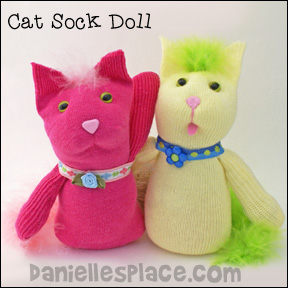
Cat Sock Dolls
What you will need:
Socks (One sock for each cat)
Poly-fil for Stuffing the Socks
Uncooked Rice or Small Pebbles
12mm Cat Eyes and other Decorative Items
Scissors
Hot Melt Glue Gun (One that uses low temp. glue sticks)
Needle and Thread or Sewing Machine.
Ribbon for the Collar and a Bow, Ribbon Flower or Pretty Button Feather Boa to Make the Tail and Hair Between the Ears
Pink Fun Foam for the Nose and Tongue
How to make:
1. First fill the toe of the sock with 1/4 cup of rice to make the bottom heavy so it will stand up easier.
2. Fill the rest of the sock with poly-fil to just above the heel of the sock.
3. Cut the cuff of the sock off making ear shapes as you cut. (See diagram to the right.)
4. Glue or stitch the top of the head closed between the ears.
5. Glue or stitch the ears closed at the top of the head making the head rounded. And then glue the rest of the ears together.
6. Cut the cuff of the sock so that it has straight edges and then cut it in half long ways to make the arms as shown in the picture. Turn the material inside out and fold it in half. Sew the long side and one short side of the arms and then turn them right-side out again. Stuff them with poly-fil.
7. Glue the arms on the cat at the neck. Glue a piece of ribbon around the neck and over the ends of the arms to make the collar and hide the un-sewed end of the arms. Glue a pretty bow, ribbon, button, or other decorative item over the end of the ribbon.
8. Cut a small section of feather boa and glue it to the top of the cat's head. Cut a longer piece for the tail and glue it to the back of the cat. Glue the end of the boa tail so that it doesn't come apart.
9 . Use a needle and thread that matches the color of your cat to make the face features.
Cat Face
1. Start by inserting the needle where you want the mouth to be.
2. Bring it up through the inside of the cat and back out where you want the left eye to be.
3. Poke the needle back into the cat right next to where you just came out.
4. Bring the needle back up and out where you want the right eye to be.
5. Put the needle back in next to where it just came out.
6. Then bring it back out at the mouth where you started. Pull the thread tight and tie a couple of knots to secure it. Do not cut the needle off the thread yet.
7. Bring the thread up to where you want the nose and insert it into the cat.
8. Then bring it back out at the mouth again. Pull the thread tight and tie a knot to finish.
9. Cut a nose from pink fun foam and glue it to the cat. You can also cut a tongue from the pink fun foam and glue it inside the mouth.
Copyright 2009, Digital by Design, Inc - See Copyright Information
Cat and Mouse Sock Craft
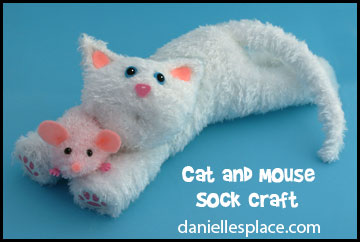
See the Cat and Kitten Crafts for Kids Page for directions to this craft.
Cow Bean Bag Sock Craft Kids Can Make
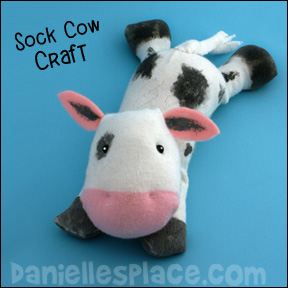
Go to the Cow Craft Page for directions to this craft.
Sock Reindeer Craft for Kids
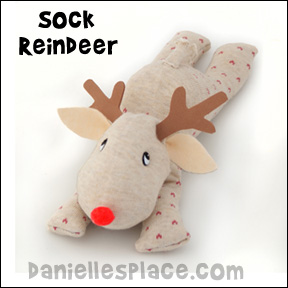
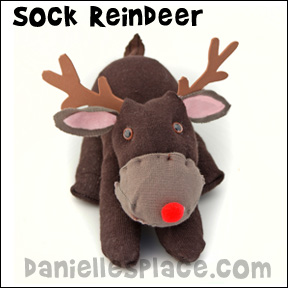
Go to the Cow Craft Page and use the directions for the Cow Beanbag Craft and then cut antler shapes from brown or tan craft foam and glue them behind the ears.
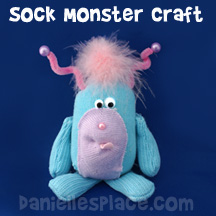
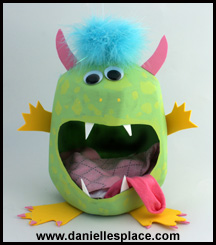
Sock Monster Sock Dolls
What you will need:
Two Pairs of Socks that are Different Colors
Eyes
Needle and Thread or Sewing Machine
Feather Boa
Chenille Stems
Red or Pink Material for the Tongue
Poly-fil
Small Beads
Low Temp. Glue Gun
How to make:
1. Cut off the toe end of the socks about 1/2" below the heel.
2. Fill the toe with poly-fil.
3. Cut off three inches from a feather boa and fold it in half. Stick the feather boa in the top of the filled sock and glue it to the inside. Glue the sock closed.
4. Use the heel of a different color sock (cut just below the cuff) to make the muzzle of the monster. Cut the heel part so it is rounded and cut the bottom part so that it just reaches the bottom of the monster. Glue the muzzle on around the top and sides and then stuff it with a little poly-fil. Glue the rest of the muzzle closed. Form the mouth with a needle and thread. Insert the needle where you want the mouth and then bring it back out close to the same place. Pull the thread tight and tie a knot. Cut off the excess thread. Glue a tongue cut from pink material inside the mouth. Glue on a pink bead for the nose.
5. To make the arms and legs, cut the cuff of the sock into four even pieces as shown in the diagram to the right. Fold the arms and leg pieces so they are wrong side out and sew them leaving one side open. Stuff the legs and arms and then glue or sew them closed. Glue them to the body as shown in the picture.
6. To make the antennae cut chenille stems about 4" long wind them around a pencil and glue a bead to one end of each antenna. Glue them to the head. To make the monster look goofy use two different sized eyes.
Copyright 2009, Digital by Design, Inc - See Copyright Information
Sock Monster Match Card Game
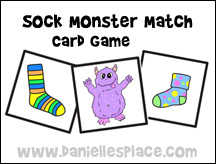
Children of all ages will love this game. Match up the socks and try to figure out which sock the sock monster ate, but be careful that the monster doesn't eat you!
To find directions and patterns for this game go to the Sock Monster Crafts and Learning Activities.
Milk Jug Sock Monster Sock Caddy
These cute little sock monsters are great for storing your missing socks and things you pull out of pockets before washing clothes. Go to the Milk Jug Crafts Page for Kids for directions.
No-Sew Sock Owl Craft for Kids

Upcycle your old or orphaned socks into adorable no-sew owls!
Go to the Owl Crafts and Activities for Kids Page for Directions to this Craft.
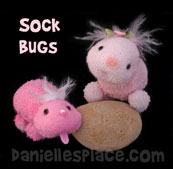
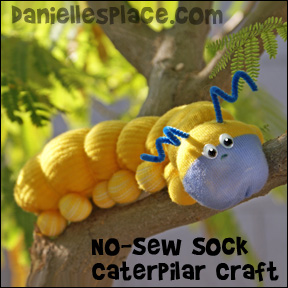
No-Sew Sock Caterpillars
These little guys are very inexpensive to make. You can make one for less than $2.00. If you buy socks at second-hand stores or garage sales, you can make them for even less.
What you will need:
Colorful Knee-high Socks
Polyester fiber for Stuffing
Small Rubber Bands (You can find these in the hair accessories section of your local department store)
Googly Eyes and Pipe Cleaners
Permanent Marker
Scissors
Low temp. Glue Gun
How to make:
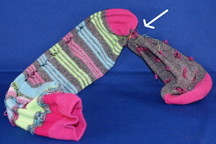
1. Turn your sock inside out and place a rubber band just below the heal of the sock.
2. Turn the sock right-side out.
(You can cut the toe off the sock right below the rubber band and use that part of the sock for another project if you would like.)
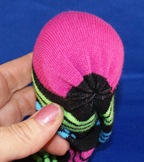
3. Fill the head part (heal) of the sock with polyester fiber.
4. Make a small ball about one-inch wide with the polyester fiber and stick it inside the sock just below the right side of the head. Push the fiber out, stretching the sock with your finger. Grab the ball from the outside of the sock with your other hand.
5. Wind a small rubber band around the ball to form the first foot. Do the same thing on the left side of the caterpillar. Fill the caterpillars body with stuffing just above the new feet.
6. Continue making feet down the whole length of the sock, filling the body with the polyester fiber as you go.
7. When you get to the end of the sock just close it off with a rubber band. You may want to cut off the band around the top of the sock if it is too thick, but it isn't necessary.
8. When you get to the end, you can add a rubber band between each set of legs to make the body sections stand out.
9. To finish glue on googly eyes. Cut two very small slits in the top of the head and glue sections of pipe cleaners in the holes for the antennae. Curl the ends of the antennae around a pencil.
10. Draw a nose and mouth with a permanent marker.
Copyright 2010, Digital by Design, Inc - See Copyright Information
Angel Sock and Glove Bear Craft for Kids
What you will need:
Child's Sock
Pair of Gloves
Hot Melt Glue Gun
Polyfil
Eyes
Animal Nose
Ribbon
White Craft Foam
Glitter Glue
Small Rubber Band
How to make:
1. Fill the toe area of the sock with Poly-fil and then close it off with a small rubber band. This is the head of the bear.
2. Fill the rest of the sock up to the cuff. Cut the cuff off and glue the opening closed.
3. Cut the fingers off of one glove, stuff them, and then glue them to the body for the arms and legs.
4. Cut the tips off of the thumb on both gloves for the ears, stuff them, and then glue them to the head.
5. Cut a circle from one of the gloves to make the muzzle. Glue it onto the head around the edges leaving a small opening. Stuff the muzzle through the opening and then glue it closed.
6. Glue on a nose and eyes.
7. Cut some ribbon and glue it around the neck for a collar.
8. Cut wings from craft foam, paint them with glitter glue, and when they are dry glue them to the back of the bear.
Copyright 2010, Digital by Design, Inc - See Copyright Information
Sock Tadpole Craft for Kids
What you will need:
Child's Sock
Hot Melt Glue Gun
Polyfil
Eyes
Sharpie Marker
Material
How to make:
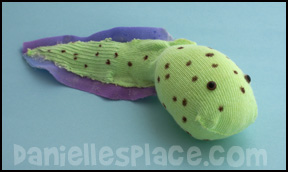
1. Stuff the toe of the sock with Polyfil and then cut the rest of the sock to form the tail of the tad pool.
2. Cut material in the shape of the tail. Glue the material to the inside of one side of the tail. (If you don't have a glue gun, you can sew it instead.)
3. Glue one side of the tail to the opposite side and stuff the tail.
4. Glue the other side of the tail closed.
5. To finish glue on eyes and use a permanent marker to draw on spots.
Designed by Danielle Warvel
Copyright 2010, Digital by Design, Inc - See Copyright Information
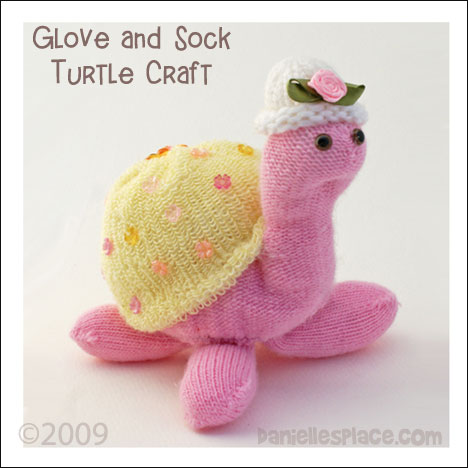
Glove and Sock Turtle
These are great to make with those gloves that you just can't find the mates. Or buy gloves and socks really cheap at sales after Christmas.
What you will need:
Stretchy Knit Gloves, Toe of One Sock, Glue Gun, Tiny Animal Eyes, Needle and Thread, Decorative Items, and Scissors
Watch a View it and Do it! Video:
How to make:
1. Fill the fingers of the glove, not including the thumb, with poly-fil.
2. Turn down the cuff of the sock and turn the thumb of the glove inside out bringing it up over the folded down cuff.
3. Fill the inside-out thumb and the palm part of the glove with poly-fil.
4. Glue the glove closed around the cuff. Spread out the fingers twisting the finger next to the thumb to the back of the turtle. Glue the fingers in place underneath the turtle.
5. Cut the foot off of a sock and glue it to the back of the turtle to make its shell. Decorate the shell with beads or sequins.
6. Glue on the eyes. To make the mouth insert a threaded needle into the mouth area bring it up through the finger of the glove to the top of the head and then back down to where mouth area. Pull the thread tight and tie the ends together to make the indent.
7. To make the hat cut the tip off a finger of another glove. Roll up the cut edge and glue it in place. Glue a flower or other decorative item to the hat and glue the hat to the head of the turtle.
Copyright 2009, Digital by Design, Inc - See Copyright Information
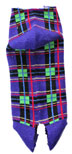
Sock Clothes for Sock Dolls and Sock Critters
Sock Clothes are very easy to make. All you need are some old socks and some scissors. Follow the diagrams below to cut the clothes.
When cutting holes in the socks for the arms and legs, cut them much smaller than you think you need because the socks are very stretchy and the holes will stretch to a much bigger size than you cut.
You can also glue on lace, buttons, sequins, and pompoms to decorate the clothes.
Copyright 2010, Digital by Design, Inc - See Copyright Information
More Sock Creations
More Sock Crafts on Sock Crafts Page 2