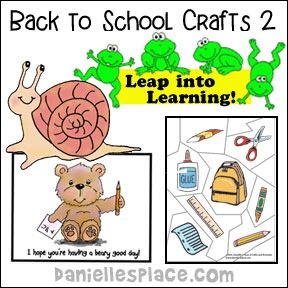
Back-to-School Crafts for Children
Crafts to Help Prepare Children for School. Crafts for Preschool and Elementary Children, and Crafts for Teens
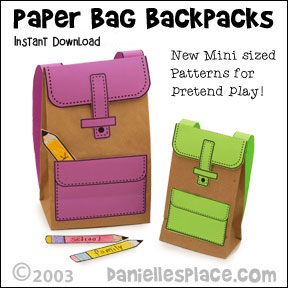
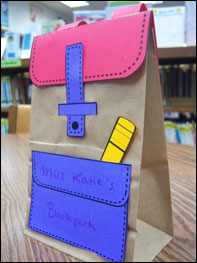
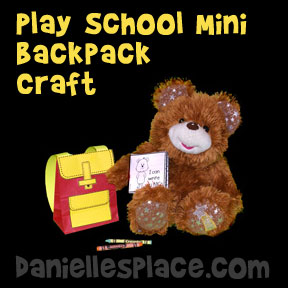
Paper Lunch Bag Backpack Back-to-School Craft for Kids
Use these backpacks to help prepare preschoolers and kindergartens for school, send home information about school on the first day of school, store new vocabulary words or spelling words, or as toys for children to pretend play school.
Folding, taping, spacing, and placing things in straight lines are great ways for children to develop their hand-eye coordination.
What you will need:
Different Colors of Paper
School Glue or Elmer s Rubber Cement
Crayons or Colored Pencils
Scissors
Tape
How to make a Paper Backpack:
1. Print out the backpack patterns onto colorful paper and cut them out.
2. Print out the school supplies pattern.
3. Cut the top of regular-sized lunch bags so it is 8" high. Glue the back pattern to the back of the lunch bag and fold over the flap to the front. Glue the rest of the patterns to the bag as shown in the picture. Glue only the sides and bottom of the front pocket to the bag so that pencil and other things can be placed in the pocket. If you are using the mini paper bags cut the top of the bags so that they are 5 3/4" high.
Member's ![]()
Instant Download - Free - ![]()
You Can Use These Little Backpacks and Supplies for Many Things.
1. As a welcome back container. Write "Welcome Back on the outside of the backpack". Place letters to your student's parents, information about their new class, etc. in their backpacks to take home with them.
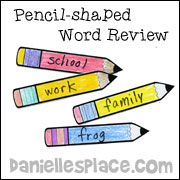
2. Have your children write their new vocabulary words on the front or back of each of the school supply pictures and take them home in their mini backpacks.
3. Any review materials can be carried in the backpack. For example, addition and subtraction review cards, spelling word lists, etc.
4. The school supply pictures can be cut apart and glued onto the back of pieces of construction paper. Make two copies of each item for each child so they can play a concentration game with them.
This craft also goes along with a Bible lesson, "Back to School with a Leap".
Member's ![]()
The lesson is presented using a popular children's book "Froggy Goes to School". In the story Froggy has a dream that he forgot to get dressed for school and went to school in his underwear. Most children can identify with Froggy's uneasiness about starting school; and this book will help them deal with their fears with a little humor. The Bible lesson points out that Froggy forgot to do something else very important; he forgot to pray. Through this lesson your children will learn that we need to be prepared for school so that we will be successful; not only do we need the right clothes and supplies, but we need to prepare our hearts and minds.
©2006, Digital by Design, Inc. - See Copyright Information
Paper Bag Backpack Craft by Users

Lesson Plans and Ideas - Suggested children would love using these for pretend school.
Storytime Katie - Used this craft for her storytime library program.
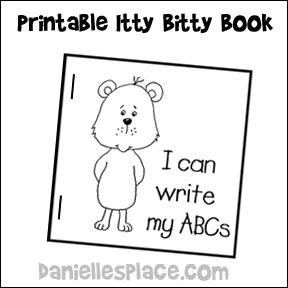
Mini Backpack with Printable Itty Bitty ABC Book
Help your child prepare for school with pretend play.
As you prepare these crafts and activities talk to your child about going to school. Kindergarten children probably already know a lot about school from television, but it is a good idea to find out what your child is expecting and if he or she has any fears relating to going to school. Your child may feel better about school by play-acting the first day of school with their stuffed animals.
Use the patterns above for the backpack.
Children will enjoy printing their ABC's in the "I Can Write My ABC's" Itty Bitty book.
Member's ![]()
Free Instant Download ![]()
For printing assembly directions go to the Book Printing Page.
Children will enjoy learning to write their ABC by pretending to be a teacher and teaching their stuffed animals or dolls to read.
When Danielle was learning to read, she would pretend to be a teacher. If she got stuck on a word, she would whisper to me and ask what the word was. I would then whisper the word to her, and she would continue reading to her bear like she knew the word. She was pretending to teach her bear to read, but she was really the one learning to read.
©2006, Digital by Design, Inc. -See Copyright Information
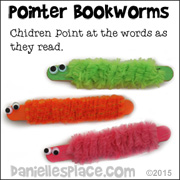
Bookworm Pencil Topper Back-to-School Craft for Kids
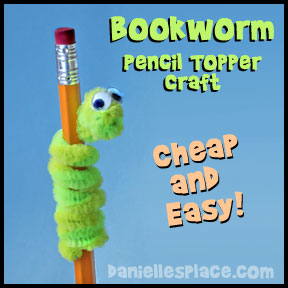
How to Make Bookworm Pencil Topper:
1. Start by rolling one end of the Chenille stem into a ball. Glue it so that it doesn't come uncurled.
2. Starting towards the middle of the pencil wind the Chenille stem around the pencil until you reach the head. Glue the Chenille stem to the pencil.
3. To finish glue on two tiny goodly eyes
©2007, Digital by Design, Inc. -This is copyrighted, including any derivative work - See Copyright Regulations for this web site.
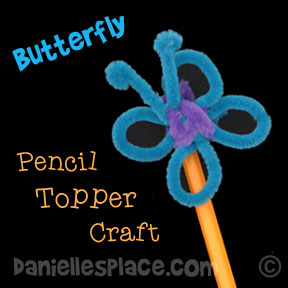
Butterfly Pencil Topper Back-to-School Craft for Kids
What you will need:
Pencil
Chenille Stems (Pipe Cleaners)
Googly Eyes (Optional)
Hot Melt Glue Gun
How to make pencil toppers:
1. Start by bending one end of a Chenille stem into a bow shape with one end longer than the other (see diagram). Wind the short end around the loop to secure.
2. Make two more big loops with the other end of the chenille and then wind the end around the loops to secure.

3. To make the antennae cut a Chenille stem four inches long and fold it in half. Roll up the ends. Secure the antennae to the body with another Chenille stem of a different color by winding it around the folded end of the antennae and around the body.
4. Wind another Chenille stem around the top of a pencil and glue it to the pencil. Glue the butterfly to the Chenille stem that is wound around the pencil.
5. To finish glue on two tiny goodly eyes (optional).
©2007, Digital by Design, Inc. -This is copyrighted, including any derivative work - See Copyright Regulations for this web site.
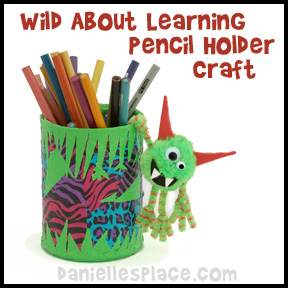
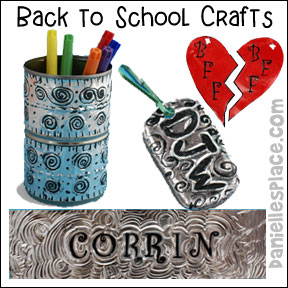
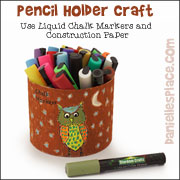
Wild About Learning Pencil Holder and Wild Thing Craft for Kids
Scissors
How to Make the Wild About Learning Pencil Holder and Wild Thing Craft:
1. Make sure your tin can is clean and dry.
2. Cut Duck tape pieces and stick them to the can to decorate it.
3. Make a matching wild thing using pom poms and pipe cleaners. Bend the pipe cleaners into arm and leg shapes and glue them to the pom pom with a low temperature glue gun.
4. Cut horn, mouth, and teeth shapes from craft foam and glue them to the pom pom. To finish glue on two different-sized wiggle eyes
©2013, Digital by Design, Inc - See Copyright Information
Wild About Learning Paper Clip Bookmarks
Four-inch Paper Clips - We found these at Michael's Craft Store

What you will need:
Brightly Colored Fuzzy Yarn
Scissors
How to Make the Wild Things Paper Clip Bookmarks:
1. Cut pieces of yarn about six inches long placing them on top of each other until you have a nice pile of them. Pick them all up and string one end of the pile through the top of the paper clip.
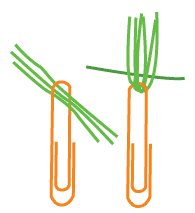
2. Place a small amount of glue on the paper clip and then fold the pieces of yarn in half up over the glue forming a pom pom.
3. Cut another piece of yarn and use it to tie the folded pieces together forming the head and hair.
4. To finish glue on wiggle eyes or other doll eyes.
©2013, Digital by Design, Inc - See Copyright Information
Paper Clip Bookmarks
What you will need:
Four-inch Paper Clips - We Found these at Michael's Craft Store
Striped Pipe Cleaners, Bright Colored Pipe Cleaners
Low Temperature Glue Gun or Aleene's Tacky Glue
Scissors
How to Make the Paper Clip Bookmarks:
1. To make the caterpillar and bee wind pipe cleaners in alternating colors around the top of a paper clip. Make sure you leave the clipping end open so the paper clip can be clipped on a book page.
2. Use a low temperature glue gun to glue the pipe cleaners together. Use short pieces of pipe cleaner or wire to make the antennae.
3. To make the snail wind a pipe cleaner around the top of a paper clip so that part of it sticks out from the clip forming the head of the snail. Cut the shell shape from craft foam and glue it to the body.
5. To make the butterfly start by winding one end of a pipe cleaner around the top of the clip then form one side of the butterfly's wing making two loops. Do the same for the other side of the wings with another pipe cleaner. Wind another color around the center of the butterfly to make the body. Add the antennae to the head before you finish the body by winding the pipe cleaner around a folded short piece of pipe cleaner. To finish glue on tiny wiggle eyes.
©2013, Digital by Design, Inc - See Copyright Information
Buggy Backpacks


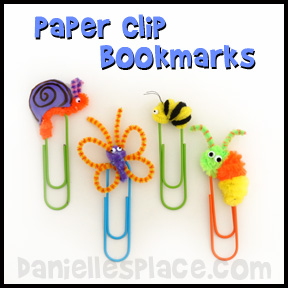
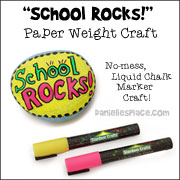
"Be Wise" Paper Cup Owl Craft for Kids
These owls will help give your child a good start to a new year in school. Each owl holds a different "wise" quote. Thinking about and writing about what it means to be wise will help give them the motivation to do their best this year.
What you will need:
16 oz. Foam or Paper Cups (Brown to Save Time)
Paint Marker Pens - The colors are amazing and there is no messy clean up, or Acrylic Paint
Printer Paper
Scissors
How to Make an Owl Paper Cup Craft:
1. Draw an owl face, wings, and feet onto printer paper or use the patterns, color them, and cut them out.
Member's ![]()
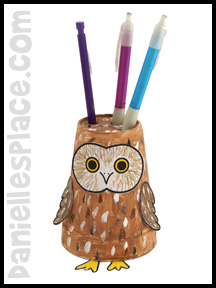
2. Paint your cup to match the face and wings and glue them to the cup as shown in the picture. Note - For a quick and easy project buy brown paper cups from a party store. Your children can just use markers to draw feathers onto the cup.
3. Curl up one wing and glue it to the side of the cup so that the owl can hold its "wise saying" as shown in the picture.
4. You can also have your children punch holes in the top of the owl to make a pencil holder.
5. Find "Wise Quotes" from the Internet and write them on small sheets of colorful paper and then let your children pick the saying they like best. Instruct them to roll up the sayings and place them in their owl's wing. ("Printable "Wise Quotes" sheets are available to members and included in the instant download, above.)
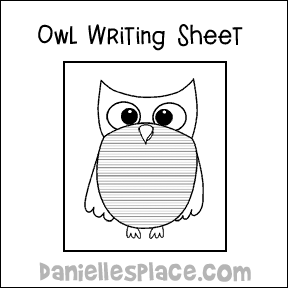
For a writing assignment have them write what the sayings mean to them on the owl printing sheet.
Wisdom Quotes
1."Don't think less of yourself, think of yourself less." Unknown
2. "To be old and wise, you must first have to be young and stupid." Unknown
3. "Learn from the mistakes of others. You can't live long enough to make them all yourself." Unknown
4. "The secret of happiness is not doing the things that you like but liking the things that you do."
Unknown
5. "The only people with whom you should try to get even are those who have helped you." John E. Southard
Member's ![]()
6. "The early bird gets the worm, but the second mouse gets the cheese." Steven Wright
7. "There's a difference between knowing the path and walking it." The Matrix ' Morpheous
8. "When you realize God is all you have, you realize, God is all you needed in the first place." Unknown
9. "An eye for an eye" leaves the whole world blind. Unknown
10. "I've always believed that a lot of the trouble in the world would disappear if we were talking to each other instead of about each other." Ronald Reagan
11. "No one can go back and make a brand new start, however anyone can start from now and make a brand new ending." Carl Bard
©2010, Digital by Design, Inc - See Copyright Information
Wise Owl Crafts and Writing Activity Instant Digital Download
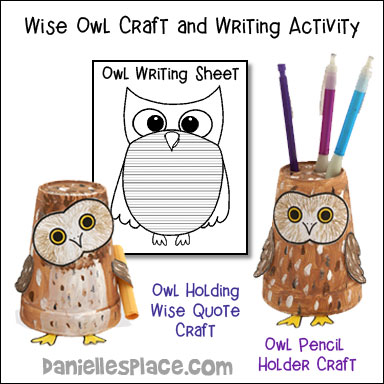
Children make cup owls holding wise quotes, or an owl pencil holders out of Styrofoam cups or paper cups and then write about the wise qoutes on the owl writing sheets. Two different owl writing sheets are included for both older and younger children. See above for the qoutes included in this download.
Instant Digital Download - ![]()
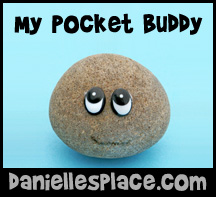
My Pocket Buddy
This is a great craft for children who are apprehensive about starting school. Knowing that they have a Buddy in their pockets or backpacks will help them relax and ease them into the new school year.
My Pocket Buddy
Written by Carolyn Warvel
When I reach into my pocket I find a little stone.
I put it there to remind me that I am not alone.
When I am scared or frightened I can always know,
That God is always with me no matter where I go,
(My friend is always with me no matter where I go,)
Just like my little buddy, an ordinary stone.
(He is my little buddy, not just an ordinary stone.)
©2010, Digital by Design, Inc. - See Copyright Information
What you will need: Small River Rocks, Googly Eyes, Markers and Paper
How to Make a Pocket Buddy:
1. Print out the poem pattern and cut the poems apart.
Member's ![]()
Free Instant Download - Christian and Non-Christian Version ![]()
2. Have your children pick out a rock they would like to use and glue googly eyes on them.
3. They may also want to draw on hair and other face features.
4. Have them read the poem and place it in their pockets with their pocket buddy.
©2010, Digital by Design, Inc - See Copyright Information
ABC Printable Activity Sheets with Hands-on Learning Games and Activities
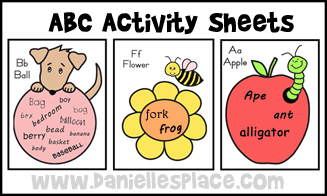
Go to the Ready for School Activities for Children Page for links to the ABC Activity Sheets and ideas to use the sheets including: Learning games, letter recognition games, a match game, beginning letter sounds games, a vocabulary display, writing the ABCs, and bean bag toss games.
Monster Tabletop Garbage Bags
Teachers, children will love helping to clean up with these charming monster bags! Place them on your student's tables and tell them to feed the monsters with their paper scraps. Children will be much more interested in keeping their space clean, and you will probably find a lot less mess on the floor at the end of the day. When the "monster" is full it can be emptied into a larger garbage bag and used again.
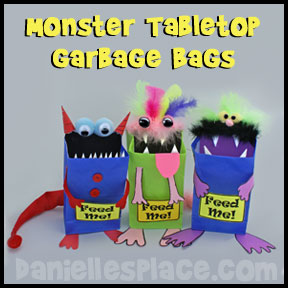
You can prepare these ahead of time, or have each group of children at a table help design one for their table.
You can also make these tabletop garbage containers out of recycled materials such as oatmeal canisters and milk jugs. See directions to make these below this craft.
What you will need:
White Craft Foam or Construction Paper for the Teeth
Aleene's Tacky Glue or other Tacky Glue
Scissors, Paper Glue and/or Low Temperature Glue Gun, Black and other Colors of Construction Paper.
Other supplies you might use: Wiggle Eyes, Feathers, Feather Boas, and Buttons
How to make Monster Desktop Garbage Bags:
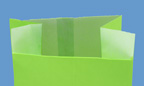
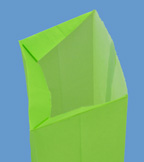
1. To form the mouth cut a one-inch slit down the two front corners on the top of the bag and fold down the flap to the inside of the bag. (See diagram) Glue or tape down the flap.
2. Fold down both sides from the bottom of the slits to the top of the back corners and then glue the flaps down on the inside. (See diagram on the left.)
3. Glue a piece of black construction paper to the inside back of the bag so that the mouth looks dark inside. This will also help the teeth to show up better.
4. The two monsters on the right side of the picture have feather boas and feathers glued to the top, back of the bag to make the monster's head. The monster on the left just has two pompoms glued on the back, top of the bag for eyes. The horns were made from rolled up fun foam. The tail was made out of rolled up red felt with a pompom glued to the end.
5. The teeth were made from white fun foam. The hands and feet were just drawn on construction paper with a black Sharpie and then cut out, and glued to the bag. The tongue was made from pink paper.
6. When you have finished your monster glue a sign that reads, "Feed Me!" to the Monster's hands.
Member's ![]()
Free Instant Download ![]()
©2010, Digital by Design, Inc - See Copyright Information
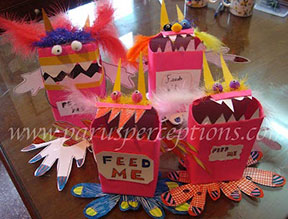
These monster bins were made by Paru's Preceptions.
Oatmeal Box Monster Tabletop Garbage Can Craft
This monster tabletop garbage can is sturdier than the paper bag monsters above. If you use fun foam instead of construction paper for the feet and arms, it will last even longer.
What you will need:
Empty Oatmeal Canister
Construction Paper
Glue, Sharpie Marker, Printer Paper, Yarn and Scissors
How to Make Tabletop Monster Garbage Cans:
1. Cover the oatmeal canister with fun foam or construction paper.
2. Paint the lid with matching acrylic paint. When the lid is dry glue the lid to the canister at the back so that it leaves a crack in the front for the mouth.
3. Draw monster hands and feet on construction paper or fun foam with a black Sharpie, cut them out, and glue them to the canister.
4. Cut triangle shapes from white fun foam and glue them to the inside rim of the lid and top of the canister as shown in the picture.
5. Glue pompoms to the top of the lid and then glue googly eyes to the pompoms.
6. Print out the "Feed Me! Sign Pattern above, cut out a sign and glue yarn onto the top corner. Hang the sign on the monster.
©2010, Digital by Design, Inc - See Copyright Information
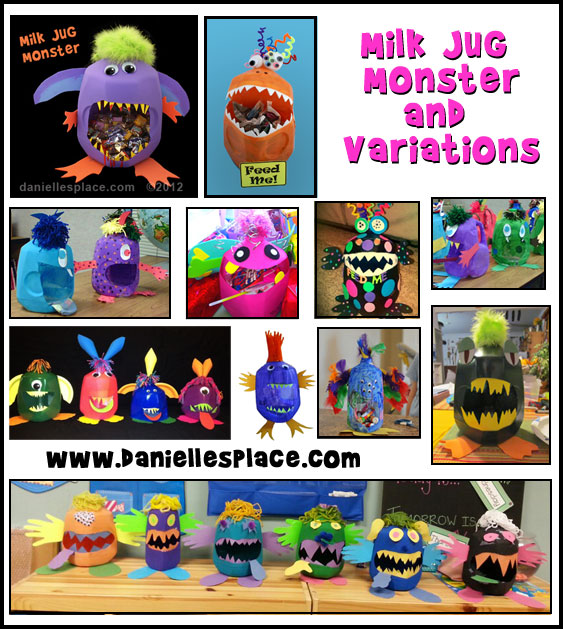
Toadly Awesome Milk Jug Tabletop Garbage Container Craft
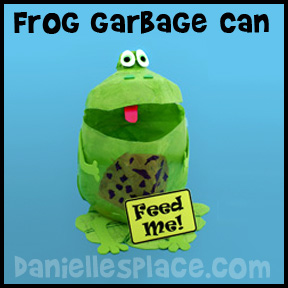
What you will need:
Valspar Plastic Primer Spray Paint or Krylon Clear Plastic Primer Paint with Acrylic Patio Paint
Printer Paper
White Glue
Scissors with Sharp Point or Knife
Duck Tape
Paint Brush
How to Make this toadly Awesome Craft:
1. To remove the label fill the jug up with hot water and let it sit for a minute. This will loosen the glue. Carefully pull off the label. Do not get the label wet before trying to remove it or it will just disintegrate and you will have a hard time getting it off. Once the label is remove you can wash and dry the plastic milk jug.
2. Cut a line from side to side at the top of the jug about one inch below where the jug starts to form the top of the jug as shown in the picture. Cut a one-inch section from the handle so that the top of the jug can be bent back and the mouth opened. Tape the remaining handle together so that the mouth stays open.
3. For this craft small pieces of green crepe paper were glued onto the jug to give this toad color. Add a small amount of water to white glue and paint it on the jug. Stick small pieces of crepe on top of the glue. Add more glue overlapping the pieces until the whole jug is covered. You may also want to add some to the inside of the jug. The belly of the toad is also made with different colors of crepe paper.
If you don't want to use the tissue paper technique you can spray paint the jug or paint it with acrylic paint. Spray the jug with plastic primer paint and then paint it with the acrylic patio paint or spray paint it with spray paint made for plastic. Spray paint works best because the craft foam sticks better to the spray paint than the acrylic paint.
4. Cut arms, legs, and a lily pad from green fun foam and glue them to the jug.
5. The eyes where made with white fun foam and green googly eyes. The tongue was cut from red fun foam.
6. Print out the "Feed Me!" Sign Pattern above, cut out a sign and glue it to the frog's hands.
Designed by Corrin Burner, age 10.
©2010, Digital by Design, Inc - See Copyright Information
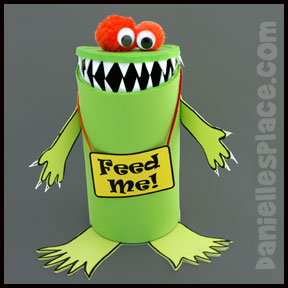
Milk Jug Monster Tabletop Garbage Can
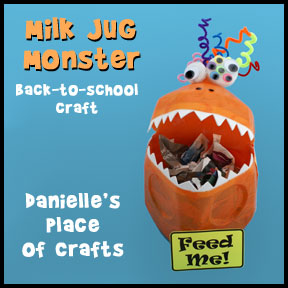
What you will need:
Valspar Plastic Primer Spray Paint or Krylon Clear Plastic Primer Paint with Acrylic Patio Paint
Printer Paper
White School Glue
Scissors with Sharp Point or Knife
Duck Tape
Paint Brush and Other Items to Decorate Your Milk Jug
How to Make a Milk Jug Monster Tabletop Garbage Can:
1. To remove the label fill the jug up with hot water and let it sit for a minute. This will loosen the glue. Carefully pull off the label. Do not get the label wet before trying to remove it or it will just disintegrate and you will have a hard time getting it off. Once the label is remove you can wash and dry the plastic milk jug.
2. Cut a line from side to side at the top of the jug about one inch below where the jug starts to form the top of the jug as shown in the picture. Cut a one-inch section from the handle so that the top of the jug can be bent back and the mouth opened. Tape the remaining handle together so that the mouth stays open.
3. For this craft small pieces of tissue paper were glued to the jug to give this monster color. Add a small amount of water to white glue and paint it on the jug. Stick small pieces of crepe on top of the glue. Add more glue and overlap the pieces until the whole jug is covered. You may also want to add some to the inside of the jug.
If you don't want to use tissue paper, use spray paint or acrylic paint. Before using the spray painting or the acrylic paint, spray the jug with plastic primer paint. Spray paint works best because the craft foam sticks better to the spray paint than the acrylic paint.
4. Cut arms and legs from fun foam or construction paper and glue them to the jug.
5. The eyes where made with white foam and lots of googly eyes. The teeth were cut from white fun foam.
6. Print out the "Feed me!" Sign Pattern above, cut out a sign, and glue to the jug.
©2010, Digital by Design, Inc - See Copyright Information
Back-to-School Crafts on Other Pages
Other Back to School Crafts and Activities for Kids
DLTK has an adorable school bus made from the lid of an egg carton and an apple pencil holder.
Making Friends has backpack crafts, hair accessories, and things to make for your locker.