Moose Crafts and Activities
How to Make Crafts and Activities Relating to Moose
Moose Pencil Holder
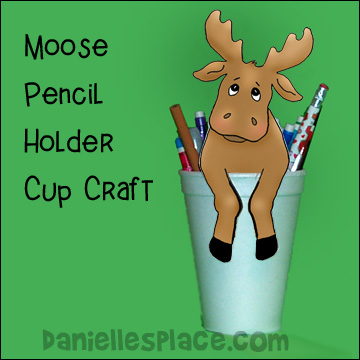
What you will need: Cardstock, Scissors, Glue or Tape, and Colored Pencils or Crayons
How to make:
1. Draw a picture of a moose head and front legs as shown or print out the pattern.
Member's ![]()
2. Color and cut out the patterns. Cut slits up along the inside of the legs as shown.
3. Decorate a tin can or use a paper cup. Place the moose cutout on the edge of the can or cup with the legs hanging over. Secure with tape or glue.
©2007, Digital by Design, Inc. -*See Copyright Information
Moose Bookmark
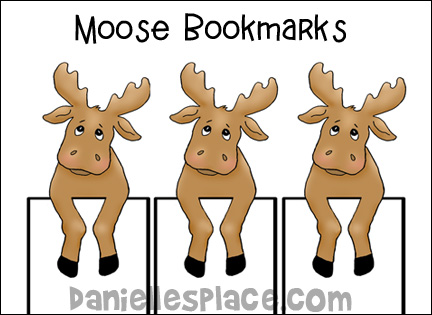
What you will need: Cardstock, Scissors, and Colored Pencils or Crayons
How to make:
1. Draw a picture of a moose with its front legs hanging over the bookmark as shown or print out the pattern (Available to members only.
Member's ![]()
2. Color and cut out the bookmarks.
©2007, Digital by Design, Inc. -*See Copyright Information
Stand up Moose Craft for Kids
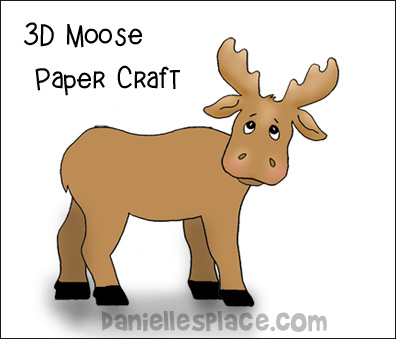
What you will need: Cardstock, Scissors, Colored Pencils or Crayons and Tape or Glue
How to Make:
1. Draw a picture of a moose body as shown in the picture and then fold your paper in half. The folded edge should be at the top of the moose's body.
Member's ![]()
2. Cut out the moose figure without cutting the folded edge.
3. Draw a moose head and cut it out. Glue it to the body.
4. Spread the legs out a little so your moose will stand up.
©2007, Digital by Design, Inc. -*See Copyright Information
Moose Made from Four Paper Bags Craft
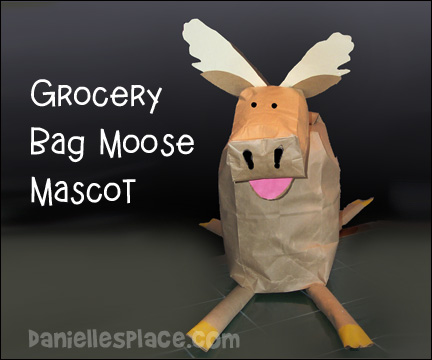
This moose can be used as a craft or a prop to use with a moose thematic unit.
What you will need: Two lunch bags, two grocery bags, gray or tan cardstock for the antlers, pink construction paper, hot melt glue gun or tape, and a black marker.
How to make:
1. To make the head place one of the two lunch bags inside the other. They should both be open, one inside the other. Cut a mouth shape from the outer bag as shown, so that the mouth will open as shown in the picture. Cut a pink tongue from construction paper, the same shape you just cut, and glue it to the inside of the mouth. Stuff the bags with wrinkled up plastic grocery bags and glue the open end closed.
2. Print out the antler pattern onto cardstock and cut out.
Member's ![]()
Free Digitial Download ![]()
3. To make the body stuff a large grocery bag with wrinkled up newspaper and glue it closed.
4. Cut the sides off another grocery bag. Cut the sides in half and roll each section up to make legs. Glue them to the body.
5. Cut ear shapes from the left over part of the grocery bag and glue them to the head. Glue on the antlers behind the ears as shown.
6. Glue the head to the body. Use a black magic marker to draw eyes and nose holes.
©2007, Digital by Design, Inc. -*See Copyright Information
"Moose on the Loose" Learning Activities

What would you do with a moose on the loose? This book asks the reader many questions about what he or she would do with a moose that is making himself at home in a little boys house. The moose becomes more daring and troublesome as the day goes on. Although he causes a lot of chaos, it is hard to imagine kicking him out of the house because he is so endearing. The cartoonish pictures, hilarious situations, and rhyming words make this book of great interest to children.
"Moose on the Loose" by Kathy-jo Wargin
What would you do with a moose on the loose? This book asks the reader many questions about what he or she would do with a moose that is making himself at home in a little boys house. The moose becomes more daring and troublesome as the day goes on. Although he causes a lot of chaos, it is hard to imagine kicking him out of the house because he is so endearing. The cartoonish pictures, hilarious situations, and rhyming words make this book of great interest to children.
Learning Activity - This is a great book from children to learn about rhyming words and writing. Have them write and illustrate their own pages to add to the book in the same format as the author. They will enjoy this activity because they can get as crazy as they would like.
"If You Give a Moose a Muffin" Crafts and Learning Activities

Give the Moose a Muffin Activity
The face of this moose is glued to a sheet of paper so that any number of muffins can be placed in his mouth.
1. Print out the patterns and cut them out.
Member's ![]()
2. Color the antler and face pattern. Cut out all the patterns. Use the muffin pattern to cut muffin shapes from construction paper.
3. Glue the antlers onto the back of the face.
4. On another sheet of paper draw a body shape as shown and color it. Glue the face pattern onto of the body shape leaving the mouth area unglued so that you will be able to stick muffins under the pattern.
Moose Muffin Math Game
This is a great math game to use with a thematic unit on moose or use as a supplement to "If you Give a Moose a Muffin" book by Laura Joffe Numeroff. You can use the moose above or the moose picture below to play this game.
1. Print out the muffin pattern (above) and cut it out. Use it to cut muffin shapes from brown construction paper.
2. Practice math facts with your students. Tell the children that you have twelve muffins, or any number you wish to use. Lay the muffins out in front of the children. Tell the children that you are going to give the moose some muffins. Randomly gather up some of the muffins and place them in the mouth of the moose. Ask the children to count how many muffins you have left. Ask them how many muffins the moose ate. Keep changing the amount of muffins you feed the moose and the amount of muffins you start with.
Moose Word Games
This is a great way to review vocabulary words to use with a thematic unit on moose or use as a supplement to If you Give a Moose a Muffin book by Laura Joffe Numeroff. You can use the moose above or the moose picture below to play this game.
1. Print out the muffin pattern (above). Use it to cut muffin shapes from brown construction paper.
2. Print vocabulary words taken from the story on the muffins. Lay them out on a table or tape them to the board. Have the children take turns coming up to the table and picking a word. If a child can pronounce the word, he can feed it to the moose.
"If You Give a Moose a Muffin" Follow the Tracks Mystery Game
The moose in the story "If You Give a Moose a Muffin" left tracks and messes wherever he went. Point out the things in the pictures he left behind as evidence that he had been there. When your children are out of the room place moose tracks around your room that the children can follow from one area to another. Leave evidence of what the moose had done or gotten into. Discuss with the children what they think happened while they were out of the room. For example:
Set up tracks coming through the door. You can use washable brown paint that looks like mud or cut Track Shapes (above) from brown construction paper. Have the tracks go to a muffin wrapper with crumbs left behind, then over to the sink where they find soap and water all over the counter. Then they can lead to an easel where a picture of a moose family has been painted. You can then leave different colors of tracks because the moose has paint on his hoofs that lead to a desk where he writes something and then maybe to the pencil sharpener. Leave the pencil in the pencil sharpener and have the prints lead out another door. Maybe make them farther apart like he was running. You can also leave brown hairs behind. (Hair cut from fake fur material.) Talk about how one thing led to another. Write down the sequence of events on the board or have your children write them down.
Moose Puppet Made from a Paper Cup and Brown Lunch Bag
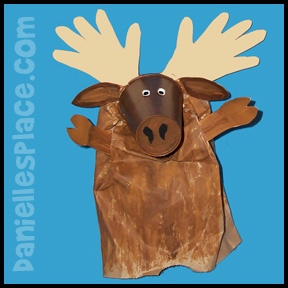
What you will need:
Brown lunch bag, 9 oz. paper cup, Tan card stock, Wiggly eyes
Glue
Brown paint
Scissors
How to make:
1. Paint the outside of the paper cup brown. While it is drying cut out two ear shapes and legs from cardstock (thick paper) and paint them brown also.
2. Trace your hands onto cardstock and cut them out to make antlers. Fold the tips of the ears and glue the folded edge onto the inside rim of the glass. Do the same thing for the antlers.
3. Open up a paper bag and place your hand inside. Squeeze the bottom of the paper bag into the paper cup, flattening it out inside the cup as much as possible. Remove the bag and place glue all around the inside of the paper cup. Put the bag back into the cup and press it around the sides. When it is dry paint the bag to match the face. To finish, glue on the arms, legs, and eyes.
©2007, Digital by Design, Inc. -*See Copyright Information