Mother's Day Crafts for Children - Page 2
Mother's Day Crafts Kids Can Make
"You Hold the Keys to My Heart!" Mother's Day Card Craft for Children

Is your class full of bubbly extroverts or shy little cinnamon buns? Want to inspire them to appreciate and express the special qualities others bring into their lives? Look no further! This Mother’s Day, invite your students to get creative with a delightful paper craft. They can pen heartfelt words about what they admire most about their moms on the keys of this charming project. Accompany it with a matching charm that reads, “You Hold the Keys to My Heart,” and watch as their loved ones heart melts with joy at the sweet and sincere sentiments they share! It’s a fabulous way to celebrate the love in your life!
The patterns for this craft are available to members on The Resource Room.
Member's ![]()
To complete this craft you will need: Colorful Cardstock (Heavy Paper), Pipe Cleaners - Chenille Stems (Any Color) or Zip Ties, Pens or Markers, Scissors, and a Hole Punch
©2014 - Digital by Design, Inc. - See Copyright Information
"I Love You a Bunch!" Mother's Day Card Craft
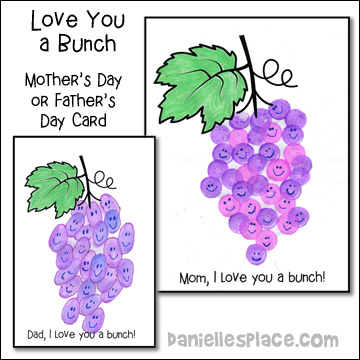
What you will need:
Cardstock (Heavy Weight Paper), Purple Do A Dot Markers, Ink Pad or Purple Paint, and Markers
How to make this Mother's Day Card:
1. Before class print out the card patterns. Patterns are available in 7.5" x 10" and 5" x 7.5", both Mom and Dad cards, and cards with no words.
Member's ![]()
Instant Digital Download - ![]()
2. In class have your children use Do A Dot Dot Markers or their fingers to make the grape shapes. (You can also use a carrot that has the top cut off or a round sponge dipped in paint to make the grape shapes.)
3. To finish have your children draw little faces on each grape.
I used the lesson "In Celebration of Mothers Day" in my Wednesday night class. We made the "bunch of grapes" card and the children loved it. When I couldn't find bingo blotters, I was worried about the mess of using an ink pad, but it worked out really great. We are fortunate enough to have our class adjoin the kitchen at our church. We made a sink full of warm soapy water and let the children use the ink in groups of three. As soon as they were done, they were ushered to the sink, and the ink came right off (even though the ink pad was marked "permanent"). When they weren't stamping, the other children were busy coloring their leaves and writing a note to Mom on the back of their cards. This was definitely a "keeper" craft for us. Thanks.
©2007-2018, Digital by Design, Inc. -*See Copyright Information
Spoonful of Love Craft for Mother’s Day
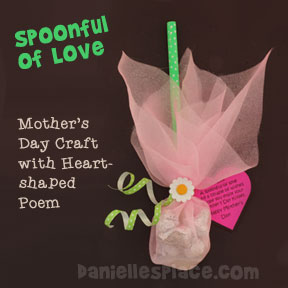
What you will need:
Wooden or Plastic Spoons
Paint
Hershey Kisses
Netting Material
Cellophane or Colored Plastic Wrap
Silk Flowers
Ribbon
Cardstock (Heavy Weight Paper)
How to make:
1. Print out the pattern onto colored card stock. Cut out the hearts and punch a hole in the upper left side of the hearts.
Member's ![]()
Free Digital Download ![]()
2. Paint the wooden spoons or use plastic spoons.
3. Place two or three kisses on the cup of the spoon and place the spoon cup in the middle of a square of of material or plastic wrap. Bring the material up and over the spoon and tie it with a ribbon or lace. Make sure you attach the heart card to the lace or ribbon before you tie it. Add some silk flowers.
©2002, Digital by Design, Inc. -*See Copyright Information
Potholder Craft for Mother’s Day
Personalized potholders make great Mother's Day gifts. Children of all ages will enjoy making these for their parents.
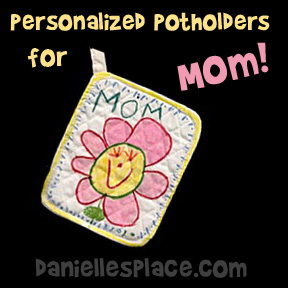
What you will need:
Bold Tip Brilliant Color Fabric Marker Set or Sharpie Fine Felt Point Markers
Pencils
How to Make the Potholders:
1. Decide on a design for the potholder. Trace your potholder onto a sheet of blank paper and draw out your design for both the front and back of the potholder. Be sure to leave a place to write a message to your mother and the date.
2. Use fabric markers or permanent markers such as Sharpie markers to draw the picture onto the potholder.
©2006, Digital by Design, Inc. -*See Copyright Information
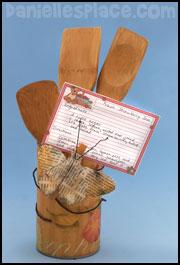
Recycled Can Spoon and Recipe Card Holder Craft for Mother's Day
Do you have a bunch of empty soup cans lying around? Some old wire that’s been collecting dust? More clothespins than you know what to do with? Does your child enjoy cooking with their mom? Are you looking for a way to motivate your class to learn an essential life skill? If so, you can achieve multiple goals at once by having them create a spoon and recipe card holder using a recycled can. This project not only helps repurpose some of your clutter, but your kids will also make something both beautiful and functional while having fun!
What you will need:
Decorative Paper Such as Scrap Booking Paper
Large 26 oz. Can
Spring Clothes Pin
Bobby Pin or Wire
Old Rusted Wire
Hot Melt Glue Gun
Blank Recipe Cards
How to Make the Spoon and Recipe Card Holder:
1. Clean, remove the label, and dry the can you will be using. Make sure large spoons and other kitchen utensils will fit in the can.
2. Decide what paper you would like to use to decorate your can. Cut the paper to fit and glue it to the can. Spray a clear coat of Acrylic Finish over the paper to make it last longer.
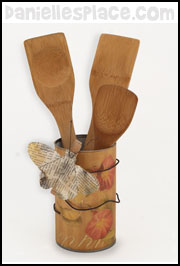
3. Glue a butterfly or other decorate item to the clothespin. I used and origami butterfly made from a sheet of newspaper. You can find directions on Todolwen Old and New Blog. (I made the butterfly a little rounder by cutting the edges.) You can also use silk flowers, or anything else that would go well with the decoration on your can. Open a bobby pin slightly and glued it to the head of the butterfly for feelers.
4. Spray the butterfly with a clear coat of Acrylic Finish.
5. I bent a piece of rusted wire around the can and glued the end to the can. Then glued the clothes pin to the outside of the can.
6. To finish write your favorite recipe on a recipe card and place it on the clothespin.
©2012, Digital by Design, Inc. -*See Copyright Information
Melted Straws Gift Boxes for Mom Using Cut Drinking Straws as Perler Beads
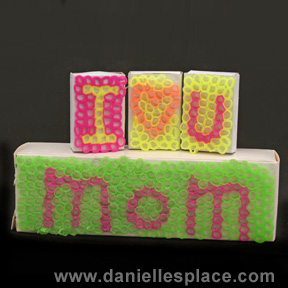
What you will need:
Plastic Drinking Straws
Tacky Glue
Scissors
Small Boxes
Waxed Paper or Parchment Paper
Iron
What to do:
See the General Directions on How to Make Drinking Straw Perler Beads on the Valentine's Day Crafts Page 3.
1. Cover the top of your box with tacky glue.
2. Place your straw beads on the glue using the end of a paint brush.
3. When the glue has dried and all the beads are in place iron the beads so they stick together.
4. Place small gifts for Mom inside the boxes.
©2012, Digital by Design, Inc. -*See Copyright Information
Card Fan Craft
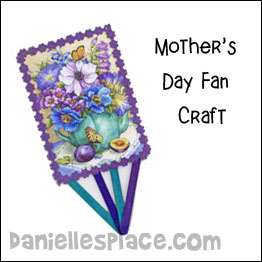
What you will need:
Old Cards
Things to Decorate Card with Such as Rick Rack, Buttons, Sequins, Ribbon, Beads, etc.
Colored Craft Sticks
Hot Melt Glue
How to Make:
1. Paint four crafts sticks and let dry. When dry, glue together to form the bottom of the fan, then glue to the bottom, inside of the card. Glue the card closed. Decorate.
Other ideas to recycle old cards:
1. Use old cards or parts of old cards to make little notebooks. Just cut out the part of the card you want. Then cut paper to fit inside the card cover. Staple to form a book. Children love these little notebooks.
Do you have any other ideas to use old cards? We would love to hear from you.
©2003, Digital by Design, Inc. See Copyright Inform
Mother's Day Crafts on Other Pages