Abraham Lincoln Unit Study Crafts and Activities for Kids
How to Make Crafts and Activities Relating to Abraham Lincoln Including: Unit Study Activities for Homeschool, Lincoln's Stovepipe Hat, a Bulletin Board Display, and a Writing Activities

The following crafts and activities come from the on The Resource Room. These learning activities arew also available as an instant download. They are appropriate for children second grade through fifth grade. It includes the following three activities:
Members ![]()
Instant Digital Download - ![]()
Abraham Lincoln Paper Bag and Paper Plate Craft Writing Unit Study Activity
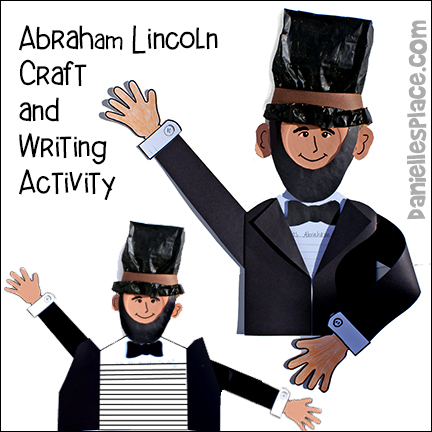
Abe's head is made from a paper plate and his stovepipe hat from a rolled-up paper lunch bag. Black construction paper is used to make the suit. Abe's shirt is a writing sheet on which children can write facts about Abraham Lincoln. The stovepipe hat can be made out of a paper lunch bag (as shown). To make the craft even easier you can use the pattern for a construction paper hat. The finished product stands twenty-one inches high and makes a great bulletin board display.
©2012 - Digital by Design, Inc.- See Copyright Information
What you will need:
Two Lunch-sized Paper Plates
One Paper Lunch Bag
Black and Brown Construction Paper
Flesh-colored and Black Paint
White Card Stock (Heavy Paper)
Scissors and Glue
Writing Paper
How to Make the Abraham Lincoln Craft with Printable Activity Sheet:
1. Before class print out the hand, bow, hat, jacket, and torso patterns.
Members ![]()
Instant Digital Download - ![]()
2. Use the jacket and bow patterns as templates to cut them from black paper, or color them black.
3. Fold a large white piece of paper in half and use the torso pattern to cut out the torso shape. Glue a piece of writing paper on the torso.
4. Cut arm shapes from black construction paper, twelve inches long and three inches wide.
5. Glue the folded 1 1/2" edges of the jacket pattern to the back of the torso piece. And then fold back the corners to make the lapels.
6. Glue the arms to the back of the jacket. Glue on the hands.
7. Paint a lunch-sized paper plate with flesh-color paint and ear shapes from the other paper plate. Paint the ear flesh color. Glue the ears to the head and the head to the torso.
8. To make the paper bag stovepipe hat, fold down the top edge of the paper lunch bag about one inch and then fold it down again. Don't worry about creases in the paper. You want the bag to be indented a little around the band. Stuff the hat with crinkled-up newspaper or paper scraps. Paint the bag black and let it dry. When the bag is dry, glue a 1 1/2" wide band cut from brown construction paper around the bottom of the hat. If you don't want to use the paper bag for the hat you can use the Abe's Hat Pattern above.
9. To finish draw on a face and cut out a beard shape from black paper and glue it to the face. Glue the bow on the neck.
"Following in Abraham Lincoln's Footsteps" Classroom Writing Activity
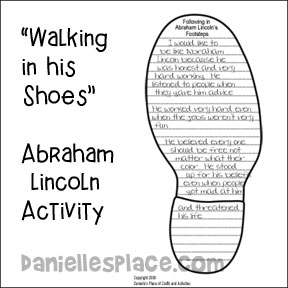
Abraham Lincoln was the United States' tallest president. He was 6'4" and he wore a size 14 shoes, but what was most impressive about him was his character. It would be hard to fill his shoes, both physically and spiritually. He was honest, hard working, respected everyone, and fought against slavery and women's rights.
To begin this activity introduce your children to idioms and discuss the meaning of "following in someone's shoes" and "filling someone's shoes".
Read about Abraham Lincoln and discuss his attributes. Then have your children write on the large shoe shape how they would like to be like Abraham Lincoln or "follow in his steps".
1. Print out the shoe print worksheets onto different colors of paper. Use light colors of paper so the children's writing will show up well.
2.Staple the "Abraham Lincoln, Following in His Footsteps" title on the middle of the bulletin board.
3. Staple the finished shoe prints in a path around the title.
Members ![]()
Instant Digital Download - ![]()
©2009 - Digital by Design, Inc. - See Copyright Information
Hats Off to Abraham Lincoln! - Classroom Writing Unit Study Activity and Bulletin Board Display

Children write about Abraham Lincoln on lined, hat-shaped paper. Display the hats on a bulletin board with the words "Hats off to Abraham Lincoln!"
The patterns for the bulletin board words and the hat-shaped paper are available free:
Members ![]()
Instant Digital Download - ![]()
Activity for Younger Children
Use the "Hats Off to Abraham Lincoln" Hat Printable to cut hat-shaped pages from blank paper. Give each child four pages and one cover page. Have them draw one picture on each page of things they admire about Abraham Lincoln. Staple the pages together to make a book.
©2009 - Digital by Design, Inc. - See Copyright Information
How to Make an Abraham Lincoln Stovepipe Hat Craft
What you will need:
Black Poster Board
Stapler and Tape
Scissors
Pencil
Glue
Ruler
Tack and String
How to Make Abraham Lincoln's Hat:
1. To make the top of Lincoln's hat cut a long strip of poster board to fit around your head with about a one-inch overlap and about seven inches tall.
2. Staple the piece into a tube shape. Put it on your head to make sure it is big enough.
3 Place the tube in the middle of a piece of poster board so that one of the open ends is resting on the poster board. Trace around the outside edge. You should have drawn a circle. Don't worry about it being perfect. Actually it would be better if it is a little oblong since your head is a little oblong.
4. Draw a bigger circle around that circle to make a brim. (To make a rounder circle tie a knot at the end of a piece of string. Place the tack through the knot at the center of the circle. Tie a pencil to the other end of the string. Move the pencil around the tack keeping the string tight and the pencil at a right angle to the working surface.)
5. Poke a hole in the middle of both circles with a pair of scissors. Cut wedge shapes starting from the center out to the first circle line. (See picture above.) Do not cut the wedges off. It should look like you are cutting a pie except that the pieces are still attached to the inside circle. Now fold up all the wedges and place the tube part of the hat in the center of the rim so that the wedges are sticking up in the inside of the tube.
6. Glue the wedges to the inside of the tube.
7. To finish glue a strip of paper black paper around the edge where the brim and top of the hat meet.
©2010 - Digital by Design, Inc. - See Copyright Information
Other Web Sites with Abraham Lincoln Activities


