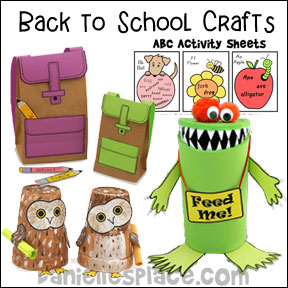
Back-to-School Crafts Page 3
Back to School Crafts for Preschool and Elementary Children, and Crafts for Teens
Duct Tape Pencil Holder Craft for Kids
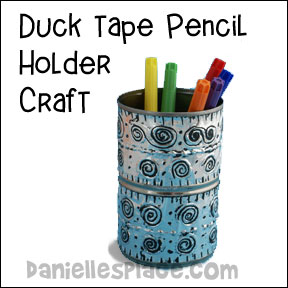
What you will need:
Aluminum Can
Shurtape AF 912 Aluminum Duct Tape (You Can Find this Tape at a Lowe's or other Home Improvement Store in the Heating and Air Conditioning Section. It is Not Duck Tape.)
Black Acrylic Paint
Paper Towels and Utensils to Engrave the Tape. I Used a Ballpoint Pen, the End of a Paintbrush, and the Tines of a Fork to Make this Design.
How to Make a Duct Tape Pencil Holder for School:
1. Measure the circumference of your can and cut the tape just a little bit longer. I used two pieces of tape, one on the top and one on the bottom of the can.
2. Lay the tape on top of the piece of fun foam. Do not take the backing off the tape. You don't want it to stick to the fun foam. The fun foam just gives you a soft surface to work on so that the utensils can indent the tape.
3. Press your utensils into the tape to make shapes and designs. You can work from the back or the front of the tape. If you press into the back of the tape, the designs will be raised. If you press into the front of the tape, the designs will be indented.
4. When you are done with your design paint the entire surface of the tape with black acrylic paint. Let it dry for a few minutes, but not completely. Wipe the paint off the surface of the tape with a folded, damp paper towel. Press lightly so that you don't remove all the paint. You want the paint to remain in the indented areas so that the design shows up better.
5. Let the tape dry thoroughly and then remove the backing and stick it to the can.
©2010, Digital by Design, Inc -See Copyright Information
Duct Tape Bookmark Back-to-School Craft for Kids
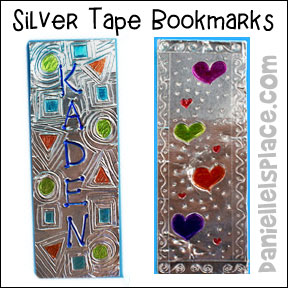
What you will need:
Shurtape AF 912Aluminum Duct Tape (You Can Find this Tape at a Lowe's or other Home Improvement Store in the Heating and Air Conditioning Section. It is Not Duck Tape.)
Card Board and Utensils to Engrave the Tape such as a Ballpoint Pen, the End of a Paintbrush, and the Tines of a Fork.
How to Make Duct Tape Bookmarks:
1. Cut a five-inch length of the duct tape and place it on the craft foam sheet. The soft surface of the foam will make it easier to engrave the tape.
2. Write your name down the length of the tape with a ball point pen or other blunt object, and add some fun shapes around the name.
3. To make the design outline each of the shapes many times until they connect and overlap.
4. You can add color by using dry erase markers and permanent markers.
5. When you are finished with your design remove the tape backing and stick it to a piece of cardboard cut to the same size or a little smaller.
©2010, Digital by Design, Inc -See Copyright Information
Duct Tape Name Plate Craft for Your Bedroom Door or Notebook
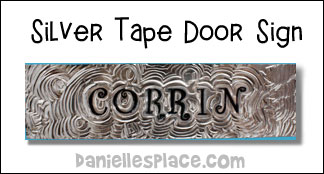
What you will need:
Shurtape AF 912 Aluminum Duct Tape (You Can Find this Tape at a Lowe's or other Home Improvement Store in the Heating and Air Conditioning Section. It is Not Duck Tape.)
Card Board
Utensils to Engrave the Tape such as a Ballpoint Pen, the End of a Paintbrush, and the Tines of a Fork
How to make duct tape name plates:
1. Cut a 6-inch length of the duct tape and place it on the craft foam sheet. The soft surface of the foam will make it easier to engrave the tape. Do not remove the back of the tape.
2. Write your name across the length of the tape using fancy letters with a ball point pen or other blunt object, and add some fun shapes around the name. You can also use rubber stamp letters with permanent ink to write the name.
3. To make the design outline each letter of the name many times until they connect with the shapes then include the shape and keep outlining until you have filled the whole surface with the pattern.
4. When you are finished with your design remove the tape backing and stick it to a piece of cardboard cut to the same size or a little smaller than the tape.
©2010, Digital by Design, Inc -See Copyright Information
Silver Duct Tape Name Tag

What you will need:
Shurtape AF 912Aluminum Duct Tape (You Can Find this Tape at a Lowe's or other Home Improvement Store in the Heating and Air Conditioning Section. It is Not Duck Tape.)
Blank Metal Dog Tags (Found at Craft Stores)
Utensils to Engrave the Tape such as a Ballpoint Pen, the End of a Paintbrush, and the Tines of a Fork
How to make duct tape name tags:
1. Place the dog tag on the duct tape and trace around the edge of the tag. Cut out the shape a little farther out than the trace line and place it on the craft foam sheet. The soft surface of the foam will make it easier to engrave the tape. Do not remove the back of the tape.
2. Engrave the tape with a ball point pen or other blunt object and add some fun shapes or designs. You can also use rubber stamp letters with permanent ink to write the name and then engrave the letters.
3. When you are finished with your design remove the tape backing and stick it to the dog tag.
©2010, Digital by Design, Inc -See Copyright Information
Back-to-School Shrink Art Backpack Tags
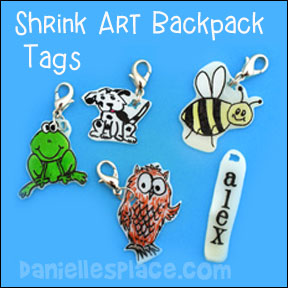
How to make shrink art tags:
1. Draw a picture of what you would like to use for you tag on a piece of paper or print out a picture. Pick a picture that is about three times bigger than you would like your tags to end up being because they will shrink a lot.
2. Tape the picture onto the back of a Shrinky Dink sheet, the shiny side.

3. Use the picture to copy the picture onto the Shrinky Dink paper (dull side) starting with your lightest colors, then outline the picture with a black colored pencil.
4. Cut the tags out and punch a hole in the tag. You will have to punch more than once to make the hole big enough if you have a regular-sized hole punch.
5. Place the tags on the shiny side of parchment paper or waxed paper and place them on a cookie sheet. Bake them for 3 minutes in a 250 degree oven or until they have shrunk to about two inches long. The directions on the Shrinky Dink web site say to use a 325 degree oven but 250 seems to work just as well. It takes a little longer to shrink them, but they don't curl up and deform as much. It probably depends on how accurate your oven temperature is.
©2007, Digital by Design, Inc -See Copyright Information
Back-to-School Shrink Art Necklace Charm
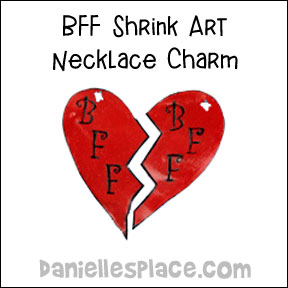
How to make:
1. Draw a picture of what you would like to use for you tag on a piece of paper or print out a picture. Pick a picture that is about three times bigger than you would like your tags to end up being because they will shrink a lot.
2. Tape the picture onto the back of a Shrinky Dink sheet, the shiny side.
3. Use the picture to copy the picture onto the Shrinky Dink paper (dull side) starting with your lightest colors, then outline the picture with a black colored pencil.
4. Cut the tags out and punch a hole in the tag. You will have to punch more than once to make the hole big enough if you have a regular-sized hole punch.
5. Place the tags on the shiny side of parchment paper or waxed paper and place them on a cookie sheet. Bake them for 3 minutes in a 250 degree oven or until they have shrunk to about two inches long. The directions on the Shrinky Dink web site say to use a 325 degree oven but 250 seems to work just as well. It takes a little longer to shrink them, but they don't curl up and deform as much. It probably depends on how accurate your oven temperature is.
©2007, Digital by Design, Inc -See Copyright Information
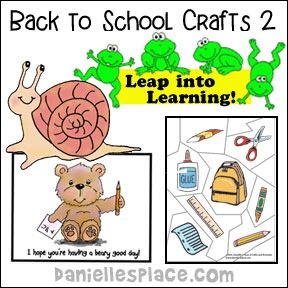
Froggy Goes to School Paper Doll Back to School Craft for Kids

This activity goes with
the book "Froggy Goes to School" by Jonathan London. Children color the frog and then pick the clothes outline that best
matches what they are wearing on their first day of school, color
the patterns, cut them out, and then
glue them onto the frog picture. The pattern for this activity is available to members only on the Educational Reading
Crafts and Activities Page.
Member's ![]()
©2005, Digital by Design, Inc -See Copyright Information
Back to School Crafts on Other Pages
Back to School Crafts on Other Websites
DLTK has an adorable school bus made from the lid of an egg carton and an apple pencil holder.
Making Friends has backpack crafts, hair accessories, and things to make for your locker.


