Christmas Crafts for Sunday School Page 4
Christmas Crafts for Children's Church and Children's Ministry
Mary and Joseph Go to Bethlehem Craft
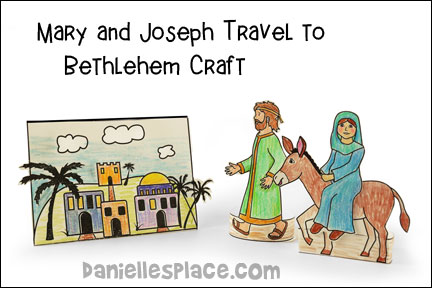
Children use the standup figures of Mary, Joseph, and the donkey to act out the Bible story of Mary and Joseph travelling to Bethlehem.
These standup paper figures are available to members on The Resource Room and as an instant download. The patterns include Joseph, Mary, donkey figures, and a figure of Mary on the donkey and the picture of Bethlehem.
Member's ![]()
Instant Download - ![]()
Baby Jesus and Stars Christmas Decoration Craft
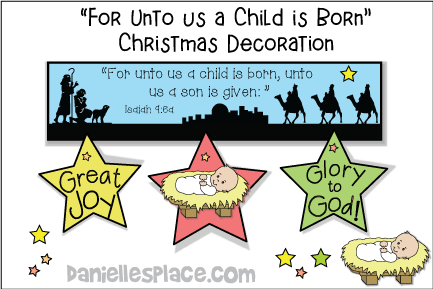
Children cut and paste the stars to the top picture and then glue the Baby Jesus in on the star and add star stickers to make this Christmas decoration.
What you will need:
Colored and White Paper
Scissors
Star Stickers
Glue
How to Make the Christmas Decoration:
1. Before class print out the patterns and make copies.
Member's ![]()
Instant Download - ![]()
2. If you have younger children cut out the star patterns and Baby Jesus patterns.
3. In class have your children cut out the patterns, and glue the stars to the poster as shown in the picture.
4. To finish have them stick star stickers on the star shapes.
©2018, Digital by Design, Inc.
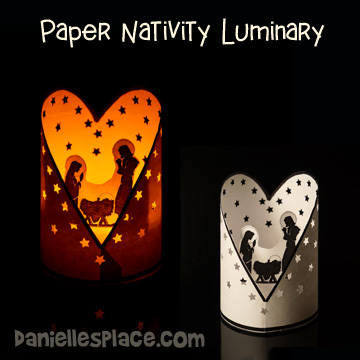
Heart Nativity Luminary
What you will need:
White Pape
Star Punch
Tape or Glue
What to do:
1. Print out the luminary pattern and nativity scene onto white paper and cut them out.
2. Glue or tape the luminary together to form a tube. Glue the tabs at the bottom of the nativity scene to form a circle that fits around a tealight.
Member's ![]()
Instant Download - ![]()
3. Use a star punch to punch star shapes all over the luminary.
4. Place a tealight in the circle of the nativity scene. Place the nativity scene in the luminary.
©2018, Digital by Design, Inc.
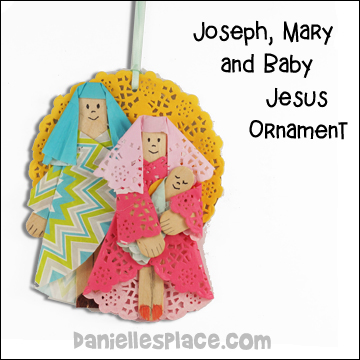
Mary, Joseph, and Baby Jesus Christmas Ornament Craft for Kids
What you wil need:
2" Paper Baking Cups or 4.5" Circles Cut from Paper
Paper Doilies - 4" or 4" Circles Cut from Paper
Member's ![]()
Free Printable Diagram ![]()
How to Make the Cupcake Liner Joseph Craft:
1. Flatten a 2-inch cupcake liner. Tape or glue a jumbo craft stick in the center of one of the flattened cupcake liners.
(If you don't have cupcake liners, you can use 4 1/2" circles cut from patterned paper.)
To make the shepherd's robe fold one side of the cupcake liner over the jumbo craft stick as shown in the diagram. Glue the cupcake liner to the craft stick.
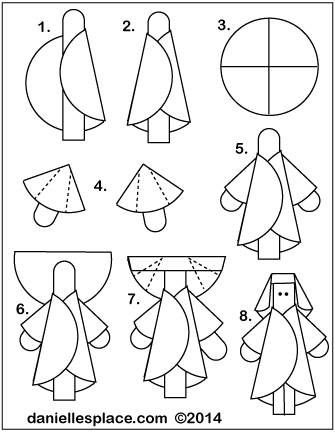
2. Fold the other side over the jumbo craft stick overlapping the first fold. Glue the flap down.
3. To make the arms flatten another matching 2" cupcake liner and cut it into quarters. (If you don't have cupcake liners, you can just use 2 3/4" circles.)
4. Fold the sides of the cupcake liner quarters in on both sides to make the arms (See diagram).
5. To make the hands cut 1 1/2" off the ends of a mini jumbo craft stick. Draw lines on the rounded ends for fingers. Glue the hands inside the arm piece and glue the arms to the body.
6. To make the head covering flatten another cupcake liner and cut it in half. Tape or glue on half behind the top of the jumbo craft stick. Fold down about 3/4" to cover the top of the jumbo craft stick.
7. Fold in both sides as shown in the diagram.
8. Fold in the sides again so that the folds meet the sides of the craft stick.
9. To finish draw on the legs, sandals, and face features with markers and colored pencils.
Mary Cupcake Liner Craft
1. To make Mary use a mini jumbo craft stick instead of the jumbo craft stick for the body.
2. Use 4" doilies or circles cut from patterned paper to make her robe, arms and headdress.
Baby Jesus
1. To make Baby Jesus cut 2" off a mini jumbo craft stick.
2. Cut a cupcake liner in half an wrap it around the craft stick leaving to rounded end showing. glue it closed.
3. Draw a face on the rounded end of the stick and then glue Baby Jesus to Mary.
To Finish glue all three figures to a paper doily that has been glued to a piece of cardboard. Punch a hole in the top and tie a string to the ornament can be hung on a tree.
©2014 - 2017, Digital by Design, Inc. -*See Copyright Information
Nativity Paper Star Craft
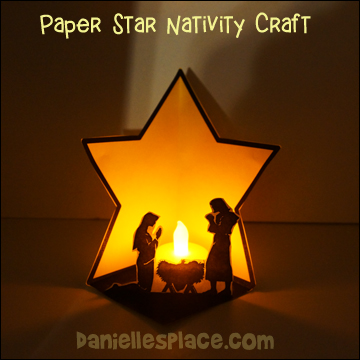
What you will need:
Yellow Paper, White Paper, Scissors and Tealight Candle
What to do:
1. Print out the star pattern onto yellow paper and cut it out. Cut the line in the middle of the black tabs at the bottom of the star.
2. Print out the nativity scene onto white paper and cut it out. Fold back the bottom tab.
Member's ![]()
Instant Download - ![]()
3. Fold the star in half lengthwise.
4. Fold up the two black tabs along the bottom lines of the star. Bring one tab over the other so they are even at the edge and glue it down.
5. Place a tea light at the bottom of the star and then glue the natvitiy scene in front of the tealight.
©2017, Digital by Design, Inc.
Christmas Cross Ornament Craft for Kids

What you will need:
Cardboard
Scissors
1 1/2" Ribbon
French Wired Polyester Mars Ribbon
Glue
Paint Markers or Acrylic Paint (Optional)
Decorative Items such as Buttons, Beans, Flowers, Rick Rack, Bows, Sequins, etc.
Watch a "View it and Do it! Video to see how to make this craft. For a larger view follow the link on the video to go to Youtube.com.
How to Make the Cross Craft:
1. Cut two cardboard strips 3/4" by 6" long and two 3/4" by 4 1/2" long.
2. Glue the strips together to form a frame.
3. Paint or decorate the frame with paint markers or acrylic paint.
4. Wind a piece of ribbon around the middle of the frame, long ways. Glue the ends of the ribbon to the back of the frame. Do not pull it too tight. Leave a little slack in the ribbon.
5. Wind another piece of ribbon around the top third of the frame in the opposite direction forming a cross shape.
6. Tie the cross shape together where the ribbons meet.
7. Glue decorative items to the frame and center of the cross.
8. To finish glue a piece of ribbon to the top of the frame so you can hang the cross ornament on your Christmas tree.
©2016, Digital by Design, Inc. - *See Copyright Information
Seed Pot Christmas Bells Craft
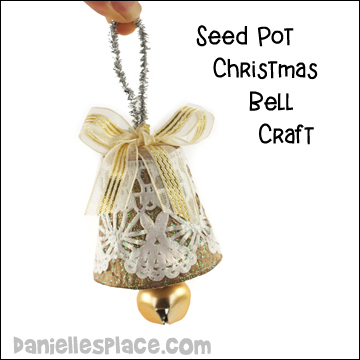
What you will need:
Small Paper Seed Pots or Small Paper Cups
One-Inch Bells
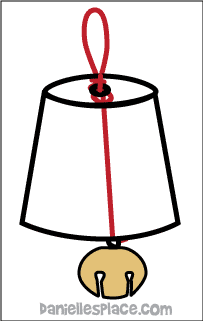
How to Make:
1. Cut the edge off of the dolies, and then cut the edge to fit around the paper seed pots or cups, and glue it on the pot.
2. Wind the end of a Chenille Stem around the top of the bell. Place the other end of the Chenille stem up through the pot and the through bottom hole. Determine where you want the bell to sit in the pot and then pull the stem back out and wind it into a small circle so that when you put the chenille stem back the circle stops the Chenille stem from going all the way through. Wind the other end of the Chenille stem into a loop for hanging.
3. Tie a ribbon to the top of the bell.
4. Cover the bell with glitter glue to make it shiny.
©2017, Digital by Design, Inc. - *See Copyright Information
3D Paper Christmas Ornaments Craft for Kids
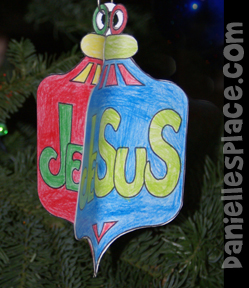
What you will need:
Paper (Card Stock Preferred)
Colored Pencils or Crayons
String or Yarn to Hang the Finished Ornaments
Scissors
Glue
How to Make the 3D Christmas Ornament:
1. Print out the patterns (3 copies) and cut them out.
Member's ![]()
Free Digital Download 
2. Color them and then glue all three patterns of the same picture together so that each side is glued to the side of a different pattern as shown in the picture.
©2009, Digital by Design, Inc. -*See Copyright Information
Shrinky Dink Christmas Ornament Craft for Kids
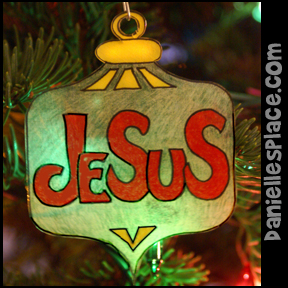
What you will need: Plastic Shrink Paper, Colored Pencils, Black Permanent Markers, Scissors, Hole Punch, and String or Ribbon to Hang the Ornaments
How to make:
1. Print out the patterns and trace them onto the dull side of the Shrinky Dink paper with a permanent marker.
Member's ![]()
Free Instant Download
(The words are backwards because the front of the ornaments are the shiny side.) Color the patterns on the dull side with colored pencils, and then cut them out.
2. Use a hole punch to punch the hole at the top of the ornaments. Shrink them in an oven according to the Shrinky Dink directions on the package.
3. When they are cool tie a string or pretty ribbon to the top.
©2009, Digital by Design, Inc. -*See Copyright Information


