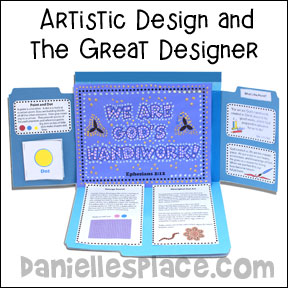
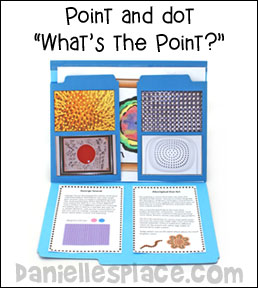
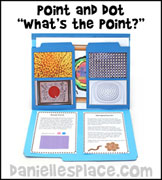
Artistic Design And the Great Designer Point and Dot
"What's the Point?" Art Bible-Based Lesson for Children
This lesson is only one lesson in the series of lessons Elements of Design And the Great Designer.
The patterns for this lesson are available to members on The Resource Room and as an instant download.
Member's 
Free Instant Download ![]()
Although this lesson is available free for your personal use, it is still copyrighted. You may not use the material on another web site or blog. See Copyright Regulations.
Bible Verse:
"For we are his workmanship, created in Christ Jesus unto good works, which God hath before ordained that we should walk in them." Eph. 2:10, KJV
Teaching Concept:
A point is a location, and a dot is a mark at a certain point. Dots are the building blocks of all the other elements. Dots give meaning to a canvas. They provide points of focused attention and reference points. When God created us he put a "dot" in our hearts, a conscious, and knowledge of him. He gives us a reason for living.
File Folder Preparation:
1. For directions on how to make and prepare the Art File Folders see below.
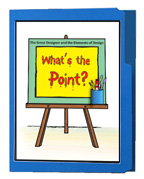
2. Print out the File Folder Cover Pattern and glue it to the front of the file folder. (This pattern is available to members on The Resource Room and as a free instant download above.)
3. Print out the George Seurat and Pointillism and Aboriginal Dot Painting Labels, cut them apart, and glue them to the inside bottom of the file folder. (This pattern is available to members on The Resource Room and as a free instant download above.)
4. Print out the Bible Verse, Element of Design, and Bible Lesson Summary Page, KJV or NIV. Cut out the labels and glue them to the inside folder on the fold-out sides. Save room on one side for the Dot Itty Bitty Book if you decide to make one.
©2012, Digital by Design, Inc. -See Copyright Information
The Lesson
Preparation:
You will need: Paper, Crayon, Markers, Water Color Paint, and other Artistic Media
(Hand out blank pieces of paper to your students. Have markers, pencils, crayons, and paint available on the table.)
What do you think of when you look at the piece of paper in front of you? (Children might answer: It's blank, there's nothing on it, it's boring, can we write on it, can we put our names on it, or it needs something.)
A blank piece of paper isn't very interesting, but there are some things that are very important on your piece of paper that you can't see. Your piece of paper is filled with points. If you place your finger on your paper, you are touching a point on that paper. A point is a location.
Picture a point on your paper. It may be in the center, on the bottom, left-hand side, or at the very top of your paper. A dot is a mark at a specific point on your paper. A dot can be any size, color (colors) or shape. Picture a dot in your mind, look at all the different things you have in front of you to make a dot. Decide what you would like to use to make the dot and how big you want to make the dot. Once you have decided what you want to use, go ahead and make one dot at the point you picked on your paper. (Let your students show off their creations. Ask each student why he or she chose to place his or her dot where he or she did, and why he or she picked a certain color, point, or size for his or her dot.)
Each of you just created a picture of a dot on a point or points. Some are more interesting then others, some took more thought and imagination, but they are all different. Your dot picture reveals something about you. Placing that dot on the piece of paper gave that piece of paper a purpose. It gave it meaning.
A dot on a piece of paper gives you something to focus on and think about. The dot on your paper made it much more interesting, didn't it? When you see a dot on a piece of paper you begin to ask yourself questions about it. You might wonder why it is there, why there aren't more, why it is so small or so big, or who made the dot? You wonder what's the point. A dot gives a piece of paper meaning. It's a starting point. The dot says, "Look at me. I'm here for a reason. Someone created me."
You are a lot like this blank piece of paper when you don't have God in your heart. You fill empty and alone. But God has put a dot in your heart. He has given you the knowledge of him, a sense of right and wrong, or a point of reference. You know somehow that there has to be a point to your existence. When you recognize that dot inside you, you recognize the creator of the "dot" and are drawn to him. God opens your eyes and you can see other dots and soon a picture appears, a beautiful picture of your life with a purpose and future.
Without Christ you are lost, but God loved you so much he sent his son to die for your sins and pay your debt. Through his grace you were (can be) saved. When you listen to that voice that tells you there is a purpose for your life and that you were created by a great designer, your life begins to have meaning, just like a blank sheet of paper begins to have a purpose when an artist places a dot on it.
You are like a work of art. Paul tells us in Ephesians, "For we are God’s workmanship, created in Christ Jesus to do good works, which God prepared in advance for us to do." Eph. 2:10 Some Bible versions use the word "masterpiece" instead of workmanship. When you follow Jesus and do what you were created to do you become what our creator intended you to be, a masterpiece!
When God created you, he had a plan for you, he wants you to be happy, he wants to give you hope and a future. You can only find that through Jesus. "For I know the plans I have for you," declares the LORD, "plans to prosper you and not to harm you, plans to give you hope and a future." Jeremiah 29:11
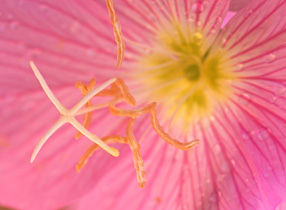
The Bible tells us that everything God created points to him, reveals his character. The world is his canvas.
"Since what may be known about God is plain to them, because God has made it plain to them. For since the creation of the world God’s invisible qualities—his eternal power and divine nature—have been clearly seen, being understood from what has been made, so that people are without excuse." Romans 1:19-20
The heavens declare the glory of God; the skies proclaim the work of his hands. Day after day they pour forth speech; night after night they display knowledge. There is no speech or language where their voice is not heard. Their voice goes out into all the earth, their words to the ends of the world which is like a bridegroom coming forth from his pavilion, like a champion rejoicing to run his course. It rises at one end of the heavens and makes its circuit to the other; nothing is hidden from its heat."Psalm 19:1-6
An artist is a lot like God in that his creations reveal who he is, or his character. When the artist places a mark on a blank page he is giving the page meaning and revealing something about himself.
An artist creates because he loves to create. He gets pleasure from his work. God created you for his pleasure and he wants to have a relationship with you.
"Thou art worthy, O Lord, to receive glory and honor and power: for thou hast created all things, and for thy pleasure they are and were created." Rev. 4:11
Prayer
Father, thank you for creating us. Help us to honor you by our actions. Help us to remember that you created us to do good works and to help others.
Art Activities
Read "The Dot" by Peter H. Reynolds
This is a great book for children who think they have no artistic ability! Vashti spends her whole art class sitting in a chair doing nothing because she thinks she can't draw. At the end of the class her teacher studies her blank paper and declares, "Ah! A polar bear in a snow storm." Vashti isn't amused and complains, "I just can't draw!" Her art teacher encourages her to "Just make a mark and see where it takes you", and that is exactly what she does. She grabs a big black marker and jabs it onto the middle of the paper and hands it to her teacher. The next day she discovers that her teacher framed her picture and hung it in the front of the class. Looking at the framed picture Vashti decides she can make an even better dot, and starts what becomes a whole series of dots, and a new confidence in her artistic abilities.

Have your children experiment to see how many different kinds of dots they can make using different artistic mediums. When their pictures have dried have them pick out their favorites and frame them. You can use the frame patterns below or buy mat boards. Make sure they sign their names to their artwork.
(This pattern is available to members on The Resource Room and as a free instant download above.)
©2012, Digital by Design, Inc. -See Copyright Information
Learn About Pointillism and Artist George Seurat
Show your children the print out of the description of pointillism and the article about artist George Seurat (See preparations) to your children, and follow the links to see pictures of Seurat's paintings.
George Seurat was a French painter who developed the artistic technique called pointillism. Pointillism uses only small dots of pure color to make a complete pictures. The close positioning of the dots fool the eye into seeing the dots as a mix of the different colors of dots (or a different color). For example, if a yellow dot is next to a red dot, the eye, at a certain distance, will see the combination of the two dots as orange. George Seurat spent two years painting his famous painting, "A Sunday Afternoon".
Dots are Used in Many Other Types of Art
1. Pointillism with Bottle Caps.
2. Cross Stitch - Print out a close up picture of cross stitch to show your children
3. Computer image editing programs use dots of color. The squares are so small that it is hard to distinguish between them making it look like a solid color or gradual change in color.
Decorate a Bible Verse Sheet Dots
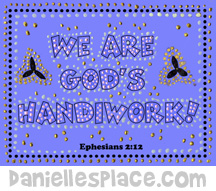
Print out the Bible Verse Sheet onto colorful paper. Have your children decorate the sheet using small dots with markers, paint, or colored glue. Add tempera paint to the glue and have your children squeeze dots onto the paper.
(This pattern is available to members on The Resource Room and as a free instant download above.)
©2012, Digital by Design, Inc. -See Copyright Information
Make Pictures Using Dotters and Discuss Good Works
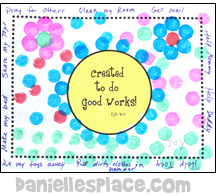
Print out the "Created to do Good Works!"
(This pattern is available to members on The Resource Room and as a free instant download above.)
Have your children think about good works they can do and write them around the border of the
page. Have them decorate their pictures with Do-A-Dot Art Markers or larger magic markers. Don't forget to have them sign their names to their works of art.
©2012, Digital by Design, Inc. -See Copyright Information
"Dot" by Patricia Intriago - Creative Graphic Exercises
It's amazing what you can do with a dot! Using opposites and simple modifications to the dots such as relative position, size, and color Patricia Intriago transforms dots into completely different objects or concepts.
Creative Activities for "Dot"
1. Read the first couple of pages of this book and discuss with your child how each dot conveys the message on the page.
2. Point out the fact the accompanying page gives clues to the overall concept. For example, the first page shows a red dot. It might read "Red dot.", but it says "Stop dot." The accompanying page shows a green dot. By following the concept of the description of the red dot, we know the green dot page will say,
"Go dot.", not "Green dot". Read several pages of the book and discuss the concepts, and then have your child compare the pictures and see if he or she can figure out what the text might read.
Make Your Own Itty Bitty Dot Book
Using opposites, positioning, and simple lines have your children make their own dot books. When they have finished see if you can figure out what their dots represent looking at the pictures without the text. This is a great exercise for any age. Children must try to convey a message with the least amount of information possible. Younger children can use crayons and older children may want to work with a computer program that allows you to manipulate shapes. If a child's picture has too much information, ask him to experiment with deleting as much information as possible, but still maintain the message. Print out the Itty Bitty Book Pattern, cut out the pages, but don't cut them apart. For Directions on How to Assemble the Books go to the Printing Instructions Page.
(This pattern is available to members on The Resource Room and as a free instant download above.)
©2012, Digital by Design, Inc. -See Copyright Information
Learn About Aboriginal Dot Painting
Follow the links below. Read the description of Aboriginal dot art from the printout to your children. Glue the description to the file folder.
Videos of Aboriginal Dot Paintings
1. Aboriginal Dot Painting - Students make dot paintings of natural forms and animals that reflects their personalities. Shows how they did a lot of pre-planning before starting their paintings.
2. How to Do Dot Painting - Detailed demonstration on how to make a dot painting.
3. Aboriginal Dot Art by Kurun Warun - Kurun Warun demonstrates dot painting and explains the meaning of his painting. He also demonstrates how to play the didgeridoo.
4. Aboriginal Artist Judy Watson Napangardi - Judy demonstrates her dot painting techniques using a series of dots to make thick lines. She makes very large paintings and sits on her canvas while she works.
5. Aboriginal Art William Sandy - Paints very large canvases with bold lines and dots.
6. Arte Aborigen Australiano (Aboriginal Art) - Pictures of Aboriginal Art
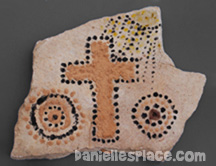
Aborigines originally used paint they made from natural items such as clay (Ochre) mixed with saliva, eggs, or animal fat.
Children will enjoy trying to make their own paints. We used orange clay, charcoal, and pollen from sunflowers to make the natural paints used on this rock.
Other things they might use are crushed fruit and vegetables such as berries and beets.
Paint with sticks that have been flattened at the ends. Rub the ends on sandstone to flatten them.
The Aborigines painted things that had meaning to them, to tell stories, and teach. Show your children the different symbols they used and ask them what symbols we use today. Have your children paint things that have meaning to them using symbols and dots.
Read "Because of You" by B. G. Hennessy
This lovely book lets children know that they are important and were created for a purpose. They were created to be loved and to love others, to be cared for and to care for others, and to be helped and to help others.
"When two people help, care, share, and listen to each other, they are friends.
When people all over the world "help, care, share, and listen to one another, it is called peace. Even something as big and important as peace begins with something small and precious. It might begin because of you."
Because of You - Purchase at Amazon.com or find it at your local library.
Look for Dots in Your Environment
Help your children find dots in their environment. Take digital photographs of the dots in natural and man-made items. If you don't have a camera, you can have your children look for examples of dots in old magazines, cut them out, and glue them to the outside of the fold-out flaps.
Look at Artists Who Used Dots in Art
Wassily Kandinsky - "Blue", "Black Increasing", "Heavy Circles", and "Several Circles".
Paul Klee - "Clarification", "Tanzerin", "Sunset"
Paul Signac - "Portrait of Félix Fénéon"
Bible Verses
“I am the vine; you are the branches. If you remain in me and I in you, you will bear much fruit; apart from me you can do nothing. John 15:5
" I have told you this so that my joy may be in you and that your joy may be complete." john 15:11
" For now we see only a reflection as in a mirror; then we shall see face to face. Now I know in part; then I shall know fully, even as I am fully known." 1 Corn. 13:12
"For this reason, since the day we heard about you, we have not stopped praying for you. We continually ask God to fill you with the knowledge of his will through all the wisdom and understanding that the Spirit gives, so that you may live a life worthy of the Lord and please him in every way: bearing fruit in every good work, growing in the knowledge of God, being strengthened with all power according to his glorious might so that you may have great endurance and patience, and giving joyful thanks to the Father, who has qualified you to share in the inheritance of his holy people in the kingdom of light. For he has rescued us from the dominion of darkness and brought us into the kingdom of the Son he loves, in whom we have redemption, the forgiveness of sins. The Son is the image of the invisible God, the firstborn over all creation. For in him all things were created: things in heaven and on earth, visible and invisible, whether thrones or powers or rulers or authorities; all things have been created through him and for him. Colossians 1:9-16
More Lessons in this Series
Line – "Which Path do You Choose?"
Color - "How Do You Feel?"
Value – "Light or Dark?"
Assembling the File Folder
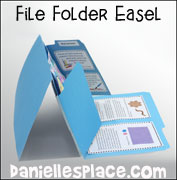
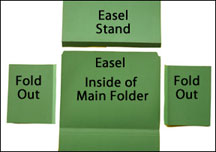
1. The two fold-outs can be folded in to hold the art in place. Photographs of 3-D artwork can also be attached to the outside of the fold-outs and to the back of the easel.
2. The back of a second folder is attached to the inside of the main folder creating a easel where art work can be displayed.
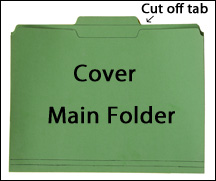
1. Cut the tab or tabs off the file folder to make a straight edge.
2. Glue the Cover Picture onto the front of the folder (the shorter side).
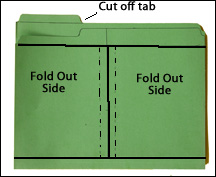
3. To make the tabs and easel stand and fold outs cut the front cover off another file folder 3/4" from the fold on the top scored line.
4. Fold the top part of the folder in half and cut it in half. Fold one side of each fold-out 1/2".
5. Fold the back part of the folder (easel stand) 1/2' on one long side and glue the folded edge it to the inside of the main folder.
6. Glue the fold-outs to the sides of the folder.
©2012, Digital by Design, Inc. -See Copyright Information
Copyright Notice
The craft patterns, ideas, songs, lessons, etc. on this web site are copyrighted.
You may not publish a copy of them on any other web site.
It is illegal to copy material from this web site without permission and publish it any where on the web even if you include the copyright notice and author's name.
All rights reserved. While many of the crafts on this site are free, they are still copyrighted. They may not be reproduced or transmitted in any form or by any means, electronic or mechanical, except for use in your local church, school, home, library, and other organizations. It is illegal to copy any part of this craft and place it on another web site, bulletin board, or personal web site. To request permission to copy this material for any other use than personal use contact me by e-mail.
For more Sample Sunday school lessons go to the Sample Sunday School Lessons Page.
For free Sunday school lessons go to the Free Sunday School Lessons for Children Page.


