Duck and Goose Crafts and Learning Activities for Kids
How to Make Crafts and Learning Activities Relating to Ducks
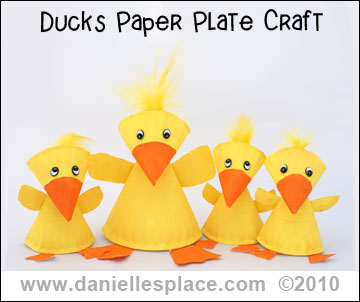
Duck Paper Plate Craft
What you will need:
Small Lunch-size Paper Plates
Dinner-size Paper Plates for the Large Bird
Paint
Glue Gun or Stapler
Yellow Feathers
Eyes
How to Make Duck Paper Plate Craft:
1. To make the smaller ducks use the small paper plates. To make the larger duck use larger plates.
2. Fold a paper plate in half and cut it in half.
3. To make the head roll one half of the plate into a cone shape overlapping the sides about 1/3 of the plate. Glue the cut side closed.
4. To make the body roll the other half of the paper plate into a cone shape overlapping the side only about one inch at the edge. Glue the cone closed on the cut edge. Fold the tip of the cone down about 1/2" and glue the head to the folded tip.
5. Cut wings and feet from another paper plate and glue them to the body as shown in the picture.
6. Paint the paper plate ducks and glue on eyes. To finish glue feathers to the top of the heads.
7. Make the larger duck the same way except use larger plates.
Activities for this Craft:
1. Make five little ducks and one mother duck and use them as puppets to act out the "Five Little Ducks" song.
2. Make at least two little ducks and hide a plastic egg under one of the ducks, mix up the ducks and have your child try to guess which duck has the egg.
3. Vocabulary Word Review - Make at least five little ducks and place small plastic eggs with your child's vocabulary words written on pieces of paper inside the eggs. Hide the eggs under the ducks. Show your child a word and ask him to find the egg that has the matching word. If your child picks a duck that doesn't have the matching word, place the word back in the egg and under the duck. Keep playing until he has found all the words. If you don't have plastic eggs, you can just cut egg shapes from paper.

4. Counting Ducks - Read Duck & Goose, 1, 2, 3 by Tad Hills. Make a bunch of ducks, a goose, and a bird and have your child practice counting them.

5. Read One Duck Stuck by Jane Chapman - Your children will love this rhyming book. It is filled with onomatopoeia (a word that imitates or suggests the source of the sound they are describing) such as splish, clomp, plop, and plunck). Help your child find as many examples as onomatopoeia as he can find in this book. Try to make some of the sounds using things you find around the house.
This book is also filled with words rhyming with duck.
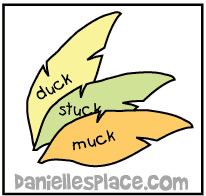
See how many words your child can find that rhymes with duck such as muck and stuck.
Write the words on feather patterns and place them in the paper plate duck's head.
Member's ![]()

6. Read Duck & Goose by Jane Chapman
Your preschool children will love this book. The pictures are adorable with bright and entertaining cartoon-like animals.
Duck and Goose find a large spotted ball at the same time. They think it is an egg and fight over who should take care of it. They grudgingly decide to both sit on the ball and eventually begin to bond and realize that they have more fun when they work together and share the "egg". When someone points out that the egg is actually a ball Duck and Goose decide that it makes a great toy for playing together. You can also buy duck and goose plush toys and act out the story with your child. Or use them to make up your own stories.
"Ruby in Her Own Time" by Jonathan Emmett

Ruby In Her Own Time - Ruby is the smallest duck of her five siblings. She is the last to hatch, to eat, and to swim. Her father wonders if she will ever catch up, but mother knows that she will "in her own time". When it comes time to fly, Ruby flies farther and wider, and soars high among the clouds.
This book is a great book for not only children, but also parents. It will remind parents not to compare siblings, and accept their children for who they are. They will each "soar high" in their own way.
The illustrations in this book are irresistible. Your children will want to read this book over and over, or at least look at the pictures again and again.
1. Feathery Picture - Have your children try to draw their own ducks and try to make them look soft and fluffy like the pictures in the book using different techniques. They can use different types of paint and brushes, feathers and any other objects they can think of. Try blowing water color paint with a straw or using a feather to smear the paint, or smearing chalk with their fingers or other objects.
2. Make a Feathered Duck - Glue soft yellow feathers to the Duck Paper Plate Craft above to make it look soft and fluffy like the pictures in "Ruby in Her Own Time".
Is it a Duck or a Goose?
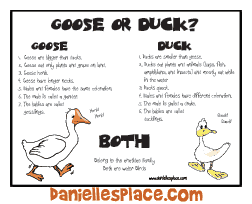
Visit a local park and observe the ducks and geese. Before you leave research on the Internet the differences between ducks and a geese. Make a list to take with you, and don't forget to take popcorn or dried bread to feed them. "Is it a Duck or Goose?" Printout is available to members.
Member's ![]()
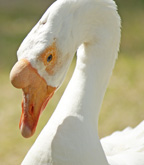
Note: Geese can be very aggressive and even nip at your legs and ankles so be careful. My daughter found one goose that was especially friendly though. It seemed to enjoy sitting on her lap and kept trying to preen her hair. At one point it put its neck around hers like it was giving her a hug and then tried to climb up on her shoulder.
©2010, Digital by Design, Inc. - See Copyright Information
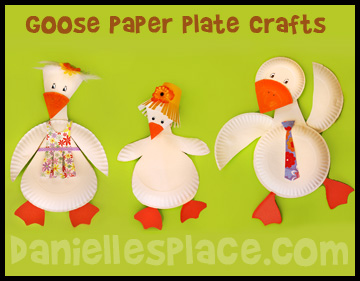
Goose Family Paper Plate Craft
What you will need:
Snack-sized Paper Plates
Dinner-sized Paper Plates
Banquet-sized Paper Plates
Orange Paint
Orange Construction Paper
Yellow Paper Cup for the Hat
Colorful Scrapbook Paper or White paper
Markers
White Feathers
Silk Flower Petals
Ribbon, Scissors, and Glue
How to Make a Gosling Paper Plate Craft:
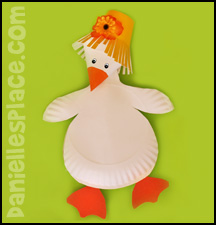
1. To make the gosling's body cut a dinner-sized paper plate using the printable pattern. Place the pattern on half the plate and trace it, and then turn the pattern over and trace it to the other half of the plate. Cut along the pattern lines. Use the first plate you cut to make the back of the gosling.
Member's ![]()
Free Digital Download ![]()
2. Use the feet pattern to cut feet from orange construction paper. Glue the feet to the bottom of one of the paper plates. Glue the back and front of the gosling's body together along the edges of the plate.
3. To make the head of the gosling cut a dinner-sized paper plate in half. Use only one half of the paper plate. Fold it in thirds forming a triangle shape. Glue the fold closed. The point of the folded plate is the gosling's beak. Fold the sides of the top of the head in about one inch and then fold down the back and front of the head at the top and glue it down. This will close up the hole on the top of the head. Paint the tip of the head orange for the beak. Use a pen to draw in the eyes.
4. Glue the head to the body.
5. To make the hat cut the edge off a paper cup and then cut slits 1 1/2" long and about 1/4" wide all the way around the paper cup. Fold up the cut edges, glue on a silk flower to decorate the hat and then glue the hat to the head of the gosling.
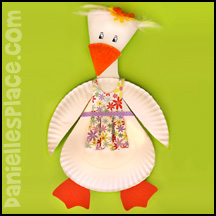
How to Make a Mother Goose Paper Plate Craft:
1. Place two banquet-sized paper plates together, top to top, and cut a slit on both sides to make the wings as shown in the picture to the left. Round out the body below where you cut the wings.
2. Cut a neck shape 2" x 5" from white cardboard and glue it to the top of one of the body paper plates.
3. Cut feet shapes from orange construction paper and glue them to the same body paper plate. Glue the two body paper plates together around the edges of the plate and the cut edges.
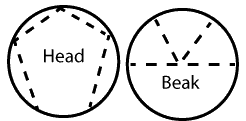
4. To make the head fold two snack-sized paper plates using the diagram above. The folds should be folded toward the top of the plate or towards the part you put food on. Glue the two folded paper plates together, folded sides together, to make the head. Fold down the pointed top or the head and glue it down. Fold another snack-sized paper plate in half and then in thirds using the diagram above to make the beak. Slide the beak over the point on the head and glue it to the head. Paint the beak orange. Glue the head to the neck. Glue some feathers and silk flowers to the top of the goose's head.
5. To make the mother goose's apron print out the pattern and cut the pieces from colorful paper, or use markers to decorate the apron pattern. To make the skirt of the apron fold the lines marked with a "B" back and the ones marked with an "F" forward. Glue the skirt part of the apron to the top of the apron and add a ribbon.
Member's ![]()
Free Digital Download ![]()
How to Make Gander Goose Paper Plate Craft:
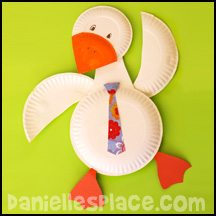
1. To make the head of the gander goose glue two snack-size plates together. To make the beak place another snack-size paper plate over the bottom of the head paper plates and fold back the sides to form a point and glue to the head. Paint the beak orange.
2. Cut a dinner-sized paper plate in half and cut the halves into wing shapes.
3. Cut a neck from white card board about 7" long about 4" wide at the bottom and 2" wide at the top. Glue the neck to a dinner-sized plate and glue another paper plate on top to make the body. Glue the wings to the top of the body and neck.
4. Cut feet from orange construction paper and glue them to the body.
5. Print out the pattern and use the pattern to cut a tie from colorful paper or color the pattern with markers. Fold the knot part of the pattern into a triangle shape and insert the tie part into the triangle shape and glue closed. Glue the tie to the goose's neck.
Member's ![]()
Free Digital Download ![]()
©2011, Digital by Design, Inc. - See Copyright Information
See the Father's Day Craft Page for Other Ideas Using this Craft.
Goose Phonics Activity Sheet
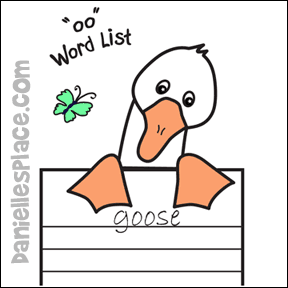
Read the story "Goose on the Loose " and then have your children make a list of all the words they can think of that are spelled with "oo".
Sample list: goose, loose, moose, too, boo, coo, goo, hoo, moo, shoo, zoo
Member's ![]()
©2011, Digital by Design, Inc. - See Copyright Information
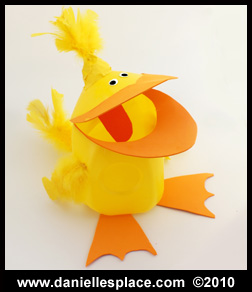
Milk Jug Duck Container Craft for Kids
What you will need:
Empty Plastic Milk Mug
Orange and Red Craft Foam Sheets
Sharp Scissors
Valspar Plastic Primer Spray Paint or Krylon Clear Plastic Primer Paint - If you are using the Acrylic Patio Paint
Yellow Krylon Fusion Spray Paint or other Spray Paint Made for Plastic
How to Make Milk Jug Duck Container:
1. To remove the label fill the jug up with hot water and let it sit for a minute. This will loosen the glue. Carefully pull off the label. Do not get the label wet before trying to remove it or it will just disintegrate and you will have a hard time getting it off. Once the label is remove you can wash and dry the plastic milk jug.
2. Cut a one-inch section from the handle so that the top of the jug can be bent back and the mouth opened. Tape the remaining handle together with yellow duck tape so that the mouth stays open.
3. Spray paint the entire with the primer paint and then paint the jug yellow.
4. Cut a duck bill shape and webbed feet from orange craft foam and glue them to the jug as shown.
5. Cut a tongue from red craft foam and glue it to the inside of the mouth.
6. To finish glue on yellow feathers for wings and a tail. Tape feathers to the top of the jug with yellow duck tape.
Designed by Danielle Warvel
©2010, Digital by Design, Inc. - See Copyright Information
Quill Pen Craft
Before pencils and pens were invented quill pens were used. People had to make their own pens from the quills of ducks and other birds.
Go to https://www.regia.org/quills.htm for directions on how to make a quill pen.
Don't worry too much about cutting the quill correctly. Just cutting off the end at an angle works pretty well. If you have young children don't use the India ink because it does not come out of your clothes. Use watered-down paint instead.
Quill Pen Activities
Write a letter to your friend or relative using your quill pen. Seal it with a wax seal like they did in medieval times to make sure no one read important documents except the intended recipient.
Painting with Feathers
Tie several feathers together to make a paintbrush. Paint a picture using your new brush. Experiment with other types of brushes. You can use grass, and other items you find around the house.
Play Duck, Duck, Goose
Have your children sit in a circle. Select one child to be the first player. That child walks around the outside of the circle saying, "Duck, duck, duck . . . goose!" tapping each child's head as he says the words. When he says "goose" and taps a child's head, the child jumps up and chases the first player around the circle back to his own place. The first player must sit down in the chasing child's place before he is tagged.
Feed the Ducks
Go to your local city park or pond and feed the ducks. The best time to do this is in the early spring when the ducklings have just hatched. Take lots of pictures and have your child write about his or her experience. While you are there write down any questions you or your child might have, and when you get home research to find the answers. You can also read The Little Duck, a factual account of a year in a duck's life.
Hatch Your Own Duckling
Check with your local zoo to see if they have duck eggs that you can hatch and then return to the zoo. Your children will learn more than you can imagine by actually seeing how the egg and duckling develops. Have your child keep a journal about his or her experience.
Lucky Duck Paper Plate Craft for Kids
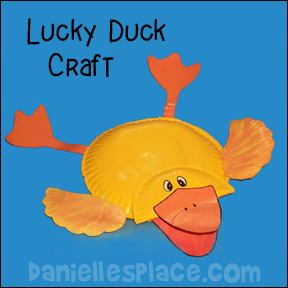
What you will need:
Four Dinner-sized Paper Plates for Each Duck (heavy duty is best, but the cheap ones will work)
One Snack Size Paper Plate
Orange, and Yellow or White Paint
Hot Melt Glue Gun or Stapler
School Glue
Card Stock
Scissors
Black Markers
How to Make Lucky Duck Paper Plate:
1. Print out the pattern and cut them out. Place the feet pattern on a paper plate so that the web part of the feet are on the outer edge of the paper plate. Trace the feet pattern twice and then cut the feet out. Place the wing pattern a paper plate so that the scalloped edge is at the edge of the plate. Trace the pattern. Turn the pattern over and place it at the edge of the paper plate again, trace it, and then cut the wings out. Place the bill pattern on the paper plate so that the part connected to the head is at the edge of the paper plate. Trace the pattern and then trace it again. Cut out the bill.
Member's ![]()
Free Digital Download ![]()
2. Place a dinner size paper plate, right side up, on the table. Decide where you want the wings and feet. Staple or glue them to the top of the paper plate. (See picture.) Place another dinner-sized paper plate upside down on top of the right side up paper plate and glue or staple it on top of the plate with the feet and wings.
3. To make the head fold a snack size paper plate in half and glue it to the body of the duck as shown.
4. Paint the feet and bill orange. Paint the body and head yellow or white and let them dry.
5. Glue the bill to the head as shown in the picture.
6. Draw eyes on a piece of card stock, cut them out and glue them to the head.
©2005, Digital by Design, Inc. - See Copyright Information
"Duck on a Bike" Learning Activity Ideas
"Duck on a Bike " written by David Shannon
One day down on the farm a goofy looking duck decides to ride a bike. He says, "hello" to all the different animals that live on the farm as he rides by. They all say, "hi" back in their own way, but what they're really thinking is something completely different. Cat says, "Meow", but what she's thinking is "I wouldn't waste my time riding a bike."
She is seen lying on the ground licking her paw like she could care less. Horse says, "Ne-e-e-igh!" but what he is thinking is "You're still not as fast as me, Duck!" He is pictured with his nose up in the air and glancing sideways at duck. Goat says, "M-a-a-a", but what he is thinking is, "I'd like to eat that bike!" He is shown with wide eyes staring at the bike's tires. (Ages 3 - 7)
1. Creative Writing - This is a great book to demonstrate repetition in writing. Your children can write their own pages to add to the story. Let them pick an animal and decide what it thought after saying hello to Duck. Have them draw a picture illustrating their own page.
For example a child may write: "Then Duck rode, no-hands, past Armadillo. "Hello, Armadillo," said Duck. "Hello," said Armadillo, but what he thought was "He needs a helmet."
2. Art - This is a great book to demonstrate perspective in drawing. We see the duck on a bike drawn from every perspective imaginable. Study the pictures in the book and discuss with your child from which direction the reader is viewing the duck. Set up a 3D duck. You can use a stuffed animal, decoy, rubber duck, or the paper plate duck craft above. Practice drawing the duck from different perspectives. If you have difficulty drawing it, take pictures of the duck first and draw the pictures from the photographs.
3. Vocabulary Review Game - This game is played like the Chinese Tile Game. Write the vocabulary words and review words on pieces of 4" x 2" sheets of paper. Pile the pieces of paper up with some covering each other. The object of the game is to uncover all the vocabulary words by saying them correctly. If a child says the word correctly, he can pick up the piece of paper. He can only say the words that are all the way uncovered.