Flower and Plant Crafts for Kids
How to Make Crafts Relating to Flowers and Plants
Paper Lunch Bag Flowers Craft
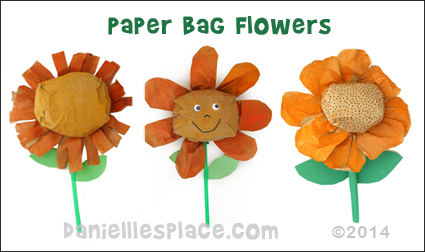
Make sunflowers, daises, roses, asters, and anything your imagination can think of out of plain brown lunch bags!
What you will need:
Brown Lunch Bags
Water Color Paint
Twistie Ties or Chenille Stems
Recycled Plastic Bags or Paper
Green Straws
Green Paper
Markers
Googly Eyes
How to Make the Paper Bag Flowers
1. There are several ways to make the flowers depending on how many petals you would like your flower to have. If you only want petals in one row around the center, you only need to use one lunch bag (see the center flower in the picture). If you would a flower with layers of petals such as the flowers at the two ends in the picture, you will need more than one bag. Place one or two bags inside each other.
2. Stuff four to five wrinkled up plastic grocery bags inside your lunch bag/bags pushing them down to the bottom of the bag.
3. Gather the sides together just above the bags and use a twistie tie or half a Chenille stem to secure the gather.
4. Starting with the outside bag, cut slits down from the top of the bag to the gathered part all the way around the bag. Fold the cut pieces down and shape the petals with your scissors. Do the same thing for the inside bag/bags.
5. Once you have the petals the way you would like use water color paint or oil pastels to paint your flowers.
6. Make a stem and petals for your flowers out of green construction paper or a green straw. Glue the stems to the back of the flowers.
7. To finish add details to your flowers with markers and googly eyes.
©2014, Digital by Design, Inc. - See Copyright Information
Books about Sunflowers
Sunflower House - Great Summer Activity for Children of all Ages!
Tissue Paper Poppies
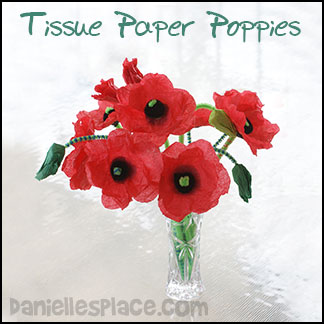
How to Make The Tissue Paper Poppy Flowers:
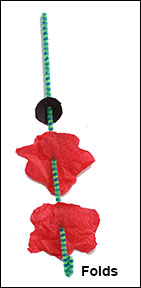
1. For each flower cut two flower shapes with five petals from red tissue paper. Make one flower shape 80% smaller than the first.
Member's ![]()
2. Wrinkle up the flower shapes and then smooth them out a little.
3. Fold the end of a green Chenille stem down about 1/2", and then fold it down two more times.
4. Cut 1 1/2" circles from construction paper, punch a hole in the center of the circle, and a slit from the outside of the circle to the center circle. Glue the circle into a slight cone shape.
5. Punch a hole in the center of smallest tissue paper flower shape with the unfolded end of the Chenille stem. Push the flower shape up the stem to the folded end.
6. Punch a hole in the center of largest tissue paper flower shape with the unfolded end of the Chenille stem. Push the flower shape up the stem to the folded end.
7. Place the cone shape on the unfolded end of Chenille stem through the inside of the cone. Push the cone shape up to almost the top of the folded end of the Chenille. Place a little glue inside the cone and press it up against the tissue paper flowers.
©2014, Digital by Design, Inc. - See Copyright Information
"In Flanders Field" Poem and Poppy Photograph Free Printable
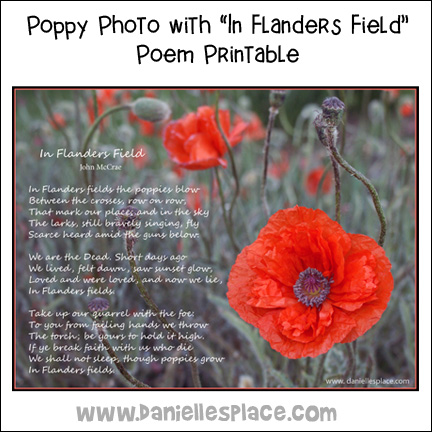
Print out this free printable, "In Flanders Field" Poem with Poppy Photograph, and use it as a display or give it to your students to help them memorize the poem.
![]() Pattern
Pattern
"Identify the Flowers" Game
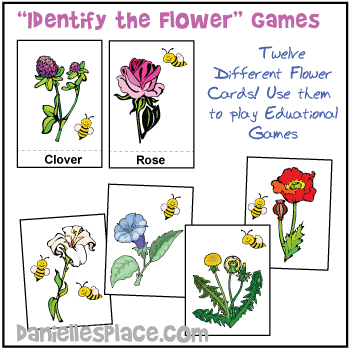
How Many Flowers Can You Identify?
Twelve Printable Flower Cards
You can use these cards to play several different games.
1. Match Game - Print two sets and use them to play a match game.
2. "Name the Flower" Race - See who can name all the flowers the quickest.
3. Writing Cards - Write descriptions and interesting facts about the flowers on the back of the cards.
4. See who can name the most flowers
Member's ![]()
Venus Flytrap Paper Plate Puppet and Toss Game
Children or adults can use this puppet to teach about the Venus Flytrap. It is so simple to make and only takes two paper plates and a little bit of card stock.

What you will need:
Two Regular-sized Paper Plates
Green and Pink Acrylic Paint
White Card Stock
How to Make the Venus Flytrap Puppet:
1. Fold one paper plate in half so that the top of the plate is on the outside. This will be the inside mouth of the Venus Flytrap. Paint the inside green around the edge and pink in the middle.
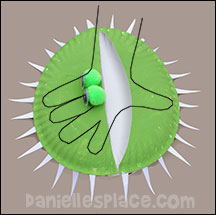
2. Cut another paper plate in half, and cut a curve from the side of one of the halves as shown in the diagram to the right. This will be the bottom outside of the Venus Flytrap. Paint the bottoms of the paper plate halves green.
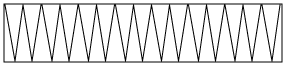
3. Cut a strip of card stock two inches wide and 8 1/2" long. Cut wedge shapes (teeth) from the strip as shown in the picture below.
Glue the teeth around the edge of the unpainted side of the mouth piece. Fold the mouth in half to make sure you glue the bottom teeth so they line up opposite the top teeth. When the teeth come together they should alternate. Glue the paper plate halves to the folded paper plate mouth covering the area where the teeth are glued to the mouth.
4. Glue eyes to the top of the puppet.
5. Use your puppet to teach about Venus Flytraps.
Educational Activities Using the Venus Flytrap Puppet
1. Discuss how Venus Flytraps catch their prey by snapping shut their modified leaves when trigger hairs are touched. The teeth around the end of the leave form a cell-like enclosure so that flies can not escape. Have your children make their own paper plate flytraps and then test them to see if they can catch flies. Make flies from 2-inch black pom poms. Cut strips of white plastic grocery bags about 6" long by 1" wide. Tie the strip around the center of the pom pom and then cut the ends into wing shapes. Glue on wiggle eyes to finish.
©2014, Digital by Design, Inc. - See Copyright Information
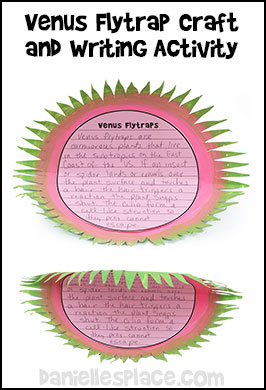
Venus Flytrap Paper Plate Craft and Writing Activity
Use this Venus Flytrap paper plate craft as a educational tool. Children can write facts about flytraps on the writing sheet or the circular book and glue it to the inside of the paper plate flytrap.
What you will need:
Regular-sized Paper Plate
Green and Pink Paint
Paint Brushes
Scissors
Green Construction Paper
How to Make the Paper Plate Venus Flytrap:
1. Paint the bottom of the paper plate green and the top green around the edges. When it is dry fold it in half so that the top of the plate is on the inside.

2. Print out the circular book or writing sheet on onto pink paper.
Member's ![]()
3. Have your children write facts about flytraps on writing paper or circular book and then glue it to the inside center of the paper plate flytrap.
4. Cut wedge shapes all the way around the edge of the paper plate to make the cilia.
©2014, Digital by Design, Inc. - See Copyright Information
Test Your Knowledge - Can You Answer these Questions About the Venus Flytrap?
1. What does the flower of the Venus Flytrap look like?
2. Where do Venus Flytraps grow naturally?
3. How does the flytrap attract bugs?
4. How does it know when an insect has landed on it.
5. How does the flytrap determine when to snap shut its leaf?
6. How many hairs does the flytrap have?
7. How long does it take a plant to digest an insect?
More Learning Activities
1. Lookup these other interesting Carnivorous Plants on the web - Cobra Lily, English Sundew, Pitcher Plants, and Yellow Trumpet.
2. Check out these videos and Movie:
BBC - Life - Venus Flytraps: Jaws of Death - This is an amazing video with up-close images of the flytrap, hairs, nectar, fly, etc. Don't miss this video!
Watch "Little Shop of Horrors" 1986 Movie with Steve Martin, Rick Morainis, and Bill Murray.
©2014, Digital by Design, Inc. - See Copyright Information
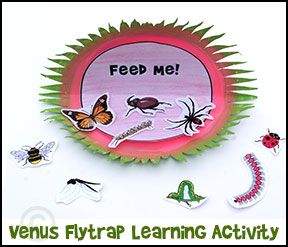
Venus Flytrap Arthropods Craft and Learning Activity
Use this Venus Flytrap paper plate craft as a educational tool. Children can see how many different arthropods they can name and feed to the Venus Flytrap, and classify them into subphylums - arachnids, crustaceans, and insects.
What you will need:
Regular-sized Paper Plate
Green and Pink Paint
Paint Brushes
Scissors
Green Construction Paper
How to Make the Paper Plate Venus Flytrap:
1. Paint the bottom of the paper plate green and the top green around the edges. When it is dry fold it in half so that the top of the plate is on the inside.
2. Cut wedge shapes all the way around the edge of the paper plate to make the cilia.
3. Print out the "Feed Me" sheet onto pink paper. Cut stem shapes from green construction paper and glue them to the side of the flytrap.
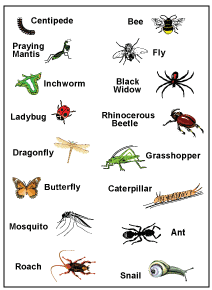
4. Print out the arthropod sheet or use clip art.
Member's ![]()
5. Have your children see how many arthropods they can name and feed them to the flytrap. Then have them divide them into subphylums.
©2014, Digital by Design, Inc. - See Copyright Information
Venus Flytrap "Feed Me" Printable Board Game
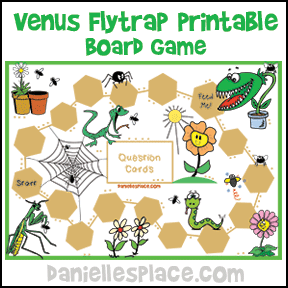
This printable game is a great way to review facts about Venus Flytraps.
Children read about flytraps and make up their own questions and answers for the game.
Each player starts with five flies. Players take turns picking a card and trying to answer a question. If a player answers a question correctly, he spins a die and tries to get one of his flies to land on the Venus flytrap space.
The player who "feeds" all his flies to the flytrap first wins.
This Printable Game is available to members.
Member's ![]()
©2014, Digital by Design, Inc. - See Copyright Information
Good Books about Venus Flytraps and Other Carnivorous Plants