The Christmas Story Sunday School Lesson Series for Children
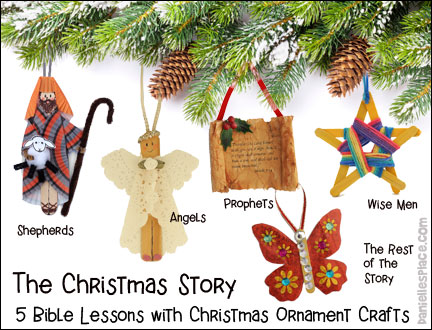
In this series of five Christmas lessons children make Christmas tree decorations that will remind them about part of the Christmas story.
Each week children add their decorations to the classroom tree. They will enjoy seeing the tree changing and getting more beautiful each week as ornaments are added. Use the decorations each week to review previous Bible lessons.
If you don't have room for a Christmas tree in your room, you can send the ornaments home with your children, or make a large paper tree and tape it to your wall.
The following 5 lessons in this series are available to members on The Resource Room and as instant digital downloads.
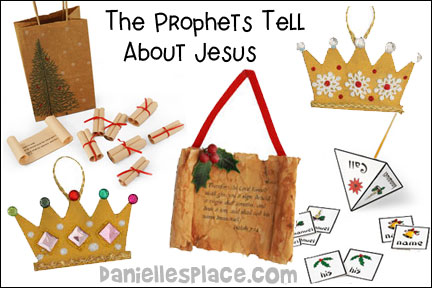
Free Sample Lesson Lesson 1 - The Prophets Tell About Jesus
This is the first lesson in a series of five lessons. Each week your children make Christmas tree decorations that will remind them about part of the Christmas story. They will add more decorations to the tree for each new lesson, and will enjoy seeing the tree changing and getting more beautiful each week. If you don't have room for a Christmas tree in your room, you can send the ornaments home with your children, or make a large paper tree and tape it to your wall. These lessons can be used for any age group by adjusting the content.
Member's ![]()
![]() Instant Download Sample Lesson
Instant Download Sample Lesson
Crown Ornament Christmas Craft
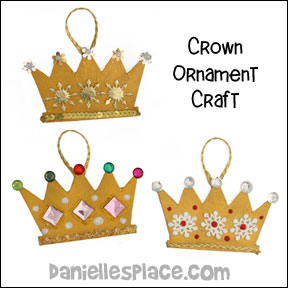
What you will need:
Gold Poster Board or Cardboard and Gold Paint
Tacky Glue
Ribbon to Hang Ornaments
Decorative items such as Gems, Rickrack, Glitter Glue, Sequins, Craft Foam Shapes, or Stickers
Scissors
Low Temp. Glue Gun
What to do:
1. Print out the Pattern.
Member's ![]()
![]() Instant Download Sample Lesson
Instant Download Sample Lesson
2. Cut the crowns from poster board.
3. In class have the children decorate them with sequins, glitter glue, and beads.
4. Add a string or ribbon to hang the ornament.
Copyright 2005, Digital by Design, Inc. - See Copyright Information
Make a Foil Tape Crown Craft
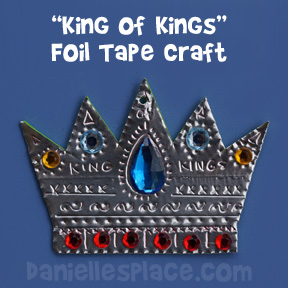
What you will need:
Four-Inch Aluminum Foil Tape - Utensils to Engrave the Tape such as a Ballpoint Pen, Straws, the End of a Paintbrush, and the Tines of a Fork
Card Stock (Heavy Paper)
How to Make Foil Tape Crown:
1. Draw crown shapes on card stock (heavy paper) and cut them out.
Member's ![]()
![]() Instant Download Sample Lesson
Instant Download Sample Lesson
2. Measure the crown templates and cut the foil tape the length of the templates. Peel off the backing from the tape being careful not to crease the tape. Stick the tape on the foam sheets smoothing them down so there are no bumps.
3. Place the template on the foil tape and trace around it. Cut out the crown shape.
4. Engrave the crowns with objects such as a straw, a pen, the tip of a paint brush, etc. by pressing the objects into the tape. Write words on the crown using a ballpoint pen.
5. To finish glue on gemstones with the tacky glue.
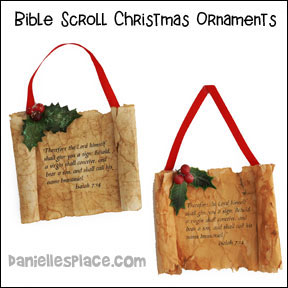
Bible Scroll Christmas Ornament
In the first lesson your children learn that the prophets told about Jesus' birth thousands of years before he was born.
What you will need:
Paper
Paint or Tea Bags
Ribbon
Holly Leaves
Bows
Paper Towels
Glue
How to Make Isaiah Scrolls:
1. Print out the scroll patterns and tear them apart. (Don't worry about the edges being even because you want the edges to look old and worn.)
Member's ![]()
![]() Instant Download Sample Lesson
Instant Download Sample Lesson
2. Have your children wrinkle up their papers and then flatten them out. Then have them do it again. Give them watered down brown watercolor paint or concentrated tea to paint lightly over their pieces of paper. Wipe of any excess water and place them on paper towels to dry.
3. Show them how to roll up the ends as shown in the picture. Let them pick some decorations such as holly leaves, bows, etc. to glue to the scrolls. Help them glue on a ribbon to hang the scroll. Save these for next week. They will place them on the tree as you review the lesson.
©2007, Digital by Design, Inc. -*See Copyright Information
Games and Activities
Play a Bible Lesson Review Waiting Game
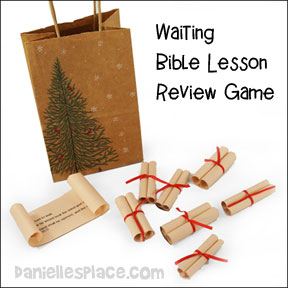
Preparation:
1. Before class print out the Scripture Papers, cut them apart, and roll them up and tie them with ribbon to make them look like Bible scrolls.
2. Cut out some more pieces of paper and write, "Have a snack" on them. Place them all in a pretty Christmas gift bag.
3. Set up chairs like you would for Musical Chairs. Have one chair for each child.
4. Place a special sticker on one of the chairs.
5. In class have your children walk around the chairs in a circle while you play Christmas music. When you stop the music have the child who sat on the chair with the sticker pick a piece of paper from the bag. Read the paper and have him do what it says to do on the paper.
Member's ![]()
![]() Instant Download Sample Lesson
Instant Download Sample Lesson
Before you start the game talk about the following:
How much did your parents know about you before you were born? They may have known if you were going to be a boy or a girl. Doctors can take pictures of a baby before it is born, although sometimes they are wrong. Your parents may have picked out a name for you before you were born. They may have known what hospital they would go to when it was time for you to be born. But parents don't really know much at all about their babies. They just have to be patient and wait and see.
God told the Israelites all about Jesus before he was born. If they had read the scriptures and believed, they would have been expecting him. They would have known that it was time for their new king to come. They would have known all kinds of things about him. (Hold up your bag.) I have a bunch of pieces of paper in this bag some of them have scriptures from the Bible on them that tell about Jesus. These are the same scriptures that the Israelites had long ago. Some of the papers have, "Have a snack" written on them. We are going to take turns picking out pieces of paper. If you get one with a scripture, I will read it to find out what God said about Jesus, and you will have to wait just like the Israelites had to wait. If you get one that says, "Have a snack", you get to go sit down and eat your snack.
Have your children stand in front of one of the chairs and start your music. Tell them that they are going to play musical chairs and the person who sits on the chair with a sticker gets to pick from the bag. Take away one chair every time some one leaves to get his or her snack. (If you have older children, you don't have to play musical chairs, you can place markers on the floor and have one marker different. Play like musical chairs except the children walk around and step on the markers. When the music stops, whoever is standing on the "different" marker gets a snack. When you read the scriptures to older children, ask them what the scripture says about the coming Messiah.)
Play a Bible Verse Memory Game
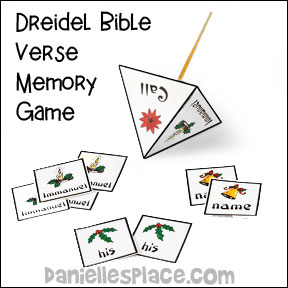
Before class print out the top pattern and card patterns, and cut them out. If you are using the black and white pattern, color the pictures.
(Patterns available to members on The Resource Room and as a free instant sample lesson, above.)
Punch a hole in the middle of the square side of the top with a pencil. Fold all the side back. Glue the triangle part together first, then place a glob of hot melt glue inside the tip of the top and place the pencil down through the hole into the glue at the top. Glue the top flap closed.
How to Play:
1. Write out the verse on the board or on a piece of paper so all your children can see it. Place the pile of cards in a large bowl.
2. Children take turns spinning the top. When the top stops, they read the word on the top that is facing up and find the matching card in the bowl and place it in front of them. If a child spins the same word twice, he doesn't take a card.
3. The child that gets all four cards first to spell out the verse wins. You may want to give them a prize such as a piece of Christmas candy.
Copyright 2005, Digital by Design, Inc. - See Copyright Information
More Christmas Lessons in this Series
Lesson 2 - An Angel Tells the Good News
Lesson 3 - The Christmas Story The Shepherds Tell About Jesus' Birth

Lesson 4 - The Christmas Story The Wise Men Search For Jesus
Lesson 5 - The Christmas Story The Rest of the Story

The lessons on this page can be found on The Resource Room a subscription site designed specifically for Sunday School teachers and children’s ministry. Join the Resource Room today! You will receive online access to complete, easy to prepare, bible lessons, new craft ideas and patterns, outreach ideas to help you grow your Sunday school class, church bulletin board ideas and much more.
Comments
We would love to hear your comments about this lesson. If you taught this lesson, we would love to hear how it went, if you changed anything, added anything, what age you taught and was it appropriate. Any comments that would help others teach this lesson are welcome.
I teach a 5th and 6th grade class. We use the Christmas tree story. It was great! We had to modify it a little to make it more age appropriate, but my class loved it and loved making the crafts.
I just wanted to let you know how much we enjoyed the Christmas Tree Series of lessons. My class of 2 - 4 year olds had a blast! I used the bulletin board for my tree. I cut the children's hand prints out of green construction paper, and arranged them on the board in a triangular shape of a pine tree. After they were attached, I curled the fingertips around a pencil, to give it the texture and depth of a tree. I added a trunk, some cotton batting for snow (stapled over itself to make drifts) and a dark blue background. Each time we did an ornament, I made an extra one that was put on the tree. The board became an interactive tool, and reinforced all the lessons. We did additional projects such as: hosts of angels, the special star, gifts that were put under the tree, snowflakes, etc. to enhance the display. I then put the title "Best Gift Under the Tree", on top of the board the day we attached the manger, and followed with our Birthday Party for Jesus.
When we did the angel, I came up with an edible angel project. I used an upside down sugar-cone (iced with white canned frosting) a marshmallow pushed down over the tip of the cone for a head, gumdrop rings (red/green) for a halo and wreath. You will also need the little tubes of colored icing for the eyes, mouth, hair, and any touches like lace etc. on the gowns. I used a paper plate for a base, with a large dab of frosting to hold the cone in place. I used rippled chips for wings. Candies, raisins, or other creative items can be used too. Have fun.
I live and serve in Mozambique, Southern part of Africa. Although many lessons and resources are available, it is difficult to find something that is also practical for here, as we don't always have all the resources available in other countries. Thank you so much for this lesson series, this is so practical and hands-on, the children have enjoyed this first lesson so much! Looking forward to the rest in the series. Natasja