Garden Crafts
How to Make Crafts and Activities for Your Garden
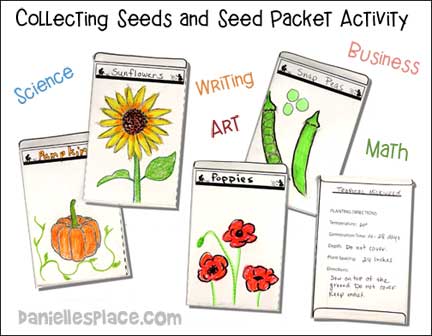
Make Seed Packets and Start Your Own Seed Company
Here is a great STEAM project that uses creativity in many forms. Children not only learn the science of plants, but use their imagination to create a seed business, design seed packets, sharpen their writing skills, and use their math skills counting money, and figuring out profit and loss.
What you will need:
Seeds from Plants, Paper, Paper Glue, Crayons or Markers, and Scissors
How to make:
1. Buy some flower or vegetable seeds like sunflowers, marigolds, pumpkins or any other kinds of plants with seeds that are easy to collect. Or collect seeds from plants and flowers you or your neighbors already have. To teach your children about business, have them keep track of what they spent on the seeds and other equipment they need to grow their plants.
2. Have your children read the directions on how to plant the seeds. (Keep the empty seed packets so that your children can use them to make their own seed packets.) Study plants and how they produce seeds.
3. Sow the seeds and let the plants mature. If you are using vegetable seeds, let the vegetables mature as long as possible before cutting them open to retrieve the seeds. If you are using flowers, let the seed pods dry out before collecting them. Place the seeds on paper towels to dry.
4. Print out the seed packet pattern and make copies.
Member's ![]()
Instant Digital Download - ![]()
5. Design the seed packets. Have your children draw pictures on the seed packets to represent the kinds of seeds in the packet and then write directions about how to plant and care for the seeds by filling out the form on the back.
6. Help your children think of a name for their seed company and write it across the top of the packet.
7. If you have a lot of seeds, you may want to make copies of the finished seeds packets so that your children don't have to draw too many pictures.
8. Cut out around the edge of the seed packet pattern. Fold down the edges and glue the bottom and sides of the packet closed.
9. Figure out how much you want to sell your seeds for and write the price on the packet. (Note: we didn't write a price on the seed packets. When my daughter was young she went to our neighbors while I was busy and starting selling the packets. She didn't know what the price was so she just told them what ever price you want to pay. I was pleasantly surprised when she came home with quite a few dollars.)
10. Add your seeds to the packets and seal the tops.
11. Before selling the seeds test them to see if they will sprout. Place a few seeds between wet paper towels and place them in a jar. Check them every few days to see if they sprout. If the seeds sprout, they are ready to to be sold.
12. Brainstorm with your children who they can sell their seeds to: neighbors, friends, grandparents, etc.
13. When your children are done selling, have them count up their sales, subtract them from their expenses to figure out their profit.
14. Discuss what they learned from the experience and what they might do differently.
© 2005, Digital by Design, Inc. - See Copyright Information
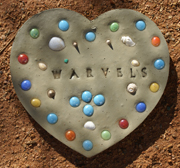
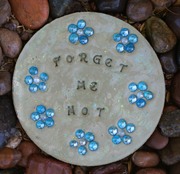
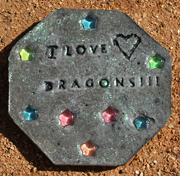
How to Make Your Own Stepping Stones
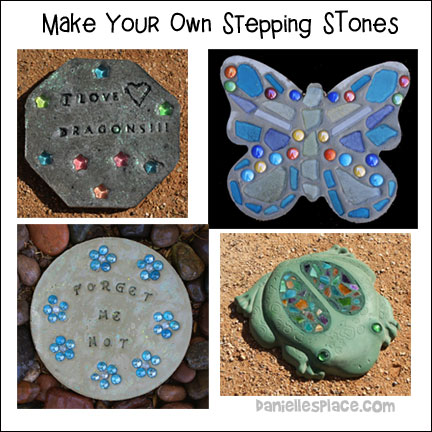
These are Great Keepsakes and Will Last for Many Years in Your Garden.
What you will need:
1. Cement or Mortar (Don't get the concrete mix that has rocks in it.)
2. Mixing Buckets
3. Plastic Gloves
4. Garden
Trowel, Paint stick, or something to mix the cement. *Dust mask or bandana to cover you mouth and nose.
5. Plastic to cover the wet cement if it is hot and dry outside.
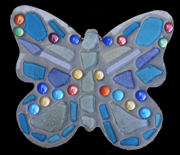
6. Pretty Stones, Ceramic Tiles,
Marbles, Seashells, or other Decorative Items.
This stepping stone was made using a Butterfly Stepping Stone Mold and Sea Glass-Sky.
How to Make the Butterfly Stepping Stone:
Before you start get everything ready. If the design is complicated, lay it out before you start. If you are going to add words, place the letters in order and make sure you have enough room before you start.
There are a lot of different craft kits available that provide everything you need to make the stones. (See the kits on the right-hand side of the page.) These kits will save you a lot of time finding everything you need. You can reuse the molds, and use different decorative items to make them all look different. Some of the kits come with letter stamps that can be used over and over. You can also buy the Letters and Numbers Stepping Stone Stamps separately.
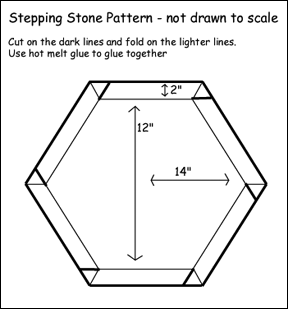
If you don't want to spend money on molds, you can make your own out of cardboard and hot melt glue. Here is a pattern for the Six-sided Stone. Press down hard with a pen when you are drawing the pattern on the cardboard so that the cardboard will fold on the lines easily. Fold up on all the lines and glue with hot melt glue. You might be able to use the molds more than once. You can also use plastic containers from the grocery store. Check out the deli department for different sandwich and vegetable tray containers. I was able to buy just the containers for just a few cents. If you don't want to use a mold, you can dig a hole in the ground, line it with small stones, and pour the cement directly into the holes.
Fill one bucket with water. Use another one to mix the cement. Use a bucket that doesn't have any bumps in the bottom to mix the cement. Make sure you use rubber or plastic gloves when handling the cement because it can cause skin irritation.
ONLY ADULTS SHOULD MIX THE CEMENT!
It tends to spatter when mixing so cover your skin with long sleeves and long pants. Keep children back when you are mixing. Where a dust mask or bandana when mixing. You don't want to breath in the dust. Have children wear gloves when decorating their stones.
Keep a bucket of clean water available in case the cement gets on your skin. It's a good idea to keep some eye wash close just in case, or better yet wear goggles. Make sure your children know to be careful when working with cement.
If you are putting footprints or handprints into the cement, cover the skin with Vaseline beforehand, and wash your skin with soap and water immediately afterwards.

This Mosaic Frog Stepping Stone Kit is great for young children because they don't work with the wet cement which can be irritating to the eyes and skin. The frog stepping stone is made first.
When it is dry your child glues the mosaic pieces onto the of the top frog shape. An adult can then use the left over cement to fill in the cracks.
Follow the direction on the package for mixing the cement. I used about 14 cups of cement to 3 1/2 to 4 cups of water. Start with a cup of water and gradually add the cement stirring as you go. Keep adding cement until it is the consistency of oatmeal.
Do not breath in the dust.
Pour the cement into the mold. You want it to be about 2 inches deep. Gently pick up a side of the mold and tap it on the ground to get rid of the air bubbles. Wait until the water on the top is gone or until the cement leaves a lasting impression, then start adding your decorations. If the cement is drying too quickly and the top begins to crack when you place the stones, you can spray the top with a little water to keep it moist while you work. Smooth out any cracks with your fingers.
When you are finished cover your stones with plastic so that they don't dry too fast. This will keep them from cracking. Do not move the stones for at least twelve hours or longer. When they are completely dry, remove the cardboard or mold.
Comments:
We did stepping stones for a bridal shower and mixed the cement in large black garbage bags. We had the guests work in pairs, or threes, and take turns mixing. My daughter then used the same idea for a Vacation Bible School project at her church. (A hands-on activity should be just that. I don't like stuff that adults have to do for kids, then it's not their craft anymore, just my opinion. ) They still wore plastic gloves even though their hands didn't come in contact with the wet cement as they were kneading the outside of the bags. But you have to use a bag that's heavy or they tear from the effort. We also sprayed the inside of the mold with cooking spray before filling. I don't know if it helped that much or not. They seemed to come out okay. Just thought I'd pass it on. Keep up your great site, Georgia
© 2010, Digital by Design, Inc. - See Copyright Information
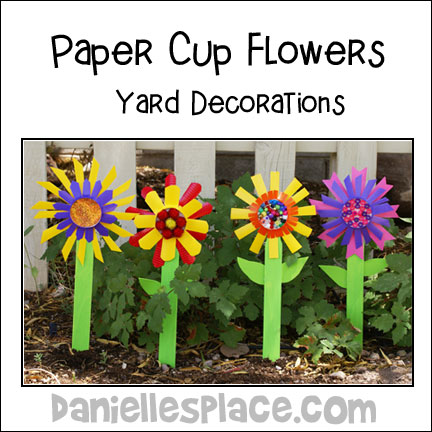
Paper Cup Flower Yard Decorations
What you will need:
Different Colors of Paper or Plastic Cups from a Party Supply Store
Paint Stir Sticks (from hardware store)
Green Acrylic Paint
Green Craft Foam
Glue
Beads or Other Decorative Items
How to make:
1. Paint the stir stick green to match the fun foam and let it dry.
2. Cut the top half off a cup. Then cut slits in the cup 1/2" apart so that the slits reach all the way down to the bottom of the cup. Fold down the slits to flatten out the cup.
3. Cut the top 3/4 off the top of another cup and cut slits all the way around the cup 1 cm wide. Fold down the slits to flatten the cup. Glue the flattened orange cup on top of the flattened yellow cup. To make the flowers look different, you can vary the width of the slits, cut the edges at different angles or round off the edges. It is fun to experiment with different shapes and colors.
4. Glue the flower onto the top of the paint stir stick.
5. Cut leaf shapes from the green foam and glue them to the back of the stir stick.
6. To finish place glue in the center of the flower and fill with beads, pompoms, yarn, shiny paper, etc.
© 2010, Digital by Design, Inc. - See Copyright Information
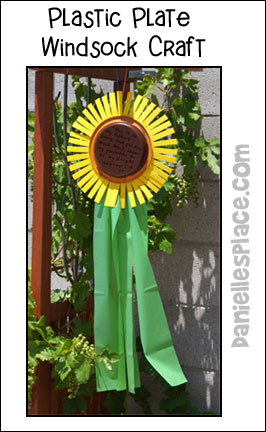
Sunflower Windsock Made from Plastic Plates
What you will need:
Two Small Brown Plastic Plates (You can buy these at party supply stores.
Yellow Craft Foam
Double-sided Tape
Green Plastic Tablecloth (Party section of your local department store)
Glue
String
How to Make the Sunflower Windsock:
1. Cut foam pieces into 3" by as-long-as-you-can-make-them strips. Draw a line 1/2" from one of the long edges.
2. Cut slits 1/2" apart all the way down the length of the foam strip stopping at the 1/2" line.
3. Stick double-sided tape all the way around the top edge of one of the plates. Carefully stick the uncut edge of the foam strip all the way around the edge of the plate. The slits will separate to make the petals of the flower.
4. Cut strips of green plastic about 4" wide and 36" long and glue them on one side of the plate over the foam petals.
5. Cut a piece of string about two feet long, fold it in half and tie the ends together. Glue the string to the opposite end of the green plastic strips.
6. To finish glue the other plate over the foam to cover the edge so that you have a plate on each side of the yellow petals.
© 2010, Digital by Design, Inc. - See Copyright Information
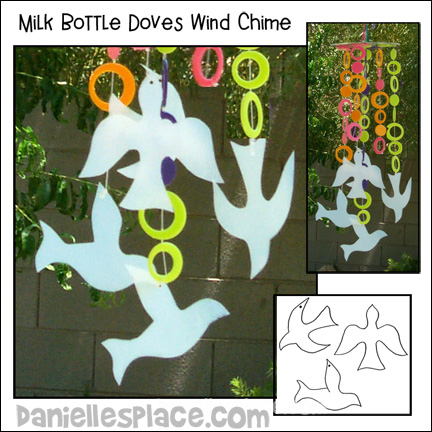
Dove Wind Chimes for Your Garden Craft
What you will need:
Beads, Plastic Curtain Rings, Toss Rings
Computer CD
Plastic Milk Carton
Heavy Duty Thread or Fishing Line
Low Temperature Glue Gun
How to Make the Dove Wind Chimes Craft:
1. Print out the bird patterns and use them as templates to cut shapes from a plastic milk carton. Use one pattern twice so you have at least four bird shapes. Punch holes in the bird shapes.
Member's ![]()
Free Instant Download ![]()
2. Cut lengths of thread or fishing line and string on beads to make a chain of beads. If you use curtain rings, you can just attach them to each other to make a chain. Glue them to one side of a computer CD. You can use a drill to drill holes around the outside of the CD and tie the fishing line to the CD.
3. Tie the birds to the ends of the bead chains.
4. Glue a string to the top of the CD to hang the wind chime.
© 2006, 2017, Digital by Design, Inc. - See Copyright Information
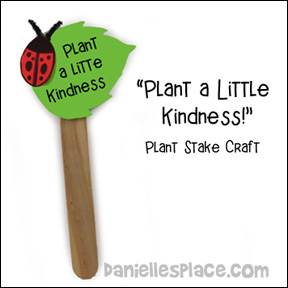
"Plant a Little Kindness" Plant Marker
This Little Plant Marker Would Look Great in a Painted Pot Filled with Flowers
What you will need:
Jumbo Craft Stick
Green Craft Foam
Red Craft Foam
Black Permanent Marker
Thin Black Wire or Black Chenille Stems
Glue
How to Make the Ladybug Planter Stake:
1. Cut out a leaf shape using the pattern provided from green craft foam and a red oval for the ladybug from red craft foam.
Member's ![]()
Free Instant Digital Download - 
2. Glue the leaf to the stick.
3. Use a permanent marker to draw spots and a head onto the ladybug body.
4. Glue black wire or Chenille stems onto to back of the ladybug's head for antennae.
5. Glue the ladybug onto the leaf.
6. Write "Plant a Little Kindness!" on the leaf.
© 2005, Digital by Design, Inc. - See Copyright Information


