Spider Crafts and Learning Activities
Spider-Themed Educational Crafts and Learning Activities
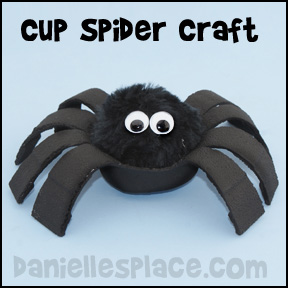
Spider Melted Styrofoam Cup Craft for Kids
What you will need:
8.5 oz. Styrofoam Cup
Paint Brushes
Large Black Pom Pom
Scissors
How to Make the Pom Pom and Cup Spider:
1. Cut off the rim of the cup so that the cup is three inches tall. Cut slits about 1/2" apart down from the rim of the cup to about 1 inch from the bottom of the cup.
2. Cut off the extra slits so that you have four legs left on each side of the spider as shown in the picture.
3. Preheat your oven to 250 degrees (convection oven works best). Make sure you turn on your oven vent and you have your windows open because the fumes from the melting cups probably aren't good to breath in.
4. Place the cut Styrofoam cup, right-side up, on an old cookie sheet. Turn on the oven light so you can see inside the oven. You should see the cup start to melt and the sides curl down in about 15 to 30 seconds or maybe a little longer. As soon as you see the sides start to curl down open the oven door and take out the cup. The cup will not be hot, but be very careful not to touch the sides of the oven.
5. Paint legs and body black and let them dry.
6. To finish glue a large black pompom in the middle of the cup for the spider's body. Glue on googly eyes.
Created by Corrin Burner
©2012, Digital by Design, Inc. -*See Copyright Information
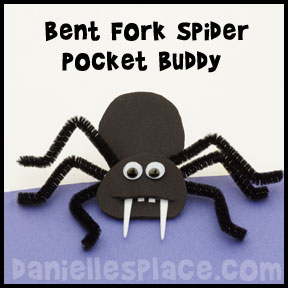
Bent Fork Spider Pocket Buddy
What you will need:
Cheap White Plastic Forks
Utility Lighter with Long Handle
Scissors
Card Stock (Heavy Paper) or Black Craft Foam

How to Make the Walrus Pocket Buddy Made from a Plastic Fork:
1. Hold a white plastic fork in your left hand (if you are right-handed) so that it is parallel to the table with the tines facing down as shown in the diagram to the right.
2. Hold the lighter with your right hand underneath the fork near the top of the handle where the head of the fork meets the handle. (See diagram to the right.) *Do not hold the lighter too close to the fork because it could catch fire. You only want to heat it up. (This part of the craft is for adults only. Children should not use lighters.) When the fork starts to melt and bend remove the lighter and bend the head of the fork down so that it meets the handle. Hold it in place for about ten seconds until the plastic hardens.
3. Break off the two middle tines by snapping them off with your fingers. Place your fingernail on the tine where you would like it to break off and then bend the tine up or down until it snaps off.
4. Draw the spiders body and head on a piece of craft foam and cut it out. Fold the face in half and cut the mouth.
5. Place the tines through the spider's mouth as shown in the picture and glue the head and body to the fork.
6. Place the handle of the fork in your pocket and let the spider hang over your pocket.
©2013, Digital by Design, Inc. -*See Copyright Information


