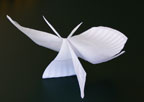
Butterfly, Caterpillar, and Inchworm Crafts For Kids
How to Make Crafts and Activities Relating to Butterflies, Caterpillars and Inchworms
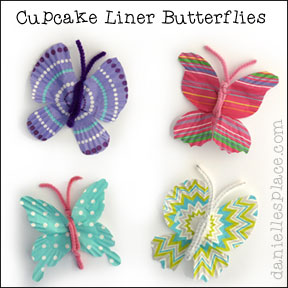
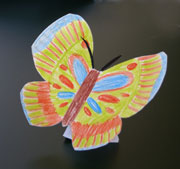
Cupcake Liner Butterfly Decorations
What you will need:
Baking Cups (Cupcake Liners) - Regular-sized and Mini Liners
Chenille Stems
Scissors
Paper
How to Make the Cupcake Liner Butterflies:
1. Print out the butterfly patterns and cut out the half circles. (Patterns available to members.)
Member's ![]()
2. Fold a cupcake liner in half and place the butterfly pattern on the folder cupcake liner.
3. Unfold the cut cupcake liner and flatten it out.
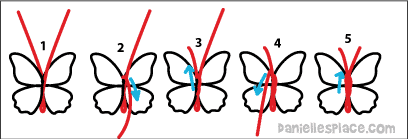
4. Fold a Chenille stem in half and wind the folded end twice (1). Place the Chenille stem on the butterfly shape so that the fold end makes the butterfly's tail.
5. Fold down one end of the Chenille stem over the butterfly and back up behind the butterfly (2 and 3).
6. Fold down the other end of the Chenille stem and then back up from behind (4 and 5).
7. Wind the two ends together to make the butterfly's head and then bend the ends to make the antennae.
Note: You can use mini liners to make two-toned butterflies.
©2014, Digital by Design, Inc. - See Copyright Information
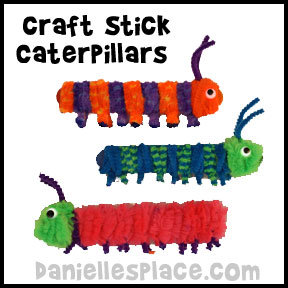
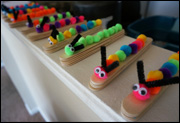
Caterpillar Craft Stick Craft
This would be a great craft to use with the "The Very Hungry Caterpillar" by Eric Carle. Just use green pipe cleaners for the body and a red one for the head.
What you will need:
Woodsies 4.5" Mini Jumbo Craft Sticks
Red and Different Colors of Pipe Cleaners
Aleene's Tacky Glue or Low Temp Mini Glue Gun
Needle-nose Pliers
How to Make The Craft Stick and Pipe Cleaner Caterpillars:
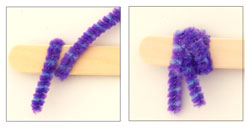
1. Start making the caterpillar by winding a pipe cleaner around one end of the craft stick. Let 1/2" of one end of the pipe cleaner hang down over the craft stick and wind the rest around the craft stick until only about 1/2" left to hang down like the other end of the pipe cleaner (see diagram). Twist the two ends together to make the caterpillar's legs.
2. Keep adding more pipe cleaners in the same way until you have covered the whole craft stick except for the head area.
3. Next add the antennae.
Cut a piece of pipe cleaner about 5" long and fold it in half. Wind the two ends together and bend the antennae down.
4. To make the head wind two pipe cleaners around the end of the craft stick one on top of the other. Glue on wiggle eyes.
Your children can use the caterpillar to act out the story, as a bookmark, or a pointer when reading.
©2013, Digital by Design, Inc. - See Copyright Information
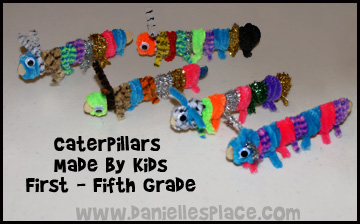
These adorable caterpillars were made by a group of students, first grade through 5th grade. Most of them were able to make them with very little help.
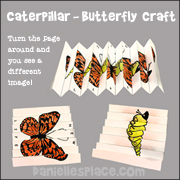
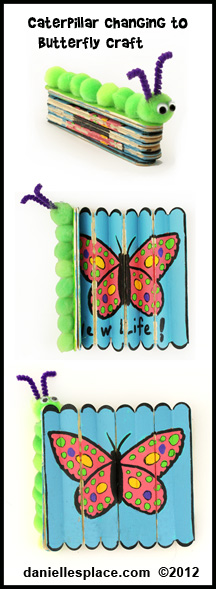
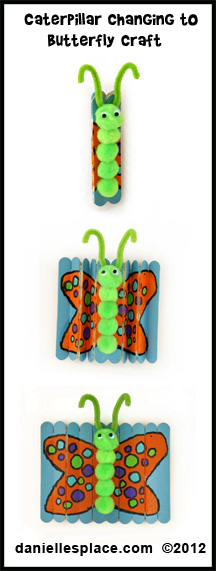
Caterpillar Changing to a Butterfly Craft
The craft sticks are taped together so that when they are pushed together from the sides they fold up into a compact stack of sticks.
What you will need:
Woodsies Mini Jumbo Craft Sticks -4.5" - Use good quality craft sticks that lay flat. The 5/8" work perfect with the one-inch tape.
*You can use the Woodsies Jumbo Craft Sticks with the 1.5 Inch - 3M Scotch Masking Tape for a bigger Canvas.
3M Scotch Masking Tape, 1-Inch - Other brands will work, but this tape works great! It is the exact color of the craft sticks. (Staple's Tape works better with the washable markers, but it is lighter than the stick and more transparent and doesn't cover the stick as well.)
Pom poms
Acrylic Paint, Permanent Markers, Crayons, or Colored Pencils - (The washable markers don't work well because they smear.)
How to Make the Caterpillar:
1. To make the caterpillar glue pompoms onto one of the craft sticks. Glue on googly eyes and Chenille stems for the antennae.
How to Make the Folding Craft Stick Canvas:
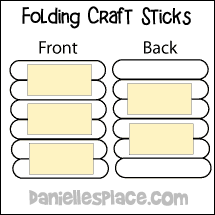
1. If you are using the mini-jumbo craft sticks, cut the one-inch masking into 4-inch pieces.
2. Place two sticks together, side by side, and tape them together covering both the sticks with the tape.
3. Turn the two sticks over so that they are diagonal to you.
4. Place another craft stick next to and below the two sticks that you taped together. Use another piece of tape to tape the bottom two sticks together.
5. Turn all three sticks over diagonally and place another stick at the bottom of the row and tape the last two sticks together. Keep going until you have a whole row of sticks.
6. You can also cover the first and last stick in the row by placing tape over the stick and then folding it back over the stick. It is easier to write on the tape than the craft stick. The ink soaks into the sticks and blurs.
7. Draw a butterfly design on the craft stick canvas with a pencil. If you make a mistake, you can erase it. When you are happy with your design paint it with the acrylic paint. When the acrylic paint is dry use a black marker to outline your shapes and write the words.
8. To finish fold up the craft stick canvas and then glue the caterpillar onto the top of the butterfly craft stick picture.
View a Video on Youtube showing how to make this craft.
©2012, Digital by Design, Inc. - See Copyright Information - Bloggers, if you use this craft idea or an adaptation, you must link back to this page for complete directions. If you use this technique, let us know and we will put a link to your blog.
Caterpillar Changing to a Butterfly Craft Stick Craft for Kids - #2
This craft is basically the same as the above craft except the crafts sticks unfold from the middle forming the wings.
1. First make the caterpillar by taping two sticks together on the front and back of the sticks. Glue the pompoms on the the center of the two sticks. Add the eyes and Chenille stem antenna.
2. To make the wings tape a craft stick to each side of the caterpillar craft sticks placing the tape on what will be the back of the butterfly. (See the directions above.)
3. Then turn the butterfly over and tape two more craft sticks to the first two. The tape will be on the opposite side of the first set of taped craft sticks.
4. Keep adding craft sticks to each side alternating the tape until the wings are long enough.
5. Draw wings onto the craft sticks with a pencil. If you make a mistake you can erase. Once you have the design you would like, paint the craft sticks.
6. When they are dry outline your design with a black marker, and then fan fold the wings to the back of the pompom body.
Watch a video on how to make the folding craft stick canvases:
©2012, Digital by Design, Inc. - See Copyright Information - Bloggers, if you use this craft idea or an adaptation, you must link back to this page for the complete directions. Let us know if you use it, and we will put a link to your blog.

Kindergarten and first grade children made these caterpillar/butterfly crafts with just a little help from their teacher. They used Sharpies (Permanent Markers) to color the wings and looked at the book Waiting for Wings by Lois Ehlert to get inspiration. Sent in by Helen Weeks.
Watch a Mom and children make this craft on Youtube.com:
See how Rachel used the caterpillar to butterfly craft with her Backyard Bible Club.
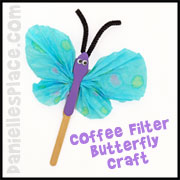
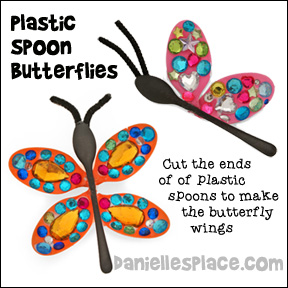
Butterfly DIY Craft for Kids Made from Plastic Spoons
What you will need:
Plastic spoons
Mini spoons (You can find these a party stores.)
Black Spray Paint
Sequins
Lighter
How to Make the Plastic Spoon Butterflies:
1. Spray paint the mini plastic spoons black (I could only find them in a clear plastic.)
2. Cut the cupped ends off of the regular-sized plastic spoons and glue them to the mini spoon with a low temp. glue gun. You can use a lighter to melt the cut end and bend it slightly to fit on the spoon better.
3. Glue on antennae and sequins to decorate the butterfly.
©2012, Digital by Design, Inc. -*See Copyright Information
Butterfly Magnet or Pin Puzzle Piece Craft
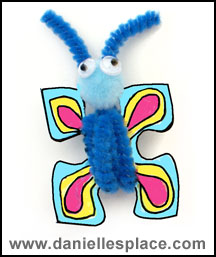
What you will need:
Chenille Stems
Pom poms
Acrylic paint and/or permanent markers
Magnet or pin for the back
How to Make the Butterfly Magnet or Pin Puzzle Piece Craft:
1. Find a puzzle piece that has four indents. Blank Puzzles Pieces. You can use, but there are only two of this type of piece per puzzle, and 48 per pack of 25 puzzles.
2. Paint the puzzle piece with acrylic paints or permanent markers. If you use markers that aren't permanent markers draw on the side that doesn't have the shiny coating. The markers will stick better without rubbing off.

3. When the paint is dry fold a pipe cleaner in half and then place the folded end at the bottom of the puzzle piece so that the two ends of the pieces are on opposites sides of the puzzle piece. Wind the pipe cleaner ends around the middle of the puzzle several times.
4. Twist the pipe cleaners together at the top of the puzzle piece to make antennae.
5. Glue a pompom on for the head and glue on googly eyes. Glue a magnet or attach a pin to the back of the butterfly.
©2012, Digital by Design, Inc. -*See Copyright Information
Butterfly Window Clings
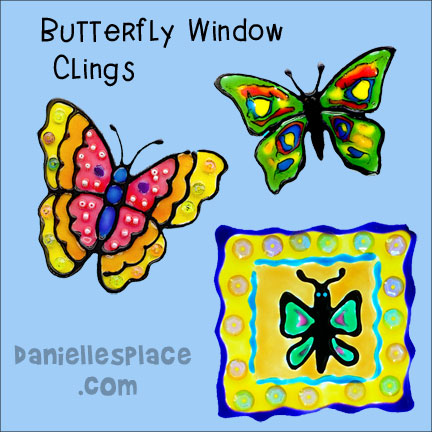
What you will need:
Window Art Deluxe Refill Set, Rhinestones Sequins, Crystal Iris Sequins and Tape
How to Make Butterfly Window Clings:
1. Print out the Butterfly Patterns or find patterns you would like to use from coloring books or clip art.
Member's ![]()
Instant Digital Download ![]()
2. Cut a piece of vinyl to fit over the pattern and tape it down to the pattern.
3. Trace the outline of the pattern onto the vinyl with the black window cling liner and let it dry for a half an hour to an hour.
4. There are several techniques you can use to make these clings. To make the green butterfly I filled in all the colors at the same time so that they would kind of run together. Then I used a tooth pick to make the swirl effect and blend them together a little more.
6. On the top left butterfly, I outlined the butterfly in black and did the squiggly lines in blue and let them dry. I then added all the other colors at the same time. To finish I used some tweezers to place small clear sequins all around the edge. The sequins pick up all the colors around them.
7. On the top right butterfly I outlined everything in black and let it dry. I then filled in all the colors and used tweezers to drop very small facetted beads onto the outside of the wings and then drop tiny pearl beads in the center of the wings.
©2007, Digital by Design, Inc. -*See Copyright Information
Paper Plate Fluttering Butterfly
This butterfly is attached to a stand which allows it to flutter in the wind.
What you will need:
Dinner-sized paper plates
Scissors
Crayons or Markers
Paint
How to Make Paper Plate Fluttering Butterfly:
Member's ![]()
Free Digital Download ![]()
1. Print out the butterfly pattern and cut it out. Place the pattern on the paper plate so that the top and bottom wings touch the edge of the plate. Trace the pattern then turn it over and place it on the other half of the paper plate and trace it. It should look like a butterfly.
2. Cut on the solid lines. Do not cut the line between the antenna.
3. When it is cut out color it and then fold the butterfly in half so that the top of the paper plate is up. Fold the other piece between the top wings and antennae down or the opposite way.
Then fold the line between the antenna down. This will be the stand. You may have to cut the stand a little flatter on the bottom edge.
4. Place a small piece of tape on the back side of the butterfly between the antenna and the butterfly at the fold.
©2008, Digital by Design, Inc. -*See Copyright Information
Fan-Fold Butterfly Paper Craft for Kids
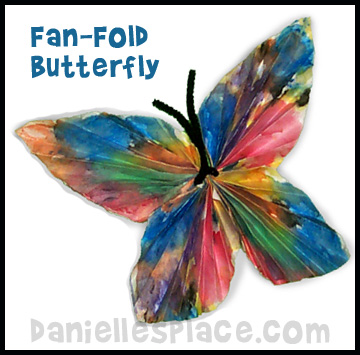
What you will need:
White Paper
Water Color Paint or Markers
Scissors
Aleene's Tacky Glue or a Low Temperature Glue Gun
How to Make Fan-Fold Butterfly:
1. Cut your paper in squares. You will need two squares for each butterfly.
2. Paint or color each square and let dry.
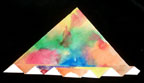
3. Fan-fold each square from corner to corner as shown in the picture.
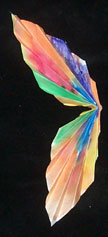
4. Fold the fan-folded squares in half as shown in the picture to the right. Spread out the ends to look like wings.
5. Place the two pairs of wings together at the middle and secure them with a pipe cleaner. Bring the ends of the pipe cleaner up the center to form antennae.
6. Spread out the wings and glue them together at the tops and sides. You can cut the wings any shape you would like to finish.
This craft idea was sent in by Susan Vaughn
©2007, Digital by Design, Inc. -*See Copyright Information
Inchworm Measuring Activities
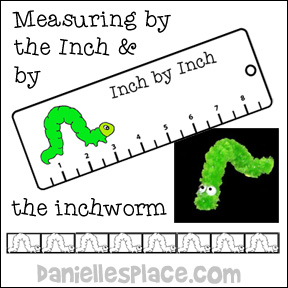
1. Measure Using Inchworms
Print out the inchworm bookmark pattern onto card stock. Cut them out. Have your children color them in class. Add yarn and beads to finish.
Member's ![]()
Instant Digital Download - ![]()
Use them with the following activities.
1. Measure Things
Have your children use inchworm measuring tapes and their chenille stem inchworms to measure things and then compare the two measurements.
2.How Long is An Inch?
Give each child a small amount of green play dough and show them how to make inchworms by rolling the dough into a ball and then rolling it between their hands and then scrunching it up in the middle.
Use a pencil to poke holes for eyes. If you have older children, give them rulers and tell them to try to make an inchworm that is exactly one inch long. Tell them that inchworms aren't actually worms. They are a type of caterpillar. They have three sets of legs in the front and two set of false legs in the back. Some people call inchworms loopers because they make loops in their bodies when they walk.
3.Compare Inchworms
After children have made an one-inch inchworm, tell them to roll it out and make the longest worm they can without breaking it. Give them one minute. When time is up measure each "inchworm" to see who made the longest worm.
4. Measure Chenille Stems
Give your children green Chenille Stems (Pipe Cleaners) and have them measure them. Then have them roll the stems around a pencil to make an inchworm. When they are finished have them measure their inchworms. Ask them who has the shortest inchworm, and who has the longest? Have them subtract the length of their inchworms from the length of the Chenille Stem, and ask them to determine the difference. If you are studying ratio, you can also have them determine what percent the length of the inchworm is to the length of the Chenille stem.
©2004, Digital by Design, Inc. -*See Copyright Information
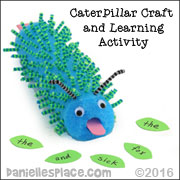
Place Value Caterpillar War
Great Home School Math Review Game!
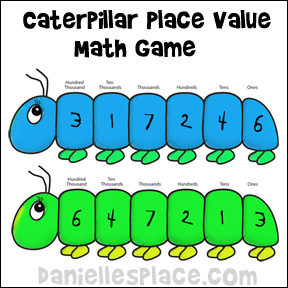
Children fill in the place values on their caterpillar cards to try and get the highest number.
Give each child a caterpillar card. Review the place values. Break your children up into teams of two or three and give each team a die.
How to Play:
Children take turns rolling the die and deciding in which place value they want to place the number they roll.
When all the place values have been filled in, the children compare the caterpillars and decide which number is the highest. Have them read the number on their caterpillars out loud. The child who has the largest number gets to keep the caterpillars.
Member's ![]()
©2004, Digital by Design, Inc. -*See Copyright Information