Benjamin Franklin Crafts and Learning Activities for Kids
How to Make Crafts and Activities Relating to Benjamin Franklin
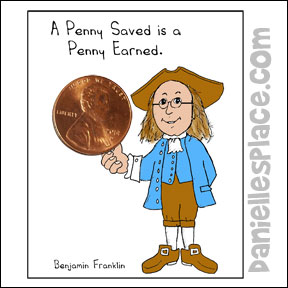
Benjamin Franklin Holding a Penny Craft
Benjamin holds a sign and a real penny reminding children to save their money. The sign says, "A penny saved is a penny earned."
What you will need:
White Card Stock or Paper
Scissors
Crayons or Colored Pencils
Glue
How to make the Benjamin Franklin Holding a Penny Craft:
1. Print out the picture of Benjamin Franklin and the pennies onto card stock and cut them out.
Member's
2. Color the picture.
3. Glue the penny to Ben's fingers.
![]()
©2006, Digital by Design - See Copyright Information
Inventions and Achievements of Benjamin Franklin Worksheet and Color Sheet
Use this worksheet to review Benjamin Franklin's life.
1. Print out the worksheet.
Member's ![]()
Free Instant Download ![]()
2. Have your children circle or color the objects that remind them of something Benjamin Franklin was famous for, and then discuss what each picture represents.
Writing Activity
Have your children pick one item from the activity sheet and write how that item relates to Benjamin Franklin. Or have them pick another items, draw it, and then write about it.
Benjamin Franklin Review Game
After reading about Benjamin Franklin have all your students draw pictures of something that relates to Benjamin Franklin. Give each child a chance to show his or her picture in front of the class to see if the other students can guess why the child drew the picture. Then let the child tell the class how that item relates to Benjamin.
©2006, Digital by Design - See Copyright Information
Make Candles or Soap
When Ben was ten years old he started working in his father's candle and soap making shop. Ben did not like working with hot wax and smelly soap, but candle and soap making can be fun. Candles were made by dipping a wick into hot wax over and over again or by pouring it into a mold. You can make both of these types with very little equipment.
Dipped Candles
(Caution: This project should only be done with adult supervision.)
What you will need:
To make dip candles you will need to buy some candle wicks, a candy thermometer, and some wax. (If you don't want to buy wax, you can melt down old candles to make new ones. Try looking in thrift stores for cheep old candles.) If you would like to add a color to your candle or a scent, you will also need to buy those. The rest of the stuff you can find at home. You will need a pan to heat the wax, a tin can to melt the wax in and one to hold cold water. (The taller the can the taller you can make your candle. Tall skinny cans are best because you will need less wax.)
What to do:
Chop up your wax if it is in a big chunk. Place the pieces in a tin can. Cut up extra wax because the wax will melt down. Place the can in a pan filled with about 3" of water. Heat the water. As the water boils it will melt the wax. When all the wax is melted and the temperature reaches 180 degrees, you are ready to start dipping. (Do not let the wax get over 200 degrees. It could burst in to flames if it gets too hot.)First fill the other can with cold water. Cut a wick about 5" longer than the can with the melted wax. Dip the wick into the hot wax and then pull it out. Let it cool a little and pull to straightened the wick. Keep dipping the wick into the hot wax and pulling it out right away. Do not touch the bottom of the can. Each time you pull out the wick dunk it into the cold water. Keep doing this until the candle is the size you would like it. Hang the candle to dry. Cut off the bottom so it is flat.
Mold Candles
(Caution: This project should only be done with adult supervision.)
You can use the bottom of a milk carton as a mold for your candle. Just cut off the top to the height you would like your candle. Clean and dry out the inside of the carton. Cut a piece of wick a little longer than the mold. Tie the wick to a craft stick or dowel and place the dowel or craft stick across the top of the carton so that the wick hangs down into the middle of the carton. You can fasten the wick down to the bottom of the carton with a piece of tape.
Melt your wax the same as you would for making dip candles. When it reaches about 180 degrees you can add dye or scents. (Do not let the wax get over 200 degrees. It could burst in to flames if it gets too hot.)Carefully pour the hot wax into your mold. Let it stand over night until it is completely hard. In the morning peel off the carton. Your candle is ready to use!
Ice Candles
These candles are very pretty and easy to make. Follow the directions for mold candles except before you pour the wax fill the carton with small chunks of ice. Pour the wax over the ice until the mold is completely filled. This candle only takes a few hours to dry.
Layered Candles
You can make more than one color of wax in separate cans. Pour one color in first and let it set a little and then pour another color over top of that. You can add as many layers as you would like. You can even hold the can at different angle as the wax dries for a different effect.
Use your candles in the evening to read stories or write with your quill pen to write a letter. Pretend you are living back in colonial times. Discuss other things you would be doing if you lived in that time period.
©2006, Digital by Design - See Copyright Information
Make or Write with a Quill Pen
Benjamin Franklin loved to write. He wrote letters to his friends, secretly wrote articles for his brother's newspaper, and one of the most read almanacs at that time. They didn't have pencils or the kinds of pens we have today. They had to make their pens from the quills of ducks and other birds. Go to https://www.regia.org/quills.htm for directions on how to make a quill pen. We bought big dyed feathers and a bottle of India ink from the craft store and it worked great. Don't worry too much about cutting the quill correctly. Just cutting off the end at an angle works pretty well.
©2006, Digital by Design - See Copyright Information
Make Up a Pen Name and Disguise Your Handwriting
Ben's brother printed one of the earliest newspapers in America called the New England Courant. Ben wanted to write for the paper, but he didn't think his brother would publish his writings so he used a fake name or pen name and disguised his handwriting so that his brother wouldn't know who he was. Have children think up a pen name and write a story trying to disguise their handwriting. Read the story and show them the handwriting. Have the children guess who wrote the story.
©2006, Digital by Design - See Copyright Information
Set Up a Colonial Print Shop
Benjamin Franklin was a printer. He owned his own newspaper and printed things for other people also. They didn't have computers or typewriters in colonial times. They had to set their type using individual letters much like the rubber stamps we use today. They were called fonts. Printers had several different styles of fonts and had quit a few fonts of the same letters. They had to find the correct fonts to spell out each word and place it upside down in a tray. This was called typesetting. Once they had a page typeset they would use it to run off many copies. Then they would remove all the fonts and start on the next page. You can pretend you are a typesetter by writing letters on small pieces of paper (your fonts). Make several copies of each letter. Make capital and lower case letters. Arrange the capital letters in a row and then the lower case letters in a row below the capital letters. Printers called the capital letters "upper case" letters because they stored them in a case above the "lower case" letters. Pretend to typeset one of Benjamin's famous sayings such as "There is no gains without pains," or "Early to be and early to rise, Makes a man healthy, wealthy, and wise." Glue the letters one by one on a sheet of paper to spell out the saying. Keep track of how much time it takes you to finish the saying. Now type the same thing on a computer and print it out. How much faster did it take you to use the computer.
©2006, Digital by Design - See Copyright Information
Piggy Bank Made from Recycled Plastic Container
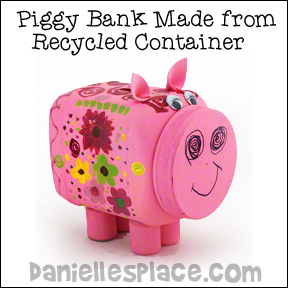
"A penny saved is a penny earned."
See the Pig Crafts and Learning Activities Page for directions to this craft.
©2012, Digital by Design - See Copyright Information
Words of Wisdom
In colonial days all the printers published almanacs each year. They featured a calendar, the phases of the moon, predicted the weather and tides, told farmers the best time to plant. They also gave advice, humor, recipes, and words of wisdom. Ben Franklin's almanac Poor Richard's Almanac became the most popular almanac of his time. He was famous for the sayings or proverbs he published in the almanac. People still quote these proverbs today.
©2006, Digital by Design - See Copyright Information
Make Your Own Almanac
Print out a blank calendar from a publishing program. Think up or use sayings from "Poor Richard's Almanac" to illustrate the calendar. Add the moon phases, and other helpful information. Here are a few you would want to miss. A penny saved is a penny earned. Early to bed and early to rise, Makes a man healthy, wealthy, and wise. There is no gains without pains. If you would be loved, love and be lovable. He that cannot obey, cannot command. Never leave that till tomorrow which you can do today. Little strokes fell great oaks. The early bird gets the worm. Haste makes waste.
©2006, Digital by Design - See Copyright Information
No-Sew Benjamin Franklin Paint Stick Puppet
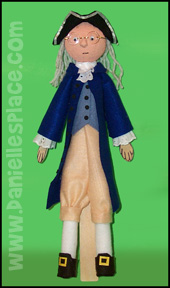
This type of puppet is fairly easy to make but does take some practice. The Styrofoam ball head is attached to a paint stick. The clothes and tricorn hat are made from felt.
Member's ![]()
Free Instant Download ![]()
What you will need:
Head: 2 1/2" Styrofoam Ball, Paint Stir Stick (paint stir stick - you get them free when you buy a gallon of paint or you can buy them very cheap from a paint store.) Small Glasses, Flesh Colored Acrylic Paint, Marker, Googly Eyes, and White or Off-White Yarn. (Optional - I used fast drying clay to make a nose)
Hat: Black Felt and 12" Gold Trim to Go Around the Tricorn Hat
Body: One Dark Blue Felt, One Light Blue Felt, One Tan Felt, One White Felt, One Brown Felt, 10" of Eyelet Lace, Tiny Piece of White Fabric, Two Wooden Spoons, Hole Punch, and Black Fun Foam
How to Make the Head:
1. Press one end of the paint stick into Styrofoam ball, pull it back out, and put some glue on the end of the stick. Put it back in. This will keep the head from falling off.
2. Add a nose - Make a small raindrop shape out of fast drying clay, flatten out one side, put a little glue on the flat side and press it onto the head. Use an eraser or something else to smooth out the nose. Poke two holes in the bottom of the nose to make nose holes. You can even add ears or other face features in the same way if you would like.
3. Paint the whole ball flesh color. You will need a lot of paint. Use a hair dryer to speed up drying. You may need at least three coats of paint. When the face is dry glue on yarn for hair. Ben had long hair and was bald on top. Glue the yarn all the way around the head at about nose level.
4. Place the glasses on the head to see where the eyes should be glued on. Remove the glasses and glue on the eyes. Place the glasses on the face. You may need to bend them to make them stay on.
How to Make the Tricorn Hat:
1. Print out the pattern for the hat.
2. Cut the shape from black felt.
3. Place glue on one side of the darts as shown in the pattern. Bring side A over side B and press together. Bring side C over side D and press together. Glue gold or white trim all the way around on the edge of one side of the hat. (I used a stiff trim that had wire in it. This helped to keep the hat shape.)
4. Place the hat on top of the head making sure the front of the hat faces forward. The trim should be facing down. Secure on the head with a pin or glue it to the head. Fold up the two side of the hat as shown in the picture. Glue them up in place. Fold up the back of the hat and glue in place.
How to Make the Body:
1. Start by making the bottom part of the legs. Cut two 6" x 6" pieces of white felt. Roll up the pieces and glue them closed down the length of the pieces.
2. To make the breeches cut two pieces of tan felt 6" x 5". Place glue down the 6" side of one of the pieces; bring the other side just overlapping the glued edge and press to secure. Do this with the other piece also. Place a white leg into one tan piece so that the tan piece covers about 2 1/2" of the white leg. Glue the tan piece to the white leg pleating the felt as you go around the leg. Do the same for the other two pieces. Cut two small strips of tan felt and glue them around the pleated edges of the felt at the knees. Glue the legs to the paint stick about 3" below the head. Glue them so that the breeches reach around the sides of the paint stick.
3. Use the shoe pattern (found on the tricorn hat pattern above) to cut shapes from brown felt. Glue the strips around the bottom of the legs so that the tongue of the shoe is in the front. Cut square buckle shapes from gold paper and glue to the front of the shoe. Cut two small circle shapes from the brown felt and glue them to the bottom of the shoe. Cut them to fit.
4. Print out the vest pattern and cut it from light blue felt. Glue the top of the vest around the paint stick below the head. Glue the front closed. Punch little circles from fun foam and glue them down the front of the vest.
5. Cut a strip of material from white fabric and glue it around the neck. Cut two pieces of eyelet lace about 3/4" each. Glue one to the front of the white collar and then glue the other one underneath that one a little farther down.
6. Print out the coat pattern and cut it from dark blue felt. Fold down the top edge about 1/2" to make the collar. Place a dot of glue in the middle to hold the collar down. Glue the coat over the vest at the neck. Punch out more circles from the fun foam and glue to the coat. Cut out the sleeve pattern (this is with the vest pattern) and cut two from dark blue felt. Place glue down the long edge of the sleeves and bring the other edge just over the glue and press to secure. Glue them to the top of the coat underneath the collar at the neck.
7. To make the arms cut two pieces of white felt 3" x 3" and roll them up. Glue them closed so they don't unroll. Glue some eyelet lace around one edge on each roll. Stick the arms inside the sleeve of the coat. Glue them so they don't fall out. To make hands draw fingers on the wide end of the wooden spoon. Place some glue on the thinner end and push them up into the arms.
©2006, Digital by Design - See Copyright Information