Box Crafts Sculpture Learning Activities for Children
Sculpture Crafts Made with Recycled Cereal Boxes and Other Recycled Items
Scottie Dog Cereal Box Sculpture for Kids

Engaging in 3D crafts is not just a fun activity; it’s a powerful way to boost your child's fine motor skills and enhance their spatial recognition. By repurposing cereal boxes, containers, and a few other materials, your child can create stunning sculptures without breaking the bank. The Scottie dog sculpture serves as an ideal introduction to the world of cereal box art, sparking creativity and imagination. Once your children have mastered the techniques, inspire them to unleash their own designs and share their unique patterns with friends and family. This hands-on experience not only cultivates artistic abilities but also fosters confidence and collaboration!
Things you will need for this activity:
14 oz. Cereal Box, Black Patio Paint, Black Construction Paper, Black Craft Foam, Animal Eyes, Scissors, Low Temperature Glue Gun, Ribbon for the Collar, and Printer Paper for the Patterns
The patterns for this activity is available to members and as an intant download.
Member's Pattern 
Instant Digital Download - 
©2013, Digital by Design, Inc. - See Copyright Information
Scottie Dog Cereal Box Sculpture
Dragon Cereal Box Craft Kids Can Make

What you will need:
Two - 14 oz. Cereal Box
Patio Paint
Black Craft Foam
Animal Eyes (Optional)
Scissors
Low Temperature Glue Gun
How to Make the Dragon Cereal Box Craft:
Member's ![]()
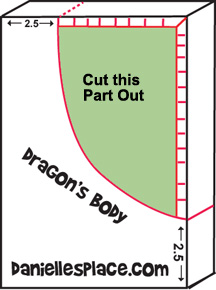
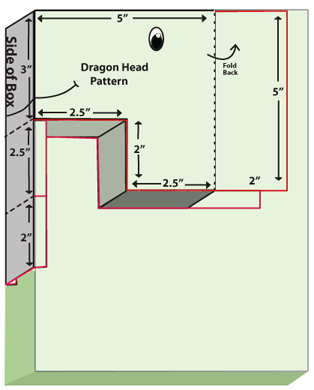
1. Draw the dragon's body on one cereal box starting at the top of the box, 2.5" in from the left curving down toward the bottom right-hand side of the box ending 2.5" from the bottom. (See the diagram to the right).
2. To cut the body out poke a hole in the front of the box and cut along the curved line. Cut up the side and along the top of the box about 1/2" in from the side (the green area in the diagram).
Cut across the right side of the box. Use the "green" area you cut from the front of the box as a template to trace around on the back of the box (Red line). Cut out the back of the box exactly the same as the front leaving the side of the box attached at the top (dotted line).
3. Cut slits along the sides as shown by the red lines in the diagram. Fold down the side and glue it to the curved sides of the body on the tab created by the cut slits (See picture.)
4. To make the head of the dragon follow the diagram to the right. (A printed diagram is available to members which is made to scale so you can use it as a template.)
5. Fold up the left side of the box so that is goes under the dragon's chin and neck. Glue it down on the sides.
6. Glue the flaps on the right side of the head over each other and then glue the head to the body. (A to - scale pattern is available to members.)
7. Cut a tail about 7" long and 3" tall at one end. Glue the tail to the body. Cut card board to fill in the top of the tail and glue it on the sides of the tail.
8. Make two small boxes for the legs and glue them to the sides of the box. (A printable pattern for the legs is available to members.)
9. Cut arms, feet, and wings from cardboard and glue them to the dragon's body. (A printable pattern is available to members.)
10. To make the horns cut strips of card board about one inch wide, wind them up and glue them together. Cut a notch at the end and glue them to the head.
11. To finish paint the dragon and draw on the eyes, nostril, and mouth.
©2013, Digital by Design, Inc. - See Copyright Information
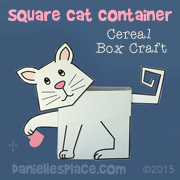
Cereal Box Cat Craft
Cereal box crafts are great learning tools for children because they can learn to follow directions, read diagrams, work with 3D modeling, and measure accurately. You can have them follow the directions exactly like they are written or make up their own designs using the same techniques. 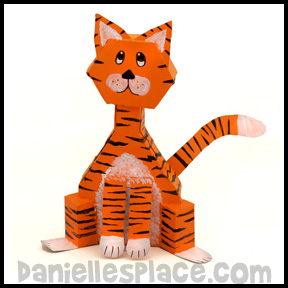
What you will need:
Two 18-oz. Cereal Boxes - 7.5" x 10.5" - (A 13-oz. box will also work, but the cat will be thinner.)
Black, White, and Orange Patio Paint
Scissors
Low Temperature Glue Gun
Printer Paper for the Patterns
Ruler
Black Marker
How to Make the Cereal Box Cat:
Member's ![]()
1. Using the diagram below measure 4 1/4" up from the bottom of the box and mark it with a black marker on the right and left sides of the front and back of the box. (The back of the box should look exactly like the front.) Make four more marks 4 1/4" up from the first marks. (A printable diagram is available to members.)
2. Measure in 2 3/4" in from the second marks and draw a line from the mark down to the first marks to draw the slanted lines of the body. Also draw lines straight up to the top of the box to make the neck. These lines are the fold lines (dotted lines) on the diagram.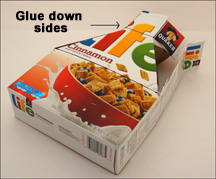
3. Draw in the red lines from the diagram and then cut the box on the lines indicated by the red lines.
4. Fold back the dotted lines. Glue the sides of the box down to the slanted sides of the cat's body. Glue the folded sides of the neck together.
How to Make the Cat Head
1. Use another cereal box to make the head.
2. Draw the pattern onto the box using the diagram to the right. Draw the diagram on the back and front of the box. (A printable pattern for the head is available to members, above.)
3. Make a dot 2" in on each side on the bottom of the box. Measure up 4 1/2" and mark two more dots 2" in from the sides of the box (Shown as Dot B).
4. Measure 2 1/4" up from the bottom of the box and draw a dot 1" in from the sides of the box. Draw lines with the marker to connect the dots.
5. Draw cut lines 1" around the first lines.
6. Draw the same lines on the back of the box.
7. Cut out around the shapes on the lines indicated by red on the diagram. Do not cut the sides or the bottom of the box off.
8. Use a sharp object to score the fold lines. (Trace the fold lines with the point of a knife and a ruler. This will make it easier to fold the lines.) Fold back the tabs around the face shape.
9. Fold up the bottom edge of the box at the bottom Points B so that they cover the sides of the cat face shape.
Fold where the side of the box meets Points A and then again at the top Point B. Cut off the excess length, and glue the sides down.
10. Cut ears shapes from the left over cardboard (See diagram). Fold back the bottom tabs on the ears and glue them to the head.
11. Glue the head to the body.
How to Make the Legs:
1. Make 3.5" x 2" x 1.5" boxes for the legs (see the diagram to the right) and glue them to the body. (Printable patterns for the legs are available to members, above.)
2. Draw the cat's feet, tail, and legs onto cardboard, cut them out, and glue them to the body.
(A printable pattern for the feet, tail, and legs are available to members, above.)
©2013, Digital by Design, Inc. - See Copyright Information
Box Crafts on Other Pages
More Box Crafts
Watch how to make a cardboard Cat House on Youtube: