"In the News" - Bible Lesson about Daniel for Older Children
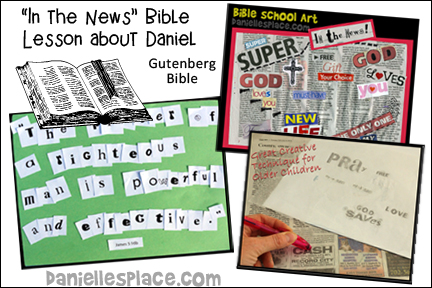
In this lesson children explore what it might have been like to be an eyewitness to the events experienced by Daniel when he was arrested and thrown into the lion's den. They explore how people communicated the news in Daniel's day and in the past, and compare it to the present.
Children pretend to be eyewitnesses to the events and are interviewed by an anchorperson.
Member's ![]()
The way we spread information has changed dramatically over time. The earliest books were written by hand using quill pens, and the paper was handmade from animal skins or plant materials. Some books were printed using engraved pieces of wood. Each page had to be carved into wooden block. The images and text had to be engraved as mirror images. This process could take years.
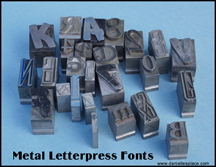
Johann Gutenberg revolutionized the speed in which information could be spread with the invention of the printing press. To make a letter block the mirror image of the letter was engraved at the end of a metal rod. The rod was pushed into soft copper to form a mold.
Lead was poured into the mold and when it hardened a block was formed. Each metal block with the letter at the top was carefully placed in a wood frame to spell out words and sentences in reverse order.
Once the letters blocks were in the right place the frame was put on the printing press and ink was rolled over the letters. Then a sheet of paper was placed over the inked letters. The paper was pressed into the letters with the printing press and then removed. Many copies could be made in this manner.
Gutenberg's first major project was printing the Bible. It is known as the Gutenberg Bible.
Show your children a picture of letterpress letters.
Member's ![]()
To see a video of how Gutenberg made his letters go to this Web Page - https://www.hrc.utexas.edu/exhibitions/permanent/gutenbergbible/process/#top
©2014, Digital by Design - See Copyright Information
Discover How Many Letters are on one Page of the Bible and Read Text Backwards
Before class print out the first chapter of the Bible in reverse and make copies.
Member's ![]()
Over three hundred different pieces of type were used in the Gutenberg Bible. Every letter on a page was a different piece of metal. There were 42 lines on most pages of the Bible with approximately 2,500 pieces of type per page. The metal type had to be placed backwards from right to left (a mirror image) in the correct location in a wooden frames. Give your students copies of the backwards printed text and see if they can read it. Tell them that this is what the text would have looked like in Gutenberg's press, except his was in Latin.
Ask your students: Do you think it would be hard to proof this text before printing it? There were mistakes in the Gutenberg Bible. Words were crossed out by hand and the corrections were written in the margins.
(This activity goes along with the Daniel in the Lion's Den Sunday School Lesson for Older Children.)
©2014, Digital by Design - See Copyright Information
Pretend to be Printers
Ask you students to guess how many letters are on one page of their Bibles, and then have them figure out approximately how many letters there are by multiplying the number of words across by the number of lines and then multiplying that number by 5 for the average word length. Genesis Chapter 1 has 825 words so approximately 4,125 letters.
What to do:
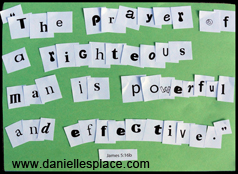
1. Before class print out the Bible verse letters pattern and make copies. You can use the reverse letters pattern and have your children glue them to a piece of paper backwards like a printer would have placed the letters in a printing press.
Member's ![]()
2. Have your students check their work by placing the picture up to a mirror. Or you can just have your children glue the regular letters from the bible verse letter pattern (Pattern available to members of The Resource Room) onto a piece of paper to spell out the Bible verse. You can also make it a game to see who can finish first. You can cut the letters apart before class and place each set in a Ziploc bag or have your children cut them apart during class. Make extra copies in case some letters are lost.
Remind your children that the letters Gutenberg used were much smaller.
If you have a computer available in class, children will enjoy practicing being printers at the Harry Ransom Center, University of Texas web site.
(This activity goes along with the Daniel in the Lion's Den Sunday School Lesson for Older Children.)
©2014, Digital by Design - See Copyright Information
Just wanted to drop a note and let you know how much I have thoroughly enjoyed your resources. I use them almost weekly in preparing for Sunday School, Children's Church, our Christmas Play, etc. It's even easy enough for me to use! and I'm not a computer expert by any means. Thank you so much for the work that has gone into your website. I'm sure it has enriched the work of others too. Linda
"Where Did it Come From?" Game
Read famous quotes from people and characters who have been in the news and see if your children recognize them. Such as:
"This is my family. I found it, all on my own. Is little, and broken, but still
good. Yeah, still good." - Stitch
"I have a dream that my four little children will one day live in a nation where
they will not be judged by the color of their skin, but by the content of their
character." -Martin Luther King, Jr.
". . . but the gift of God is eternal life through Jesus Christ our Lord." - Romans 6:23
"Home is the comfiest place to be." - Pooh
Member's ![]()
©2014, Digital by Design - See Copyright Information
"In the News" Newsprint Art Project

What you will need:Newspaper, Markers, Colored Pencils, Glue Sticks, Colored Paper and Scissors
What to do:
1. Before class collect old newspapers, magazines, and ads and cut the big words out of the pages. Also cut pieces of newspaper a little smaller than a piece of construction paper to be used as canvases.
2. In c lass introduce the project by saying, "Although the events in the Bible happened a long time ago, they are still as exciting and important as they were when they occurred. Everyone should know and be reminded of God's amazing works. Today we are going to make a poster using newsprint to express how we feel about God, and to remind us that God's works are news worthy.
3. Pass out the newsprint sheets and the words. Let your children put the words together to make messages about God. They can cut up some of the words to make new words and sentences, and use markers to doodles and their own designs.
5. When they are finished have them glue their pictures onto pieces of construction paper.
Member's ![]()
©2014, Digital by Design - See Copyright Information
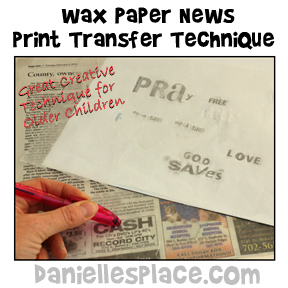
Use Wax Paper to Create Text
What you will need:
Lots of Newspapers - Ads and colored text do not work well. You want to use large black and white text.
Wax Paper, Small, Smooth Objects such as Pen Caps, Spoons etc. to Rub Over the Waxed Paper, White Paper, and Glue or Tape
What to do:
1. To make things less confusing in class cut out large text areas before class. Cut waxed paper into 7" x 10" pieces. Find small smooth object students can use to rub the wax paper.
2. Practice this technique and make up a sample page to show your class.
3. In class give each student a rubbing utensil and a piece of wax paper. Show your students how to place the wax paper over the letter they want to use and then rub the wax paper with the tip of a pen cap or other smooth object to lift the ink off the newspaper onto the wax paper. Find the next letter you want to use and place the wax paper over that letter lining it up with the previous letter.
4. Once a letter has been rubbed it shouldn't be used again. Have your children mark off any letters they have used but coloring over them with a highlighter pen.
5. When your students are done have them glue or tape the wax paper to a white sheet of paper.
©2014, Digital by Design - See Copyright Information
There isn't a Sunday that goes by that I don't check the resource room for something to add to our Sunday School lesson or a whole lesson all together. For a long time I just enjoyed Danielle's sight, but since I've been teaching Sunday School I am so thankful to have The Resource |Room. The Sunday after the terrible bombings I decided to do something other than my planned lesson. I did God's Masterpiece to remind the children and myself how important and special each one of us is to God. This last Sunday our church had a special service on "The Greatest of these is love..." and so I chose "God's love is Immeasurable." I always take the lessons and develop a worksheet for my students, because they love to read for me and write the answers. You always have so much for me to work from and it is such a marvelous help. I always share news about your site with our friends and parishioners, when I have the chance. Thanks for all the hard work you put into it! Janet
I LOVE, LOVE, LOVE your site!! I teach 3 & 4 year olds in my Sunday School class and your site is such an inspiration! If I don't find the exact idea I'm looking for, I get inspired by all the great stuff and modify something to work for "my bunch". Jeanne Young
Other Daniel Bible Lessons
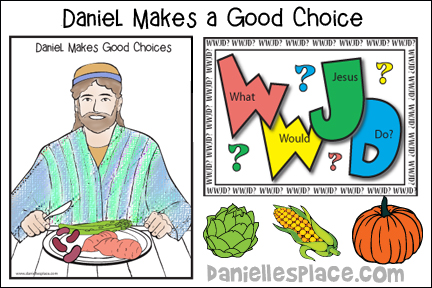
Daniel Makes Good Choices Bible Lesson
Daniel Prayed - Types of Prayer


