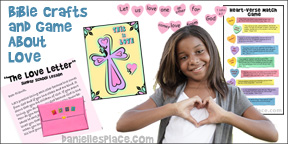
Creation Crafts for Sunday School
Creation Crafts for Day 4 of Creation
The following Bible Craft and Game ideas come from the Sunday School lesson "Light of the World" about the Fourth Day of Creation on The Resource Room
Member's Bible ![]()
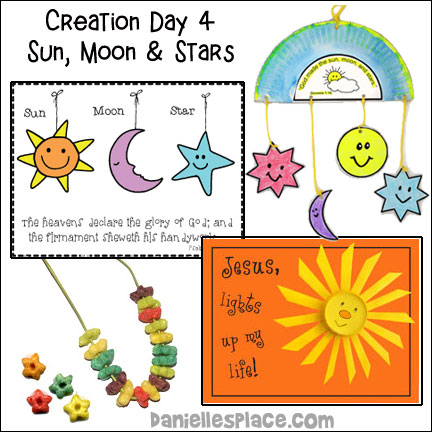
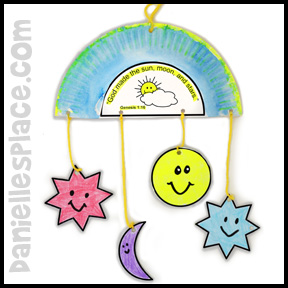
Sun, Moon, Stars Mobile Bible Craft for Sunday School
What you will need:
Regular-sized Paper Plates
Water Color Paints, Markers, Highlighter Markers, Colored Pencils.
Hole Punch
Yarn or String
Glue
Scissors
How to Make the Sun, Stars, Moon Mobile:
1. Before class cut regular-sized paper plates in half and glue the halves together, top to top, as shown in the picture. Punch four holes along the cut edge of one of the halves. Tie string or yarn from each hole. Cut sun, moon, and star shapes from card stock (heavy paper), punch holes in the tops of the shapes.
2. In class have your children write "God made the sun, moon, and stars." Genesis 1:16 on the front of the paper plate and draw a picture. They may want to paint the paper plate with water color paint, or decorate it with markers.
3. Children can color the stars, moons, and sun shapes, and add glitter if they would like, and then tie them to the strings.
Member's ![]()
4. You can get a little more complicated and use salt dough and cookie cutters to make the shapes, but you will have to do this several days before class to give the salt dough time to dry.
©2003, Digital by Design, Inc. - See Copyright Information
"Jesus Lights up My Life" Craft

Children will enjoy making this adorable picture using a yellow paper cup to remind them that Jesus lights up their lives.
What you will need:
Cardstock (Heavy Paper)
Googly Eyes (Optional)
How to make "Jesus Lights up My Life!" craft:
1. Print out the "Jesus, Lights up my Life!" pattern and make copies.
Member's ![]()
2. Cut the rim off the cup.
3. Mark one inch from the bottom of the cup all the way around.
4. In class have your children cut slits about 1/2" apart all the way down to the 1" mark on the cup and then fold down the rays to make the sun.
5. Glue the sun to a piece of paper.
©2012, Digital by Design, Inc. - See Copyright Information
God Created the Sun, Moon, and Stars Coloring Sheet
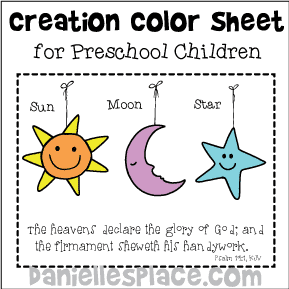
This cheery picture makes a great coloring sheet for preschool children. The large shapes are easy to color and the words next to each shape will help teach them to recognize words. The Bible verse with this sheet is Psalm 19:1 - "The heavens declare the glory of God; and the firmament sheweth his handywork." (Patterns for this coloring sheet are available to members on The Resource Room. It is available in both KJV and NIV.)
Member's ![]()
"Lift Up Your Eyes and Look to the Heavens" Activity Sheet
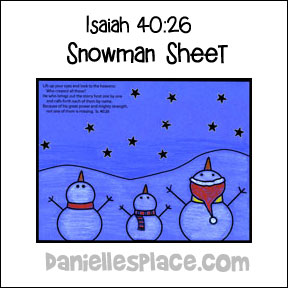
"Lift up your eyes and look to the heavens:
Who created all these?
He who brings out the starry host one by one
and calls forth each of them by name.
Because of his great power and mighty strength,
not one of them is missing." Is. 40:26
Print out the picture onto dark paper and then have your children color the picture with colored pencils.
Member's ![]()
©2012, Digital by Design, Inc. - See Copyright Information
Play a Day and Night Things Identification Game
Discuss how God made day and night and put the sun, moon, and stars in the sky and why we have night and day. Name some good things about both. Like God gave us the day and put the sun in the sky to warm up the earth. We can go outside and play when it is light. The sun helps the grass, trees, and flowers grow. God gave us night so that we can rest. He put the stars and moon in the sky so we could see at night. All that God made is beautiful. And God saw that they were good. Fill a box full of things that you would use at night and some things that you would use during the day. For example, you could use slippers, pillow, teddy bear, alarm clock, bath robe, flash light, reading glasses, sun block, sun visor, shoes, Bible, etc. Show the children one item at a time and discuss what time of day you would use them.
Just last week I subscribed to your site and I gave my first Sunday school lesson this past Sunday. We did the "God sends Rain" topic and thanks to your site my first class was an overwhelming success. The other teachers and parents were very impressed. I can tell the kids are excited about having a new and fun way to learn about God. Thanks, Cindy
Decorate Cookies
Decorate cookies shaped like stars, moons, and suns with icing and sprinkles. You can buy the icing already made or use the recipe below:
Draw an Outline of a sun and a half moon on a sheet of paper.
Have the children stick star stickers on the paper around the sun and moon outline. Cut or tear about 3" squares of yellow tissue paper. Have the children wad up the tissue squares and touch them to some watered down white glue and stick the tissue paper wad to the sun and moon. Thanks, Donna, for sending in this craft idea.
Graham Cracker Stars
What you will need: Graham Crackers, Frosting Dyed Yellow, Gumdrops
How to make:
1. Break a graham cracker rectangle in half to make two squares.
2. Frost one square with frosting dyed yellow (I bought lemon frosting in a can).
3. Frost the second square and put it at right angles to the first one so it forms an 8 pointed star.
4. Put on sprinkles if you wish. Top with a spicy gumdrop to signify the spices brought by the
wise men.
Borax Stars
What you will need:
Borax Found in the Laundry Detergent Section of Your Store, Pipe Cleaners, Wooden Craft Stick or Other Stick, a Quart Canning Jar with a Wide Mouth, and String
How to make:
1. Bend the pipe cleaner into an interesting shape like a star or heart.
2. Tie a string to the top of your shape and then tie the end of the string to a stick. Make sure the string is just long enough so that when you place the stick across the top of the jar the pipe cleaner shape will hang down into the jar but not touch the bottom.
3. Fill the jar with boiling water. Mix the Borax into the water a tablespoon at a time. You will need about three tablespoons per cup of water. Keep mixing Borax until you notice that the Borax isn't dissolving and is settling on the bottom of the jar.
4. Place the stick across the top of the jar so that the pipe cleaner shape hangs down into the Borax solution. Set the jar aside overnight and do not disturb it until morning. In the morning you should have a beautiful crystallized pipe cleaner shape.
5. You can add beads to the top of your crystallized shape and hang a piece of paper with the words "Let there be Light" from the bottom of the shape.
©2007, Digital by Design, Inc. - See Copyright Information
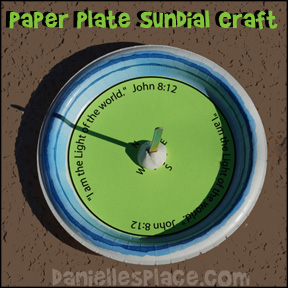
Make an "I Am the Light of the World" Sundial from a Paper Plate and Clay
What you will need:
Paper Plate
Paint
Paper
Clay or Play Dough
Marker
Craft Sticks
How to make:
1. In class have the children decorate the outside rim of a paper plate. Also have the write the Bible verse, "I am the Light of the world." John 8:12 around edge of the bottom of the paper plate. They should also make an dot in the center of the paper plate and a plus sign with letters N, S, E, W on the lines to make it look like a sundial.
Member's ![]()
2. Give each child a small ball of clay or play dough. Have them stick it to the middle of the plate and then press the craft stick into the clay so that it stands straight up. If you don't have clay, children can just punch a hole in the center of the paper plate and push a sharp straight stick through the hole down into the earth.
3. Children can use their sundial to tell time. Instruct them to place it out in their yard where it will be in the sun all day long. (They may need to put rocks on the sundial so it doesn't blow away.) They need to go outside every hour the first day and draw a line through the center of the shadow made by the craft stick. Show them how to mark the time of day next to the line they drew. After the first day of drawing lines, they can go outside and see what time it is by looking at the shadow of the stick and seeing where it falls on the lines they drew the day before.
©2003, Digital by Design, Inc. - See Copyright Information
Make Sun, Moon, and Star Sugar Cookies or Cinnamon Toast
Bring in cookie cutters and prepared dough or fresh white bread and let your children cut sun, moon and star shapes from the dough or bread. Toast or cook the cookies and then let them add cinnamon and sugar or icing.
Make a Star Necklace
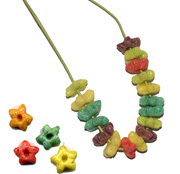
Have your children make star necklaces using General Mills Fruity Stars Cereal and thin braiding cord or cord used to make necklaces.
©2007, Digital by Design, Inc. - See Copyright Information
Your resource room has been a blessing to our Mission Friends teachers. As Mission Friends Director, I love to tell teachers about the site and I'm so happy that we were able to have this available so that they could gather ideas. Have a blessed day. In His Love, Angela Sipes
Make a Sun, Moon, and Star Picture
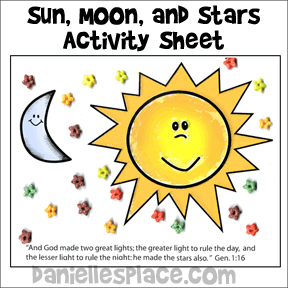
What you will need:
Paper
Crayons or Colored Pencils
Star Stickers or Star-shaped Cereal or Pasta
What to do:
1. Before class print out the craft page and make copies.
Member's ![]()
2. In class have your children color the picture and then glue on cereal stars, or use star stickers.
©2007, Digital by Design, Inc. - See Copyright Information
Play a Sun and Planets Bible Verse Review Game
Before the game explain to the children that all the planets revolve around the sun. The sun is the center of our universe and Jesus should be in the center of our lives. Tell them that they are going to play a game and that if they are picked by the "sun", they will need to come up with one way they can make Jesus the center of their lives.
Have an adult be the "sun". The children will be the "planets" that revolve around the sun. Have them make a circle around the "sun". Play some music as the children walk around the "sun". Stop the music after a short period of time. The "sun" lifts up his right arm and points straight out like a hand on a clock. The child that is closest to his arm must say the Bible verse. He then gets a snack and goes back to his seat. Keep playing until all the children have been picked. Or you can have the child say one thing about why he is glad God made the sun, moon, or stars. For example, he may say, "I'm glad God made the star because they are so beautiful.
Keep the Stars in the Sky Balloon Game
Before class blow up some blue balloon and draw stars on them with a permanent ink marker. Give your children balloons and tell them to hit the balloons up in the air and try to keep the stars in the sky. You can also break the children up into teams and have them hit the balloon back and forth. See which team can do it the longest without dropping the balloon. If you have young children that are afraid of balloons, you can use inflatable balls.
Star Wars Bible Verse Review Game
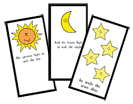
Before class print out the playing cards. In class give each child at least one card.
Have your children line up in two rows with a table at the front of the room. Have the first two children place their cards down on the table.
The child who has the highest card wins both cards. He must read or repeat the part of the Bible verse that is on the highest card, and then goes to the back of the line. If a child looses all his cards he must sit down. The child places the cards he wins underneath the cards that are already in his hands. He may not look at the cards once they are in his pile. Have the next two children in line place the card on top of their pile on the table. The child who has the highest card wins both cards. If the cards are of the same value, no one wins and they keep their cards. Keep playing until one child has all the cards or for a specified amount of time. Then see who has the highest score.
Member's ![]()
A complete lesson is available on The Resource Room
©2007, Digital by Design, Inc. - See Copyright Information
Sun Prints
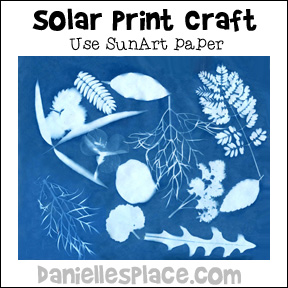
What you will need:
Sun Art Paper Kit (Kit Includes 15 Sheets)
Items to to Make Sun Prints such as Leaves and Other Natural Shapes or Small Items Found Around the House. Craft Foam Shapes Would Work Well Also.
A Large Rectangle Cake Pan
Lemon Juice (Optional)
Water
Paper Towel
Pieces of Card Board the Same Size as the Sun Art Paper
How to Make the Sun Prints
1. Before class gather everything you will need. If you have access to natural items where you will be making the print such as leaves and flowers, you can have your children collect the items they would like to use before you start.
Place some water in the cake pan. If you have a sink, you can just fill the sink with a couple of inches of water and add a little lemon juice. Place pieces of paper towels on a counter near the sink or water where the children can put their wet sun art papers.
2. Have your children pick the items they would like to use for the print and arrange them on a sheet of paper.
3. When a child has decided on a design, give him a sheet of paper and place it with the blue side up on the piece of cardboard. If you are working outside, do this step in the shade. Tell your children that they should place their items on the paper as quickly as possible. Once their items are placed, pick up the paper and cardboard and place it in the sun. The paper will start to turn a lighter color. When the paper has turned a very light blue place the sheet of paper in the water. Rinse the sheet for about a minute and then place it on a paper towel. Place another piece of paper towel on top to dry off the paper.
4. If it is a windy day place the clear acrylic sheet over the items so they do not move while your are waiting for the sun to turn the paper a light color.
We attend a small church and I am teaching Children's church ages 3 to 8. I have had a hard time finding lessons. I am so thrilled that I found your web site. I love the fact that the lessons and the crafts go together. I did the story about the "lady bug". The kids loved it as we had been talking about being friends. Thank you so much. You are truly a blessing. Shirley Lynch
"I am the light of the World" Sun Catcher
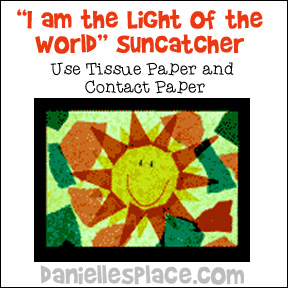
What you will need:
Card Stock
Different Colors of Tissue Paper
Clear Contact Paper
Scissors
Markers
How to make:
1. Before class cut card stock into frame shapes.
2. Cut pieces of clear contact paper to the same size as the border.
3. In class peal off the back of the contact paper and place it over a frame.
4. Have your students cut or tear pieces of tissue paper to make designs and stick them to the contact paper.
5. When the children are done with their designs, place another piece of contact paper over the back of the design.
As side note, I've structured my entire 9 month long class around the lessons that are available on you site. I'm really excited about all the neat ideas you have. I have also told several friends about your site and have made sure to tell them that I am blessed to have found it. It was an answered prayer! -bj