Christmas Crafts for Kids
Christmas Crafts For Children - Page 1
Owl Paper Gift Bag Christmas Craft for Kids
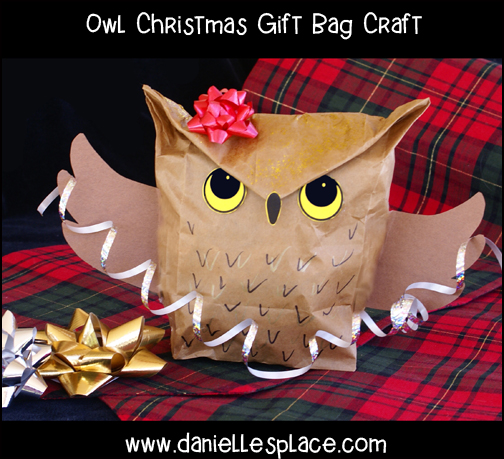
Are you tired of using plain wrapping paper or gift bags on your presents? If so, you’ve come to the right place! This craft project will show you how to transform a standard paper gift or lunch bag into a charming owl design, adding some character to your gifts. It's not only easy to create but also budget-friendly compared to fancy gift wrapping and can double as a seasonal decoration. Plus, kids will love it!
What you will need:
Brown Paper Lunch Bag
Matching Brown Construction Paper
Black Marker
Yellow Card Stock or Construction Paper
Glue
Christmas Bow
Newspaper Ripped in Quarters
Glitter Paint
How to Make Owl Paper Gift Bag:
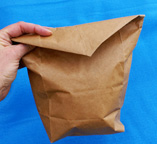
1. The owl paper bag can be used as a gift bag and stuffed with Christmas gifts such as towels, clothes, candy, cookies, etc.; or you can just stuff the bag with wrinkled up pieces of newspaper and use the owl as a decoration.
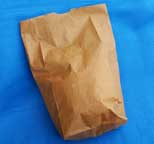 2. To make the owl pull the sides of the paper bag out from the top so that you can make a flat surface at the top of the bag.
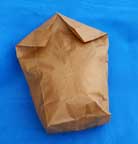
3. Fold down the sides from the middle top of the bag and glue them down.
4. Fold the down the point to the front of the bag making the top of the owls head. Pull up on the sides to make the horns and open them slightly.
5. Cut wings from brown construction paper and glue them to the sides of the bag. Draw eyes on a and a beak on piece of yellow paper using a black marker, cut them out, and glue them to the bag.
A pattern for the eyes, beak, and wings are available to members on The Resource Room and as an instant digital download.
Member's ![]()
Instant Digital Download - ![]()
6. Add a bow and gift tag. You may also want to paint the top of the owl's head with gold glitter glue.
©2008, Digital by Design, Inc. - See Copyright Information
Paper Plate Reindeer Craft - Paper Plate Reindeer Card Holder
What you will need:
Three Dinner-sized Paper Plates
Paint
Plastic Forks
Red Pom Pom
Paper
Glue
How to Make Paper Plate Reindeer Craft:
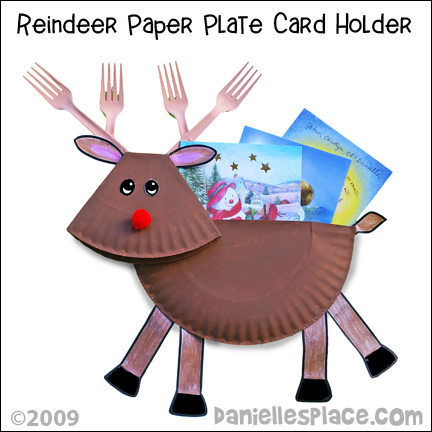
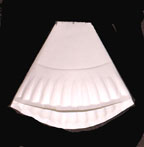
1. To make the body place two paper plates together, top to top. Cut of the top quarter of the plates to make a card holder, then glue the plates together as shown.
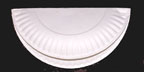
2. To make the head fold a paper plate almost in half as shown in the picture to the right.
3. Measure 3 3/4" in from the sides of the folded edge of the paper plate. Fold the sides back 3 3/4" to form the head shape as shown at the left. Glue or staple the sides together on the back.
4. Glue the head to the body as shown.
5. Cut out leg, tail, and ear shapes from brown construction paper and glue them to the body and head. Patterns for the legs, tail, and ears are available to members only.
Member's ![]()
Instant Digital Download - ![]()
6. To make the antlers cut two plastic forks in half and glue each half fork to a whole fork as shown in the picture. Glue them to the back of the head.
7. Paint the paper plates and antlers. Glue on a red pompom for the nose.
8. Attach a string or strong magnet to the back of the reindeer to hang it up. Place your Christmas cards in the holder.
©2008, Digital by Design, Inc. - See Copyright Information
Foam Elf with Candy Ornament Craft for Kids

What you will need:
Tan, Red, White, and Pink Craft Foam
Green and Pink Pompoms
Googly Eyes
Red and Green Felt
Tacky Glue or Glue Gun
Straight Pins
How to Make Foam Elf with Candy Ornament:
1. To make the face cut out a triangle shape about 5" high from the tan craft foam. Roll the triangle into a cone shape and glue it together.
2. To make the mouth fold in the foam around the open end of the cone. Cut a tongue from pink foam and glue it inside the mouth.
3. Cut ear shapes from the same tan foam and glue them to the sides of the cone.
4. To make the hat cut another triangle shape from the red felt and glue it to the top of the cone leaving about one inch above the foam cone so you can fold over the top of the hat. Glue a pompom to the end.
5. Glue a pompom on for the nose and glue on the eyes.
6. To make the candy in the elf's mouth cut two strips of foam, one from white foam and the other from the red, about 1/4" wide and the length of the foam piece. Wind the two pieces together gluing as you go. To hold them in place while they dry stick a straight pin in the side. When it is dry glue it to the tongue of the elf. Add a string to the hat to hang it on a tree.
©2008, Digital by Design, Inc. - See Copyright Information
Christmas Dog Treat Gift Bags Craft for Kids
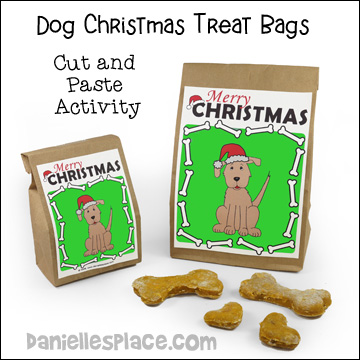
What you will need:
Lunch Bags - Regular-sized or Mini Craft Bags
Color Printer and Paper
Ingredients to Make Dog Treats
How to Make Christmas Dog Treat Gift Bags:
1. Print out the Dog Treat Bag Patterns and cut them apart.
Free ![]() - Small and Large Patterns
- Small and Large Patterns
2. Glue them to the front sides of lunch bags. Make dog treats or dog toys for your dogs and place them inside the bags. Roll down the top of the bags and staple them closed. Add a bow.
Recipe for Peanut Butter and Pumpkin Dog Treats.
3. If you are placing dog biscuits in the bag, place the biscuits in a plastic bag before putting them in the dog treat gift bag. You can find dog treats and biscuit recipes on the web.
©2007, Digital by Design, Inc. - See Copyright Information
Pipe Cleaner Christmas Tree Craft
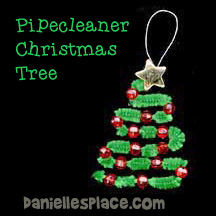
What you will need:
Green Pipe Cleaners
Red Beads
Star Bead
Wire or String to Hang the Ornament
How to Make Pipe Cleaner Christmas Tree Craft:
1. String red beads on a pipe cleaner about one inch apart.
2. When all the beads are in place bend the pipe cleaner in the form of a tree as pictured.
3. String a star button on to the top and bend the pipe cleaner end down to secure it.
4. Use a short piece of wire to hang the three. Secure the wire by bending it around the button back. If you don't want to use buttons, glue star gems to the top.
©2007, Digital by Design, Inc. - See Copyright Information
Christmas Crafts on Other Pages
Other Christmas Craft Pages on this Site
Bible Themes - Christmas Crafts
Bible Themes - Christmas Crafts Page 2
Bible Themes - Christmas Crafts Page 3