God Keeps His Promises Crafts
Noah Bible Crafts and Bible Games About God Keeping His Promise to Noah
The following crafts and activities come from the Bible lesson "God Keeps His Promises" on The Resource Room. In this lesson children learn
Member's ![]()
Instant Digital Download -  Available as a three-lesson pack.
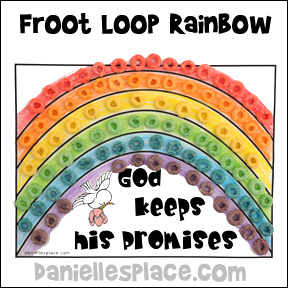
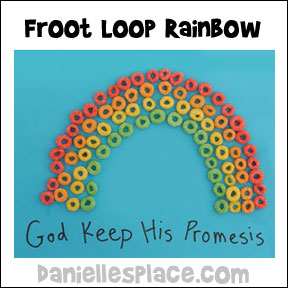
God Keeps His Promise Rainbow Dotter Activity Sheet

What you will need:
Crayons
Paper
Fruit Loops Cereal
Markers
White Frosting or Flour and Water Paste
What to do:
1. Before class print out the pattern or make up a sheet with a picture of a rainbow.
Member's ![]()
Instant Digital Download - Available as a three-lesson pack.
2. In class have your children use Do-a-Dot Dotters to color the rainbow. If you don't have dotters, you can have your children color the rainbow and then glue on Fruit Loop cereal with frosting or flour and water paste.
3. To make flour and water paste add a small amount of water to white flour just enough to make it sticky.
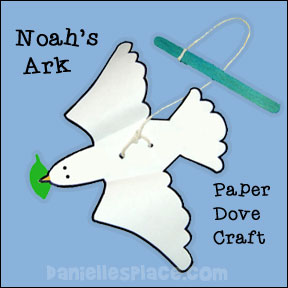
Noah's Ark Dove Holding an Olive Leaf Craft and Toy
This is a great craft for kids. Use it to act out the story of when Noah lets the dove go and it comes back with an olive branch. Hide an olive leave (branch) somewhere in the room and let your children fly their doves around the room looking for the leaf and then bring it back to "Noah".
What you will need:
White Construction Paper or Thick Paper
Scotch Tape
Wooden Craft Sticks
String
What to do:
1. Print out the and use it to cut dove shapes from white construction paper. Cut two for each child.
2. Glue the dove together except for the beaks.
3. Place a piece of Scotch tape over the circles in the middle of the dove. Use a hole punch to punch holes through the tape and the circles. Thread string through the holes. Tie the string at the end and then tie the other end to a craft stick. Cut leaf shapes to fit in the dove's mouth.
Instant Download Pattern - (This craft is also available with a Three Lesson Download about Noah for $6.00.)ake this pattern using black construction paper to make the raven that Noah sent out first from the ark.
Member's ![]()
Instant Digital Download - Available as a three-lesson pack.
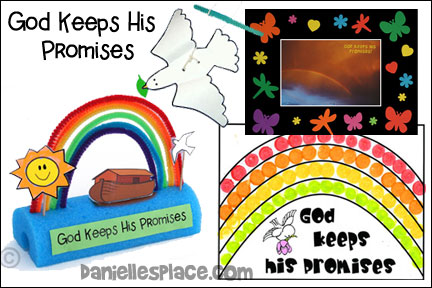
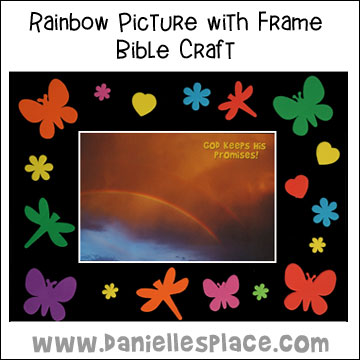
God Keeps His Promises Rainbow Picture and Frame Bible Craft
What you will need:
High Res. Printer Paper
Color Printer
Scissors
Elmer's No-Wrinkle Rubber Cement
Elmer's Glue-All Multi-Purpose Glue
How to Make the "God Keeps His Promise" Picture Craft:
1. Print out a picture of a rainbow onto High Resolution Printer Paper and cut it out.
Member's ![]()
Instant Digital Download - Available as a three-lesson pack.
2. Glue the picture to the center of a piece of black construction paper with rubber cement.
3. Have your children glue rainbow colored craft shapes to the frame.
©2013, Digital by Design - See Copyright Information
The Lesson
Preparation: You will need a large, realistic picture book of Noah and the Ark to show the class. "The True Story of Noah's Ark" by Tom Dooley at Answers in Genesis Bookstore is a great book. The pictures are very realistic and give the children an idea of what it must have been like for Noah and his family on the ark.)
Last week we learned how God took care of Noah and all the animals in the ark. They were in the ark a very long time; for over a year. What do you think it would have been like for Noah and his family to live in the ark for over a year? (Give your children time to give their ideas.)
It was probably quite noisy, with hundreds of animals cooped up next to each other. Have you ever gone into a bird store? Sometimes the birds are so loud that you have to cover your ears. The smell must have been overwhelming at times. It was probably kind of dark because there were three stories on the ark and only windows at the very top level.
Do you think Noah and his family were bored? I don’t think so. Noah and his family probably kept very busy feeding and cleaning up after all the animals.
The Bible tells us that God didn’t forget about Noah and the animals. He promised Noah that he and his family would be safe. After many months God stopped the rain and closed the springs in the ground, so the water stopped coming up, and the water finally began to go down.
Finally, ark came to rest on a mountaintop. Noah opened a window on the ark and sent out a raven. The raven kept flying back and forth, going out and coming back to the ark until the water had gone down enough for it to survive. (Have your children pretend that the raven they made was the one Noah sent out. Tell them to move them back and forth like they are flying back and forth to the ark.)
Then Noah sent out a dove to see if the water had dried up enough for the dove to land on the ground, but the dove couldn’t find anywhere to rest its feet, so it came back to Noah. (Tell your children to pretend the dove they made was the one Noah sent out. Have them swing their doves back and forth and then come back to Noah.) (Note: Ravens are scavengers and eat just about anything. Doves, on the other hand, eat seeds from the ground.)
Noah waited seven more days and sent out a dove again. This time the dove returned with an olive leaf in its mouth. (Have your children do the same thing, but this time place a leaf in the dove’s beak and pretend that it comes back to Noah with the leaf in its mouth.) Now Noah knew that the land had started to appear again. He waited another week and sent the dove out again. This time the dove didn’t return. Noah knew that it was time to leave the ark. Soon God said to Noah, “Come out of the ark, and bring all the animals so they can repopulate the earth.”
God had saved Noah and his family and all the animals. When they were all out of the ark Noah built an altar and worshipped God, and thanked him for saving his family. Then God made Noah a promise.
Does anyone know what a promise is? A promise is telling someone that you will do something. Have you ever made a promise? Did you keep your promise?
God always keeps his promises. He has made many, many promises in the Bible. On this day God made Noah a promise, and everyone else who would ever live on the earth; that includes you and me. He promised us that he would never again flood the whole earth. Then he put a rainbow in the sky and said that the rainbow would be a sign of his promise. When we see a rainbow appear after a storm, we can remember God’s promise.
Crafts
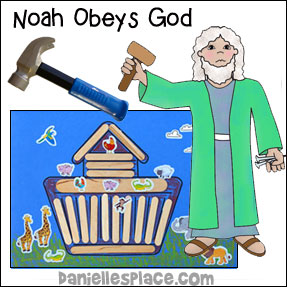
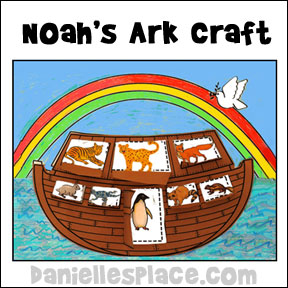
Noah's Ark with Opening Windows and Door Craft
Children pick the animal pictures they would like to glue to the ark activity sheet and then glue the ark pattern over the sheet. They can open up the window and doors to see all the animals in the ark.
What you will need:
Construction Paper
Crayons
Glue
What to do:
1. . Before class print out the ark pattern and the background pattern and make copies. Print out the ark pattern onto brown construction paper to make the craft easier for young children.
Member's ![]()
Instant Digital Download - Available as a three-lesson pack.
2. Using an Exacto knife or razor blade to cut the windows out on only three sides so they can open and close. This ark pattern will cover the main picture when the children completed coloring and gluing on the animal pictures.
3. Find and cut out small animal pictures from magazines and newspapers or use the animal patterns. In class have the children color the ark picture and glue the animal pictures onto the squares where indicated on the picture. Show your children a sample of a finished activity sheet and let them know that they should only glue the pictures in the squares because the rest of the ark will be covered up with the ark pattern.
4. When your children have finished coloring and gluing on the animal pictures, glue the ark onto the children’s pictures, being careful not to get any glue on the windows and door.
You can print the animal pictures onto sticker paper or print them on regular paper, cut them out and use a sticker making machine such as the Xyron 150 "X". (I bought the Xyron 150 "X" Dispenser Sticker Maker at Wal-Mart for less than $10.00.)
Note: It would be a good idea to show your children an ark that is drawn to scale according to the measurements given in the Bible. "The True Story of Noah's Ark" (with audio CD and pull-out spread) by Tom Dooley and Bill Looney has great pictures that will really get your children thinking about what it must have been like to build the ark and live in it. There is a preview of some of the pictures in the book on the web site.

©2013, Digital by Design - See Copyright Information
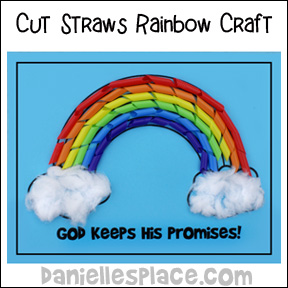
"God Keeps His Promises" Drinking Straw Craft
What you will need:
Rainbow Colors Bendable Jumbo Straws
Blue Card Stock (Heavy Paper)
Scissors
Cotton Balls
Glue
What to do:
1. Before class print out the rainbow pattern onto blue card stock.
Member's ![]()
Instant Digital Download - Available as a three-lesson pack.
2. Cut the jumbo straws into 3/4" pieces, cutting them on the diagonal.
3. In class have your children glue the cut pieces of straws onto the rainbow picture and glue pieces of cotton to the clouds.
©2013, Digital by Design - See Copyright Information
"God Keeps His Promises" Rainbow Bible Verse Holder Craft
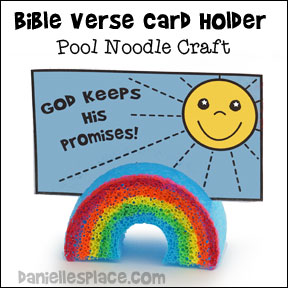
What you will need:
Round Pool Noodles (Pool Noodles are foam shapes used in swimming pools.), Serrated Knife (Bread Knife) and Liquid Chalk. Markers,
What to do:
1. Before class use a ruler to mark off 1 1/4" section on the pool noodle.
2. Cut the pool noodle at each mark with a serrated knife making donut shapes. Then cut the donut shapes in half to make rainbow shapes.
3. Cut a slit at the top of the rainbow shape lengthwise across the center of the rainbow about 1/2" deep. Use this slit to hold the Bible verse card.
4. Print out the Bible verse cards. Cut the card out, but do not cut the back and front of the cards apart.
Member's ![]()
Instant Digital Download - Available as a three-lesson pack.
5. In class have your children color the rainbows with liquid chalk markers and the Bible verse cards with colored pencils of highlighter markers. When they are done coloring fold the cards in half and glue the halves together.
6. Have them insert the Bible verse cards into the top of the rainbow.
©2013, Digital by Design - See Copyright Information
Noah's Ark Rainbow Display Craft
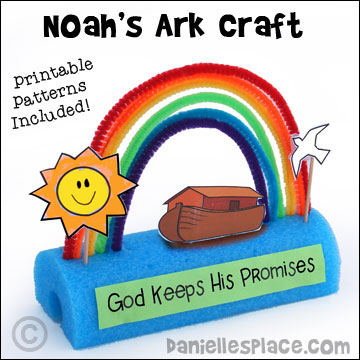
What you will need:
Chenille Stems - Red, Orange, Yellow, Green, Blue and Purple, Card Stock, Colored Pencils, Toothpicks, Tape or Glue, Pool Noodles, and Permanent Markers or Liquid Chalk Markers
How to Make the Noah's Ark Rainbow Craft:
1. Before class cut the pool noodles into 6-inch lengths and then cut them in half lengthwise.
2. Print out the paper pattern onto card stock and cut them apart.
Member's ![]()
Instant Digital Download - Available as a three-lesson pack.
Instant Download Pattern - ![]() - This craft only, color and black & white patterns.
- This craft only, color and black & white patterns.
3. In class have your children color the patterns, cut them out and glue or tape them to the end of toothpicks.
4. Show them how to bend the Chenille stems and stick them into the foam. Start with the outside red Chenille stem and stick each end in one end of the noodle to make an arch. Place the other Chenille stems right next to the other craft stems working from the outside in. You will have to cut the inside stems shorter in order to fit them in the arch. You may want to pre-cut them. Make one sample craft and use the stems from it to know how long to cut the stems.
5. To finish glue the Bible phrase on the front of the display and stick the pictures into the foam. Children may want to color part of their noodles with markers to look like dry ground where the ark came to rest.
©2013, Digital by Design - See Copyright Information
Activities
Play a Rainbow Review Game
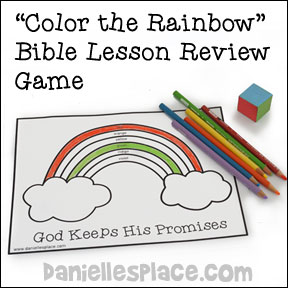
What you will need:
Paper
Crayons or Colored Pencils - Red, Orange, Yellow, Green, Blue, Indigo, Violet
Block or Die Painted with the Colors of the Rainbow
What to do:
1. Before class print out pictures of rainbows and give one to each child.
Member's ![]()
Instant Digital Download - Available as a three-lesson pack.
2. Paint each side of a die one of the colors found in the rainbow - Red, Orange, Yellow, Green, Blue, and Indigo.
3. Take turns having the children answer questions about the lesson. If a child answers the question correctly, he gets to throw the die. He can then color the corresponding color on his rainbow picture. If he has already colored that color on his rainbow, he doesn't do anything on the turn. The child who colors in all the arches first wins. (Note: I let all the children throw the die whether or not they knew the answer. If one a child didn't know the answer, I asked another child to help him.
©2000, Digital by Design - See Copyright Information
Comments
I teach a preschool Sunday school class with ages from 2 to 6. Last week I taught the story of Noah and the ark; my lesson was "God Keeps His Promises". As our craft, we made "Promise Cups". We used yogurt cups, but any container with a lid will do. We covered them with construction paper, wrote "God Keeps His Promises" on the front and decorated the whole cup with stickers. I had printed some of "God's Promises" (scriptures) onto multi-colored construction paper, the colors of the rainbow. We read these out loud as we placed them inside our cups. We also made animal masks. I purchased some of the Hefty rand plates shaped like animals and cut the eyes out. The children picked which animal they wanted to be and we taped a jumbo craft stick to it for a handle. Singing "The Animals Go Marching Two By Two" we marched one animal at a time onto the ark. I made the ark by placing a brown blanket over a long table with two folding chairs making a door. After all the "animals" were on the ark, I came inside too and reminded them of the high points in the lesson. All my children went home knowing that God really does keep His promises. I think their favorite part was marching onto the ark. Theresa Bostick
I got a large box from an appliance store and painted it to look like the ark. I cut a door in one side and folded it down to look like a ramp. Then, before class, I hid stuffed animals around the room. As the children came in the door they walked through light blue streamers (rain). As they came in I had them round up all the animals and get them in the ark before the rain came. They got very excited and enjoyed this. Then we all crawled inside the ark and had the story as they cuddled the animals. We talked about how Noah and his family took care of the animals, and how God took care of ALL of them. Then we crawled out and I pointed out the rainbow I had hung on the back window. I feel that it is very important in this story to really emphasize God's promise that he would never flood the whole earth again. Sometimes this point gets lost in the story. The ark lasted for several weeks and the children enjoyed playing with it. Fran
(Note: Let your children know that Noah didn't have to round up the animals. God led them to the ark. All Noah had to do is build the ark.)
To reinforce the promise of the rainbow for God Keeps His Promises, I gave my children's church class multi-colored cereal as a snack. They really enjoyed naming the colors before eating it. Sally Stensaas, Missionary in Uganda
Rainbow Cookie Craft - What a neat idea! My kids enjoyed using the frosting "glue" to make the rainbow, and the colored cookies were certainly a big hit also! I usually try to be creative when providing snacks and this was done during craft/snack time so I had plenty of time to finish. I told the kids that they had to show mom first before they "ate" their picture. The cookies made such bright, cheery animals. All the moms thought it was a super idea. Some of the kids didn't even want to take the cookies off to eat them because the animals were so cute. Thanks for a great site and a terrific idea!
Noah Bible Crafts and Lessons on Other Pages