Crafts and Learning Activities Elements of Design - Shape
Including: Print making Techniques, Children's Books About Shape
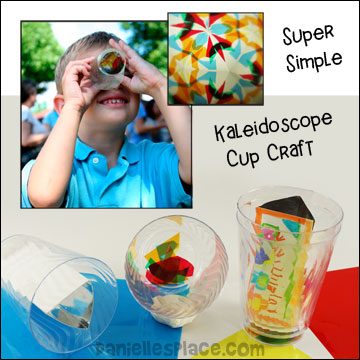
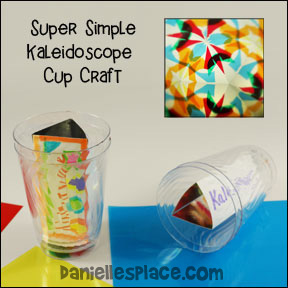
Super Simple Kaleidoscope Cup Craft
What you will need:
Chinet Cut Crystal Cup - 14 oz (2 for Each Kaleidoscope)
Highlighter Markers
Tape
Scissors
Ruler
Glue
Watch a "Do it and View it!" video:
How to Make the Super Simple Kaleidoscope Cup Craft:
1. Print out the mirror pattern and cut it out. Use the pattern to cut the mirror from the mirror board. Score the fold lines with a sharp object such as the edge of scissors or a knife.
Member's 
Instant Download Pattern 
2. Decorate the back of the mirror board with markers.
3. Fold the mirror board so that the shiny side is inside and tape it along the sides. Fold out the three tabs at the bottom.
4. Place glue on the tabs and place the mirror board the the inside of a cup so that the glued tabs are at the bottom of the cup.
5. Cut up colored acetate into different shapes. Try to make the pieces about the width of the inside of the cup. Place the pieces inside another cup.
6. Place the cup with the mirror inside the cup with the acetate pieces.
7. Hold the cups to your eye and turn the outside cup to make the shapes and colors change.
Educational Activities:
Have your children experiment with different colors and shapes, and different objects such as colored class, and clear beads. Children can also draw shapes and designs onto clear acetate and place them in the bottom of the cup or tape them to the outside bottom. Children can also hold the cup up to different objects such as backlit pictures and images on a computer screen.
Discuss the following words: Reflection, light, kaleidoscope - observation of beautiful forms, symmetrical, equilateral triangle, and 60 degree triangle.
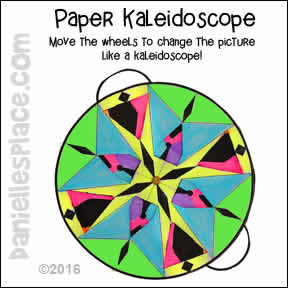
Paper Kaleidoscope - Experiment with Shapes and Color
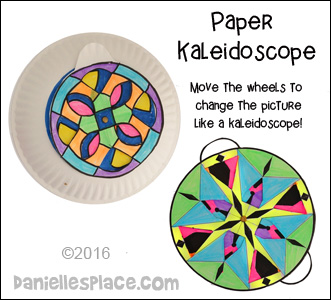
This is a great craft for children of all ages to experiment with shapes and color. Younger children will need help cutting the paper, but they will enjoy picking colors and discovering the changing shapes and colors as they turn the wheel of their own kaleidoscopes. Use the pattern from this web site as a sample, or practice kaleidoscope, and then encourage your children to make their own kaleidoscopes using different shapes.
What you will need:
Card stock (Heavy Paper) or Paper Plates
Highlighter Markers (These make really bright colors) You Could Also Use Colored Pencils or Crayons
Scissors
Hole Punch and Something Sharp to Punch Holes
Watch a "View it and Do it!" video to see how to make the paper kaleidoscopes:
How to Make the Paper Plate Kaleidoscope:
1. Cut out the inside circle of one paper plate.
2. Fold the circle in half and then in half again to form a wedge shape.
3. Cut a shape on each folded side near the tip of the wedge, but not too close to the tip.
4. Unfold the circle and then fold it in fours again making folded lines between the first ones.
5. Cut another shape on each folded side near the rounded end of the wedge.
6. Unfold the circle and punch a hole in the center of the circle.
7. To make the base of the kaleidoscope find the center of another paper plate by bending the paper plate so the sides meet.
Crease just the center of the plate. Unfold the plate and bend it again so that you make a fold perpendicular to the first fold. Crease just the folded center of the plate. Punch a hole in the center where the two folded lines meet.
8. Have your children place the cut circle in the center of the paper plate base and use a pencil to trace the shapes on to the plate. If you have younger children, you may want to attach the circle to the base paper plate with a brass fastener to make it easier for the children to trace.
9. After tracing the shapes have the child turn the circle paper plate 45 degrees and then use another color to trace the shapes again.
10. Remove the circle from the base and have your children color the shapes they traced. Remind them that it will look more like a kaleidoscope if they make opposite colors the same or make a mirror image.
11. After coloring the base of the kaleidoscope, have your children color the top piece.
Suggest using different colors than what they used for the top piece so that the colors stand out. They can also use a black marker to add details and trace around the colored shapes.
©2016, Digital by Design, Inc. - See Copyright Information - Bloggers, if you use this craft idea or an adaptation, please link back to this page for the complete directions. Send us the link to your page, and we will link to your blog.
How to Make the Printable Kaleidoscope Craft Directions:
1. Print out the Kaleidoscope patterns onto card stock (heavy paper).
Member's
Instant Download Pattern -
2. Cut out the patterns. To cut out the center shapes fold the pattern in half so that the crease is in the center of the shapes. Fold and unfold until you have cut out all the shapes.
3. Punch a hold in the top and bottom piece.
4. Use markers to decorate the kaleidoscope as described above for the paper plate kaleidoscope.
5. Use a brass fastener to attach the top of the kaleidoscope to the bottom.
©2016, Digital by Design, Inc. - See Copyright Information - Bloggers, if you use this craft idea or an adaptation, please link back to this page for the complete directions. Send us the link to your page, and we will link to your blog.
Another Paper Kaleidoscope Craft on Youtube
Make this paper kaleidoscope using just a strip of paper.
Printmaking - Experiment with Positive and Negative Shapes
See "Shape - It's Your Choice" Bible Lesson for directions to this craft.

©2012, Digital by Design, Inc. - See Copyright Information
"Beautiful Oops!" by Barney Salzberg
Beautiful Oops! - This adorable pop-up, lift-the-flap book is filled with surprises. A torn paper turns into an alligator's mouth, a spill turns into an elephant and a bent page into a penguin's head. This is a great book for children who are perfectionist; it will teach them that even mistakes can be made into something useful. They will actually be excited about the possibilities when they make a mistake.
1. Let your imagination run wild and experiment with your own oops, blobs, torn paper, folded paper, and spills to see what new creations you can come up with.
"Perfect Square" by Michael Hall
Perfect Square - It was a perfect square. It had four matching corners and four equal sides. And it was perfectly happy. Throughout the week it was cut into pieces, torn into scraps, shredded in strips, shattered, snipped into ribbons, and crumpled and ripped, and wrinkled to make all kinds of new things. But on Sunday nothing happened and the square's four equal sides became confining, the four corners were rigid and cramped so the square drew a cross on itself and made itself into a window!
This is a great book to use as an introduction to shapes. Have your children cut up, shred, snip, and tear square shapes and make them into new shapes.
"My Heart Is Like a Zoo" by Michael Hall
My Heart is Like a Zoo - All the animals in this book are made with heart shapes. With simple text it describes each animal with different emotions that come from the heart: a hopeful as a hungry heron, a silly as a seal, an eager as a beaver, and a steady as a yak.
Have your children use hearts to make their own animals.
"Not a Box" by Antoinette Portis
Not a Box - Drawn with minimal lines but still amazingly effective this adorable story shows how one imaginative little bunny can turn a simple box into whatever pleases him. Use this story to prick your imagination. Help your children build things with boxes. They're so much fun!
See the story "Not a Box" on YouTube.
Don't miss this Amazing Video about an imaginative boy, Caine, who builds his own arcade using boxes!
"When a Line Bends . . . A Shape Begins" by James Kaczman
When a Line Bends . . . A Shape Begins - A line is a jump rope, black ants in a row, a tug-or-war game and a violin bow . . Yes, a line is fine, but when a line swerves, when a line bends, watch what can happen . . . a shape begins!
Kaczman describes different shapes and where they are found.
Ed Emberley's Drawing Book of Animals
Ed Emberley's Drawing Book of Animals - Children learn how to draw animals using triangles, circles, and squares, and the letters, Y, J, L, C, D, S, V, W, M, and U.
Ed Emberley many other books on how to draw including: Ed Emberley's Drawing Book of Trucks and Trains, Ed Emberley's Drawing Book of Weirdos (Ed Emberley Drawing Books), Ed Emberley's Drawing Book: Make a World, Ed Emberley's Drawing Book of Faces)
Your children will enjoy making their own pictures out of these simple shapes.
Ed Emberley's Picture Pie
Ed Emberley's Picture Pie (Ed Emberley Drawing Books) - Ed Emberley shows how to cut a circle into shapes that can be put together to make more complex shapes.
Have your children make their own book using these simple shapes.
Ed Emberley's Picture Pie Two
Ed Emberley's Picture Pie Two (Drawing Book Series) - Ed Emberley's Picture Pie Two uses two shapes, the square and circle, to make more complex shapes with directions on how to make a menagerie of animals and other images. The book also includes a stencil to help children draw the shapes and lines.
Elements of Design Crafts and Learning Activities on Other Pages
Elements of Design - Point and Dot
Artistic Design and the Great Designer
Christian Home School Art Lessons - Art Lessons on The Elements and Principles of Design from a Biblical Perspective


