Winter and Snowman Crafts Kids Can Make!
How to Make Winter Crafts and Activities Relating to Snowmen Using Recycled and Easy-to-find Materials
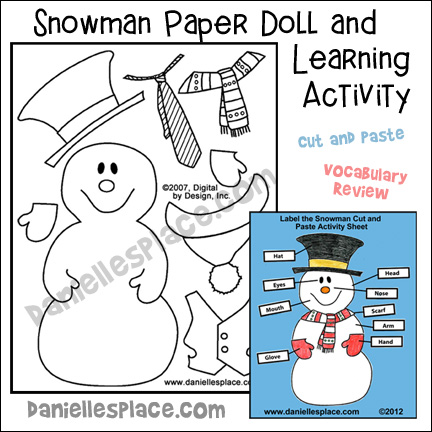
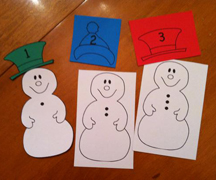
FREE Snowman Paper Doll Winter Craft and Learning Activity - Vacabulary Review
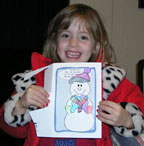
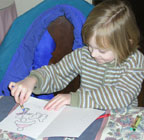
Celebrate the wonder of a chilly winter day by crafting a snowman right from the comfort of your home! Your children will love choosing the perfect outfit, igniting their imaginations as they bring enchanting winter scenes to life. It's a delightful way to blend creativity with the warmth of indoor fun!
What you will need:
Card Stock
Crayons or Markers
Scissors
Glue, Buttons, Sequins, Ribbon, etc. to Decorate the Snowmen, (optional)
How to Make the Paper Doll Snowman:
1. Print out the patterns:
Instant Digital Download ![]()
2. Color the clothes and hats. (It is much easier to color the pictures before you cut them out.)
3. Cut out the patterns. (If you would like to be able to change the snowmans clothes, cut out tabs on the clothes.)
© 2007, Digital by Design, Inc. - See Copyright Information
Color the clothes and add sequins, ribbon, or other decorative items. Glue the clothes onto the snowman.
Hello, I thought you might like to see how I used your wonderful snowman paper doll. I made cards for my twin nieces using Picture It! Publisher. On the front of the card I put the 'naked' snowman and in a balloon put the words, I am really cold. Can you help me get warm?" I pasted the clothes on the inside. I received an email yesterday with pictures from my brother who said the girls were delighted with the cards and had to 'do' them first thing. I noticed that Erin didn't even take time to take her coat off! I live in Wyoming and the twins live in Texas so I don't get to see them very often. This was a really fun thing for me to do for them and I just wanted to write and tell you thank you for the great paper doll. Linda
Kayla used this snowman craft to make a counting file folder game for young children. She printed out twelve snowmen with hats. She wrote numbers 1 - 12 on the hats and then added a different number of bottoms to each snowman. Children then match up the snowman to the corresponding hat. Check out the complete directions on mpmschoolsupplies.com.
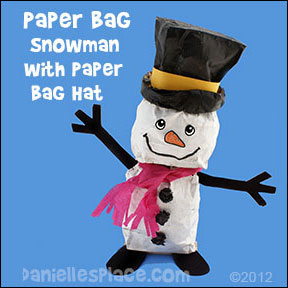
Paper Bag Snowman with Paper Bag Hat Craft for Kids
What you will need:
Brown Lunch Bags or Black Bags
Black Paint
Black Construction Paper
Scrap Paper
Black Permanent Marker
Glue
Scissors
Crepe Paper or Material for the Scarf
Orange Colored Pencil for Carrot Nose
How to Make the Paper Bag Snowman Craft with the Paper Bag Hat:
1. Print out the snowman eyes, nose, and boots pattern.
Member's ![]()
Free Digital Download ![]()
2. To make the head of the snowman crinkle up scrap paper and stuff a bag about half full. Tie off the end, and paint the bag white.
3. To make the body of the snowman fill another paper bag almost to the top, and then fold down the top edges over each other and tape them down. Paint the bag white.
4. To make the snowmans hat roll down the edge of another paper bag about 1 1/2" from the top of the bag. Roll it down again , and then one more time. Don't worry too much about wrinkles. Paint the bag black or any color you would like.
5. Glue the body to the head and then glue the hat on the head.
6. Draw eyes and a carrot nose on white paper, and then color in the nose with the orange colored pencil. Cut the eyes and nose out and glue them to the head. Draw on a mouth with the black marker.
7. Cut feet and arm shapes from black construction paper and glue them to the snowman.
8. To make the coal buttons wrinkle up black construction paper and glue it to the snowmans body.
9. Cut a strip of paper about two inches wide to glue around the snowmans hat.
10. Use the crepe paper to make the snowmans scarf. Cut little slits at the end of the crepe paper to make it look like a scarf.
©2012, Digital by Design, Inc. -*See Copyright Information
Twisted and Squashed Water Bottle Snowman Craft for Kids
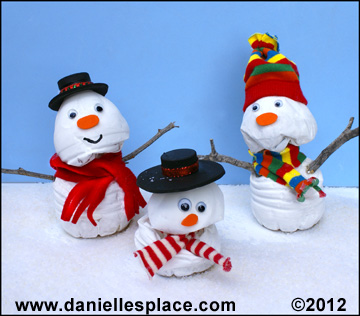
These little snowmen are so fun to make! You never know how they will look until you are done. No two look alike.
What you will need:
Plastic Water Bottles with Lids - (The thinnest you can find, the ones that make the crackly noise when you squeeze them work best.)
White and Black Acrylic Paint or Spray Paint Made for Plastic
Googly Eyes
Socks
Scissors
Things that You Want to Use to Decorate Your Snowmen such as: Ribbon, Buttons, Felt, Twigs, etc.
Dry Rice or Sand
How to Make the Twisted Water Bottle Snowmen:
1. Remove the label from the water bottle.
2. Use a funnel to fill the bottom of the bottle with sand or dry rice to about one inch. This keep your snowman from falling over.
3. Hold the bottom of the bottle with one hand and grasp the bottle about two inches up from the bottom with the other hand. Twist the bottle like you would a blown up balloon. If the bottom part of the bottle has indents, blow into the bottle until the indents disappear.
4. Insert a pen or something long and skinny inside the bottle to punch out any areas at the top of the bottle that were dented in after twisting. When you have a shape you like, screw the lid back on the bottle.
5. You can also make a melted snowman by pushing down on the top of the bottle to make it flatter. Replace the lid when you have the desired affect.
6. Paint the bottle with white paint and let it dry. If you are using acrylic paint, you will probably need two layers.
7. To make the top hat draw two-inch circle on black craft foam and cut it out. Take the cap off the bottle and place it in the middle of the craft foam circle. Trace around the outside and then cut out the circle. Replace the lid and place the cut out part of the circle over the lid. Paint the lid black to match the craft foam rim of the hat. Glue decorative ribbon around the hat.
8. To make the cap cut the top off a sock so that it is about three inches long. Tie the cut end with a string. Make a matching scarf with the leftover part of the sock.
9. Cut a carrot nose from orange craft foam. You can use real buttons or cut button shapes from craft foam to glue to the snowmans body.
10. Use real sticks or pipe cleaners for the arms.
©2012, Digital by Design, Inc. -*See Copyright Information
Winter Words Three-in-a-Row Game
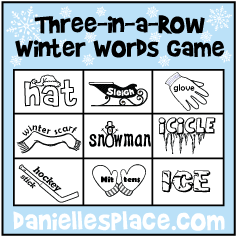
Children learn new words while having a great time. This game is played like Bingo except the children only have to mark three words in a row to win the game.
The game includes eighteen different playing cards and picture cards for the teacher. There are 29 different winter words including: mittens, snowballs, hockey sticks, gloves, blizzard, winter, ski goggles, melt, ice skates, sleigh,
shiver, snow blower, shovel, snow globe, earmuffs, jack frost, snow skis, downhill, winter scarf, bobsled, icicle, snowman, snowball, fireplace, snow, hat, sled, ice, and cold.
Member's ![]()
Cut the cards apart, place them in a bag, shake the bag, and pull one card out at a time, showing your children the pictures as you call out the word.
Children can use buttons, foam shapes, or coins to mark their cards.
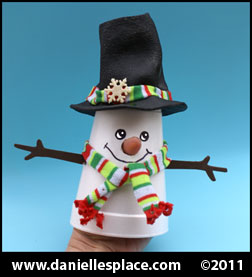
Poseable Snowman Cup Craft
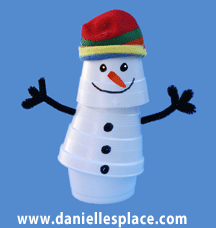
What you will need:
Two 8-oz. Foam Cups
One 16-oz. Foam Cup
Pipe Cleaners
Orange Construction Paper
Old Socks
Permanent Markers
Scissors, Tape, and Long Brass Brads
How to Make a Poseable Snowman from Foam Cups:
1. To make the head cut the bottom off one 8-oz. cup about 2 1/2" from the bottom.
2. Draw a face on one side of the cup using permanent markers and/or construction paper.
3. Punch a hole in the back of the head near the cut edge.
4. Place the head over the bottom of another 8-oz. cup so that the hole in the face cup is about 1/2" from the bottom of the cup. Place a brass brad through the hole of the head cup and punch it through the inside cup. Place your hand inside the cup and spread out the brad.
5. To make the arms and hands cut a pipe cleaner in half. Form the two halves into arms and fingers and stick through the body cup. Fold down the end inside the cup and tape the ends down so they down come out.
6. To make the bottom cup cut the bottom off the 16-oz. cup about two inches from the bottom. Place treats in the cup and place the top of the snowman over the bottom cup to cover it like a lid. To make it more secure you can also attach these two pieces with a brass brad in the back. Stick the brad in the bottom cup so that the prongs are sticking out. Then place the top cup over the bottom cup while inserting the brad into the cup. Spread out the prongs.
7. Draw black dots on the body of the snowman with a marker for the buttons.
8. Cut the toe off of an old sock and roll up the cut end. Place it on the snowmans head.
©2012, Digital by Design, Inc. - See Copyright Information
"Snowman Needs a Hat" Printable Book"
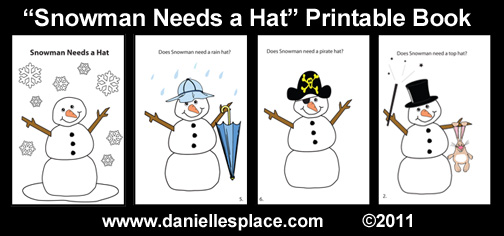
What kind of hat does a snowman need? Children will enjoy reading this printable book to discover a wide varieties of different kinds of hats and which hat is best for a snowman.
Snowman needs a hat!
Does Snowman need a baseball cap?
Does Snowman need a
top hat?
Does Snowman need a
sun hat?
Does Snowman need a
cowboy hat?
Does Snowman need a
rain hat?
Does Snowman need a
pirate hat?
Does Snowman need a dress hat?
Does Snowman need a chefs hat?
Does Snowman need a hard hat?
Snowman needs a
winter hat!
This printable book is available to members only.
Member's ![]()
1. Print out the patterns.
2. Cut around the book pages. Do not cut apart the cover and back page of the book, pages 1 and 2, 3 and 4, 5 and 6, etc.
4. Staple the pages together along the folded edge of the cover.
©2004, Digital by Design, Inc. - See Copyright Information
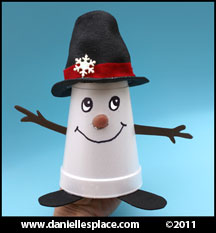
"I'm a Little Snowman Short and Stout" Cup Craft for Kids
Children will love playing with these interactive snowmen. As they sing the song that goes along with the craft they pull out the snowmans nose.
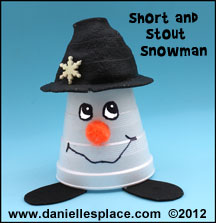
What you will need:
Styrofoam Cups (Any Size)
Black Sharpie Marker
Black Acrylic Paint and Paint Brushes
Black Craft Foam
Orange Pompom or Orange Tissue Paper
Decoration for Hat (Optional)
How to Make the Paper Cup Snowman:
1. To make the hats preheat your oven to 250 degrees.
2. Place a Styrofoam cup open side down on an old cookie sheet.
3. Turn on the oven light so you can see inside the oven. As soon as you see the cup start to melt, in about 15 to 30 seconds or maybe a little longer, open the oven door and pick up the cup.
4. Gently pull out the rim of the cup. You may have to put your hand in the cup and press the center of the cup out if it collapsed a little. The cup cools very quickly so try to keep it inside the oven as you work.
5. Keep putting the cup back in the oven and taking it out and pull on the side until you have the shape you want. You can only shape the cups a little at a time. The cups are not hot, but be very careful not to touch the sides of the oven. Once you
start to get a rim shape for the hat you can press down on the rim (press it into the cookie sheet) to make it stick out more. This seems like it is hard but it really is pretty easy.
Make sure you turn on your oven vent and you have your windows open because the fumes from the melting cups probably aren't good to breath in. I used an 8.5 oz. cup for the smaller hat pictured and a 16 oz. cup for the larger hat. If your cups are melting too fast to work with, turn down the heat in your oven.
6. Paint the hat black with acrylic paint and let it dry. Paint the rim of the hat on both sides.
7. Glue the hat to bottom of another cup. Draw eyes near the rim of the hat.
8. Cut the orange pompom into a carrot shape, making one side a little pointy. Then using a pen draw a circle a little bit smaller than the diameter of your pompom. Stick the pompom in the hole.
9. Draw a mouth on the cup and then cut feet shapes from the black craft foam and glue them to the rim of the cup. You may also want to add arms.
Use these snowmen to act out the song "I'm a Little Snowman Short and Stout".
"I'm a Little Snowman Short and Stout"
(Sing to the tune of "I'm a Little Tea Pot")
Written by Carolyn Warvel
I'm a little snowman, short and stout
Here is my big hat, here is my snout
When my bodies melting, hear me shout
Ill be back next year so don't you pout!
I'm a clever snowman, yes its true
Heres an example of what I can do
I can change my big nose, there's no doubt
Just tip me over and pull it out! (Pull the orange pompom out of the snowmans nose.)
©2011, Digital by Design, - Copyright Information - It is illegal to copy this poem and post it on another web site or anywhere on the web without permission, even if you include the authors name and copyright notice, or change it a little (derivative work) .
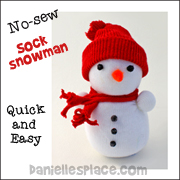
Snowman Cup Puppet
You can also make a cup snowman a puppet. Use the larger cup size to make puppets. Instead of inserting a pompom for the nose, have your children stick their hands inside the cup and put the tip of their index fingers through the holes. They can use craft felt or material to decorate the hat and make a scarf.
"I'm a Little Snowman Tall and Slim" Paper Towel Tube Craft for Kids
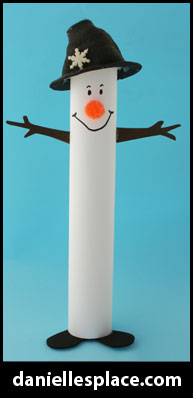
What you will need:
Styrofoam Cups (any size)
Black Sharpie Marker
Black Acrylic Paint and Paint Brushes
Black Craft Foam
Orange Pompom or Orange Tissue Paper
Decoration for Hat (optional)
Red Material to Make a Trim for the Hat
White Card Stock (Heavy paper)
How to Make the Paper Towel Tube Snowman:
Follow the directions on how to make a snowman hat out of a Styrofoam cup above. Cut red material into one-inch strips and glue it to the hat. (not shown)
"I'm a Little Snowman Tall and Slim"
(Sing to the tune of "I'm a Little Tea Pot")
Written by Carolyn Warvel
Here is my big hat, here is its brim (Point to brim of hat.)
If you pull my hat off, I look pretty grim (Pull hat off.)
I love my black hat and its red trim! (Point to red trim on hat.)
I'm a clever snowman, call me Jim
If I start melting, you better swim!
Ill be back next year, so don't be grim.
I have to go now, or Ill lose my limbs.
©2011, Digital by Design, - Copyright Information - It is illegal to copy this poem and post it on another web site or anywhere on the web without permission, even if you include the authors name and copyright notice, or change it a little (derivative work).
Snowman Shape Book
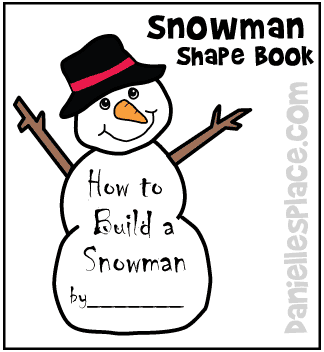
What you will need:
Printer Paper
Scissors
Crayons or Colored Pencils
Stapler
Construction Paper (Optional)
Tape
How to Make the Snowman Shape Book:
1. Draw a picture of a snowman. Trace the body of the snowman onto other sheets of paper and draw lines on the body pages. (Patterns for this activity are available to members - snowman title page and snowman writing pages.)
Member's ![]()
2. Cut the snowman and body pages out.
3. Staple the body pages together and tape them to the back of the snowman.
4. Have your child color the snowman and write "How to Build a Snowman" on the body. You can also have your child cut snowman arms from black construction paper and glue them to the snowmans body.
5. Have your child use the pages to write directions on how to build a snowman. Or you can have your children make up a story about a snowman, and write the title on the snowmans body.
© 2010, Digital by Design, Inc. - See Copyright Information - Do not link to the snowflake pattern pages - link to this page only.
Build a Snowman Review Game
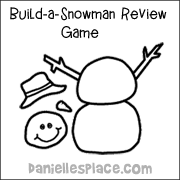
Before class cut the snowman parts from construction paper. In class ask your students review questions from their lesson. If a child answers a question correctly, he gets to put part of the snowman together. Keep playing until the whole snowman is put together.
Member's ![]()
© 2010, Digital by Design, Inc. - See Copyright Information - Do not link to the snowflake pattern pages - link to this page only.
Winter Crafts on Other Pages
Also See
Bible Themes - Christmas Crafts